
15
settings. When Sandboxie opens, click OK to apply software compatibility
configuration settings.
2. Read the Getting Started tutorial and follow the instructions for opening a
sandboxed web browser, downloading a file, and deleting the sandbox contents.
a. The browser might be slow to open and slow to respond.
b. Once it opens, use the mouse to point to the edge of the browser window.
What visual cue notifies you that the browser is running in a sandbox?
c. When you’re instructed to download a file, you can search for an image
related to your favorite hobby and download a copy to your computer.
3. Close the Sandboxie Control window.
4. You saw during the tutorial how to open the sandboxed web browser from the
Sandboxed Web Browser icon on the desktop. This time, open a web browser
from the browser’s own desktop icon. To do this, the browser’s shortcut icon
must be saved to the Desktop, or you can open the app’s file location from the
Start menu. Then right-click the browser’s icon and click Run Sandboxed. Make
sure DefaultBox is selected, then click OK.
5. Open a second window of the same browser, but this time open it normally—that
is, not in the Sandboxie sandbox.
6. Use the mouse to point to each of the browser icons in the taskbar at the bottom of
your screen. What characters in the title of the sandboxed preview window
indicate that window is sandboxed?

16
7. Close the sandboxed browser. Add a page to your Wikidot website and make
some notes about this installation.
Project 9-4: Download and Use Advanced Port Scanner
In this chapter, you learned that one way to secure a device is to close unneeded software
ports in the operating system. Advanced Port Scanner is a free tool that scans a network
for open ports and reports on the applications using those ports. In this project, you will
download and use Advanced Port Scanner. Complete the following steps:
1. In your browser, go to advanced-port-scanner.com , download the app’s
2. When Advanced Port Scanner opens, the IP address range for your network
should be listed automatically. If not, you can check your current IP address using
Command Prompt and use that information to insert the correct IP address range
yourself. When you’re ready, click the Scan button. The results of a scan on a
home network are shown in Figure 9-22.

17
3. When the scan is complete, look at the ports reported for each device. Which
ports for insecure protocols are listed, such as port 21 for FTP? Are there any
ports that stand out to you as being open unnecessarily?
4. Select another computer on the network besides your local device. Click Actions,
point to Tools, and click Ping. What happens? What other commands are
available in Advanced Port Scanner?
5. Add a page to your Wikidot website and make some notes about this installation.
Capstone Projects
Capstone Project 9-1: Configure Router Passwords in Packet Tracer
When configuring a networking device, one of the very first tasks should be to change
the default administrative credentials. In this project, you will use the CLI to configure
user accounts and passwords for a router in your Packet Tracer network. Complete the
following steps:

18
1. In Packet Tracer, open your Packet Tracer file from Capstone Project 8-3.
2. Click Router3, and click the CLI tab. Press Enter to continue.
3. Enter the commands listed in Table 9-2 to change the router’s default name.
[[Begin Table 9-2]]
Table 9-2 Change a router’s hostname
Command
Purpose
enable
Enables privileged EXEC mode
configure terminal
Enters global configuration mode
hostname R3
Renames the router from the default to R3. Notice the
prompt changes.
[[End Table 9-2]]
4. What prompt do you see now?
5. Now you’re ready to create a username and password, which will be required to
sign into the router’s management interface. Enter the commands listed in Table
9-3.
[[Begin Table 9-3]]
Table 9-3 Set a username and password and check the configuration
Command
Purpose
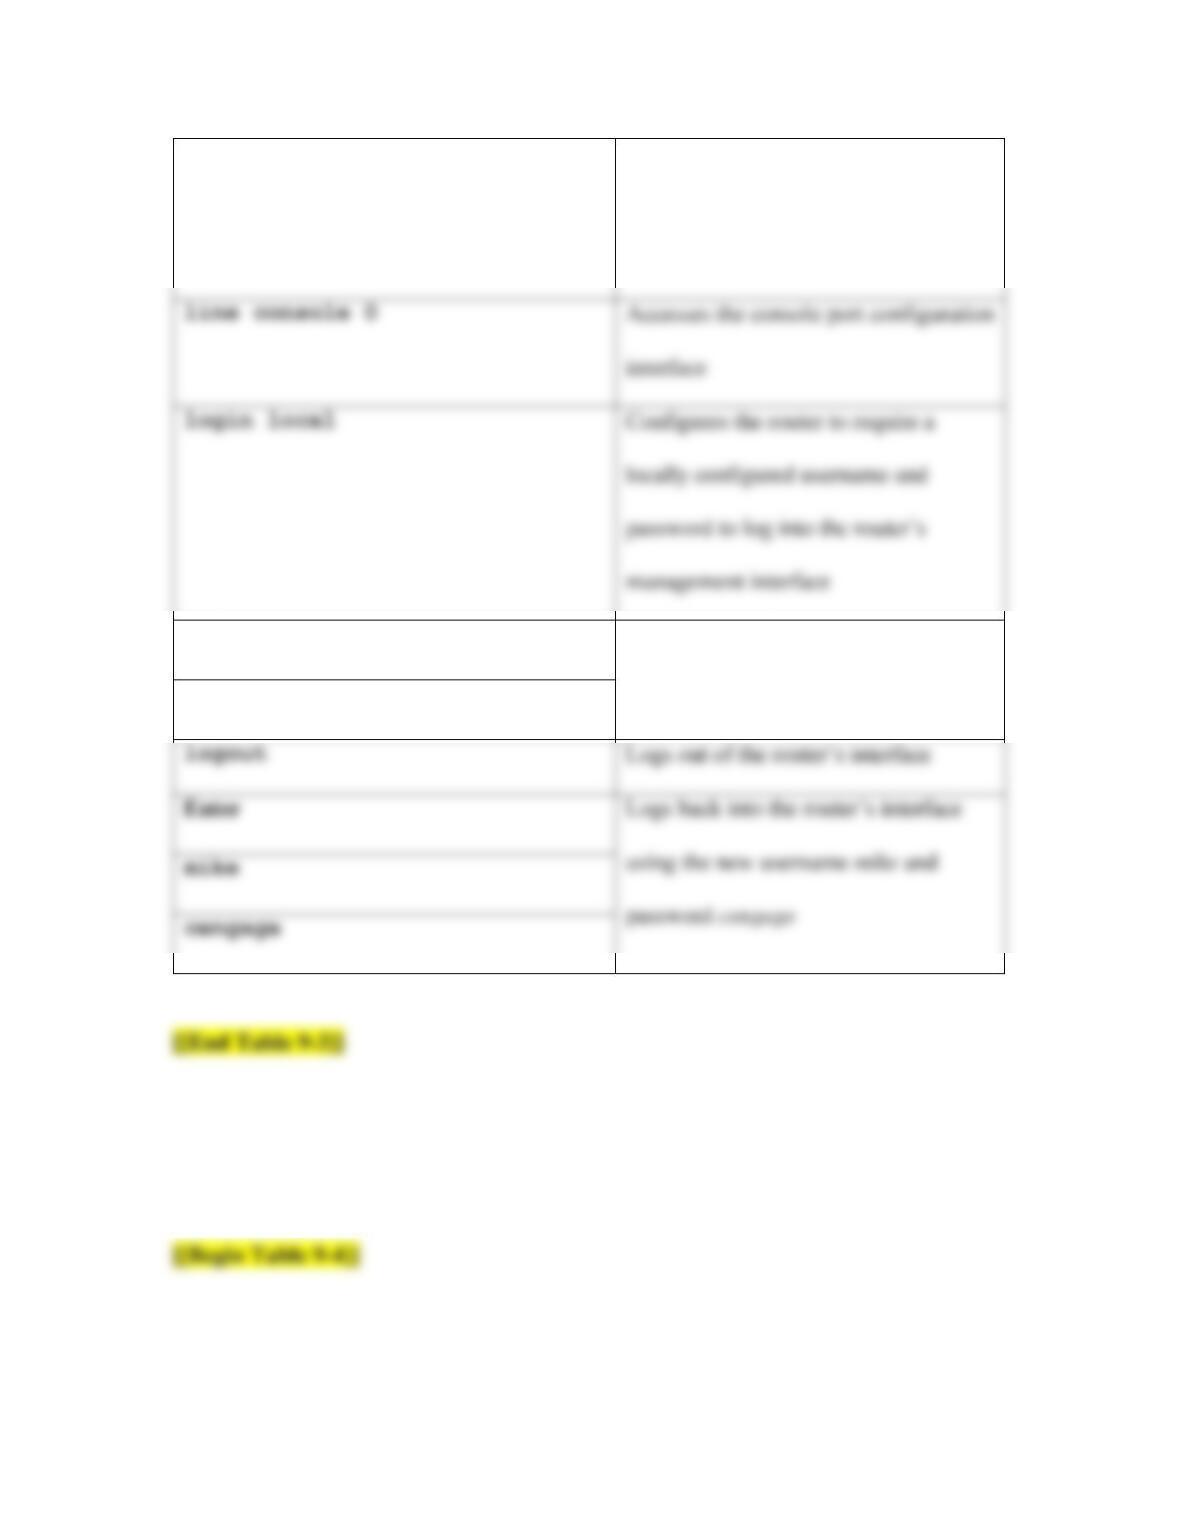
19
username mike password cengage
Creates the user account mike and
requires the password cengage for that
account
Ctrl + Z
Returns to privileged EXEC mode
Enter
6. Let’s take a look at the configured username and password in the running–config
file. Enter the commands listed in Table 9-4.
interface
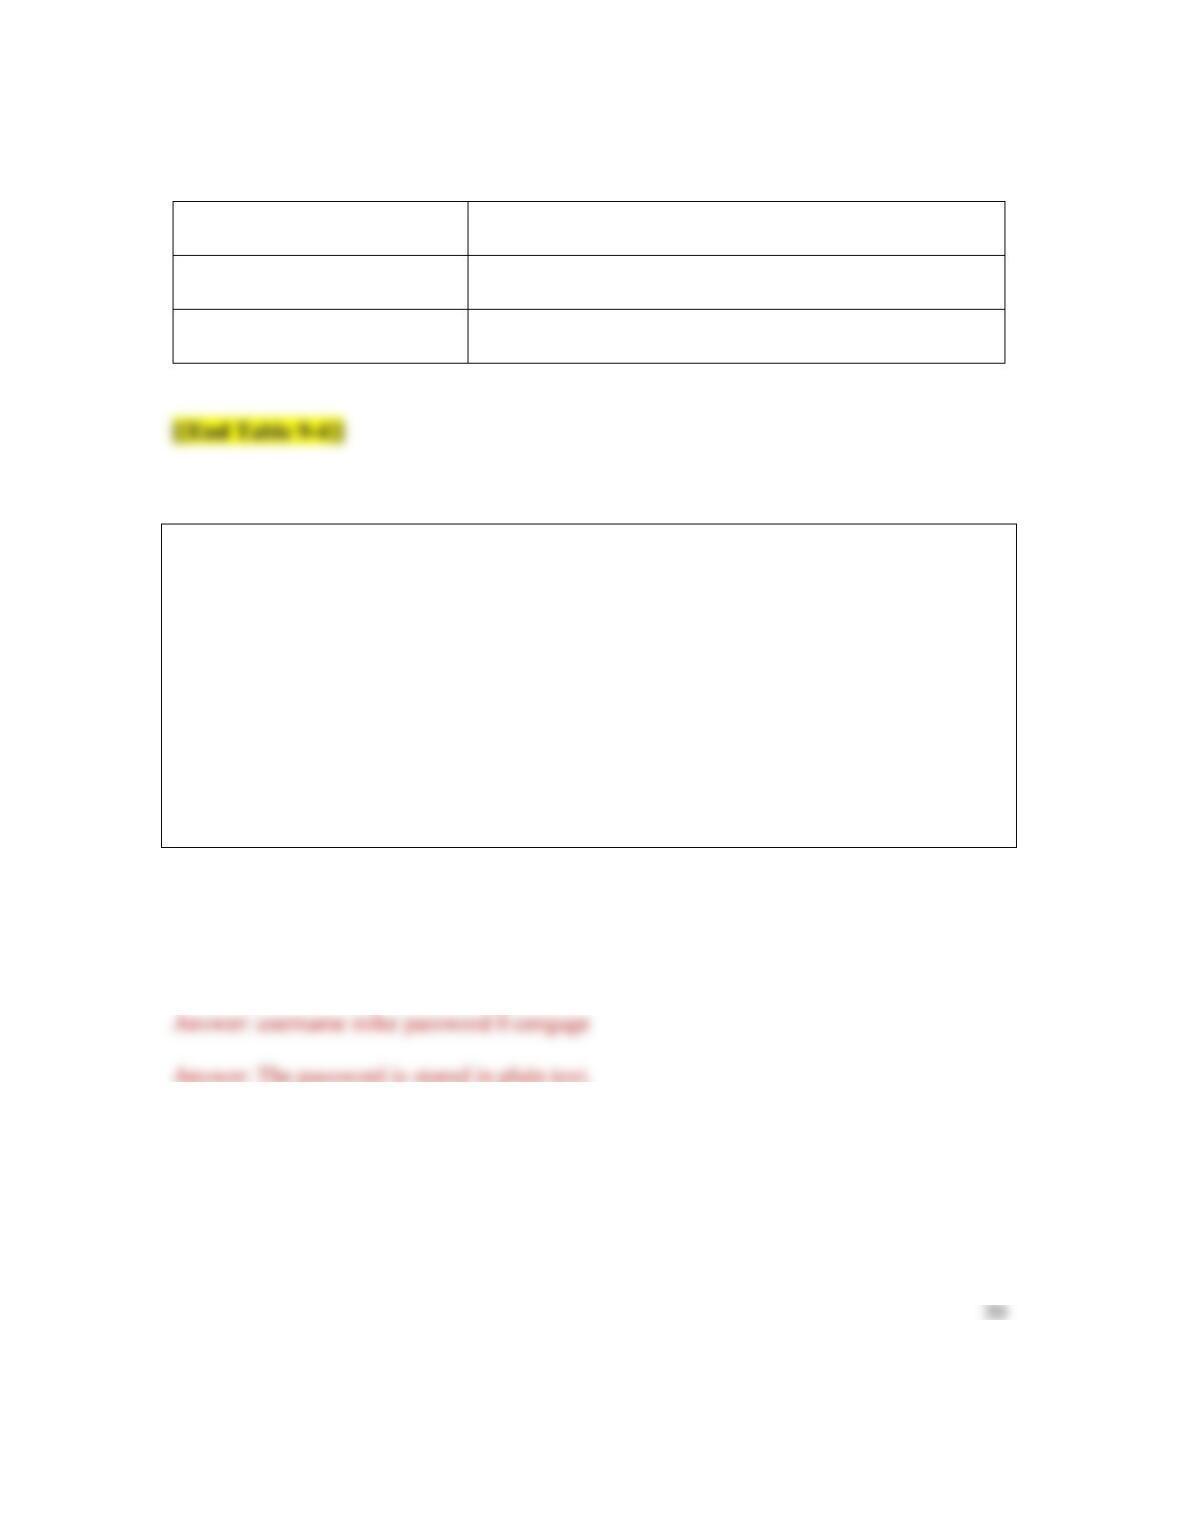
Table 9-4 View configurations in the running-config file
Command
Purpose
enable
Enables privileged EXEC mode
show running–config
Lists the configurations in the running-config file
[BEGIN NOTE]
Note
Press Enter to advance one line at a time in the running-config file.
Press Space to advance one page at a time.
When you’re finished, press Ctrl+C to exit the running-config file.
[END NOTE]
7. What username and password are shown in the running-config file? Why is this a
problem?
8. Passwords should never be stored in plain text. Let’s look at another way to create
a password so the password will be stored more securely. Enter the commands
listed in Table 9-5.

21
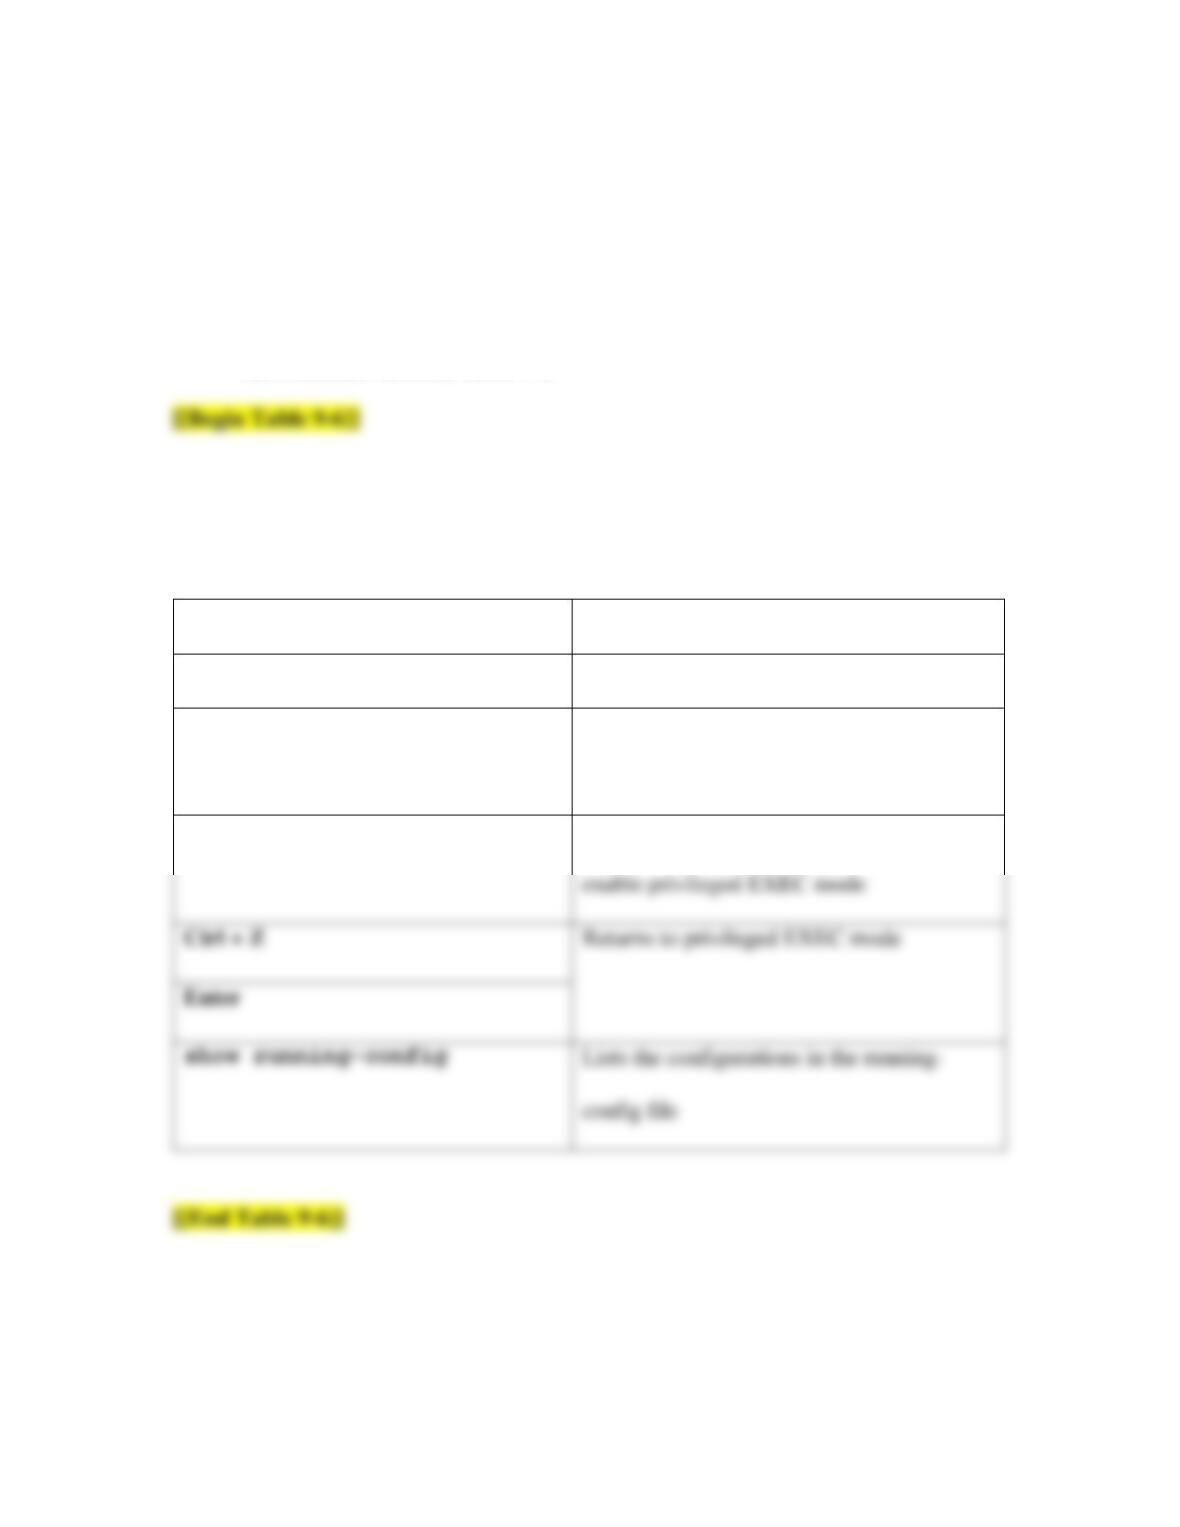
[[Begin Table 9-5]]
Table 9-5 Set a username and secret password and confirm configurations
Command
Purpose
configure terminal
Enters global configuration mode
username jill secret cengage
Creates the user account jill and requires
the secret password cengage for that
account
Ctrl + Z
Returns to privileged EXEC mode
Enter
show running–config
Lists the configurations in the running-
config file
[[End Table 9-5]]
9. What usernames and passwords are shown in the running-config file now? The
password for both accounts is cengage. Why do these passwords look different in
the running-config file?
22
10. While we’re at it, let’s also set two more passwords. Either one of these
passwords could be required in order to enable privileged EXEC mode (although
in reality, only the last enable password will continue to work). The difference is
that one password will be stored in plain text, and the other will be hashed. Enter
the commands listed in Table 9-6.
Table 9-6 Set a password and a secret password that can enable privileged EXEC
mode
Command
Purpose
configure terminal
Enters global configuration mode
enable password networkplus
Requires the password networkplus in order
to enable privileged EXEC mode
enable secret comptia
enable privileged EXEC mode
Requires the password comptia in order to
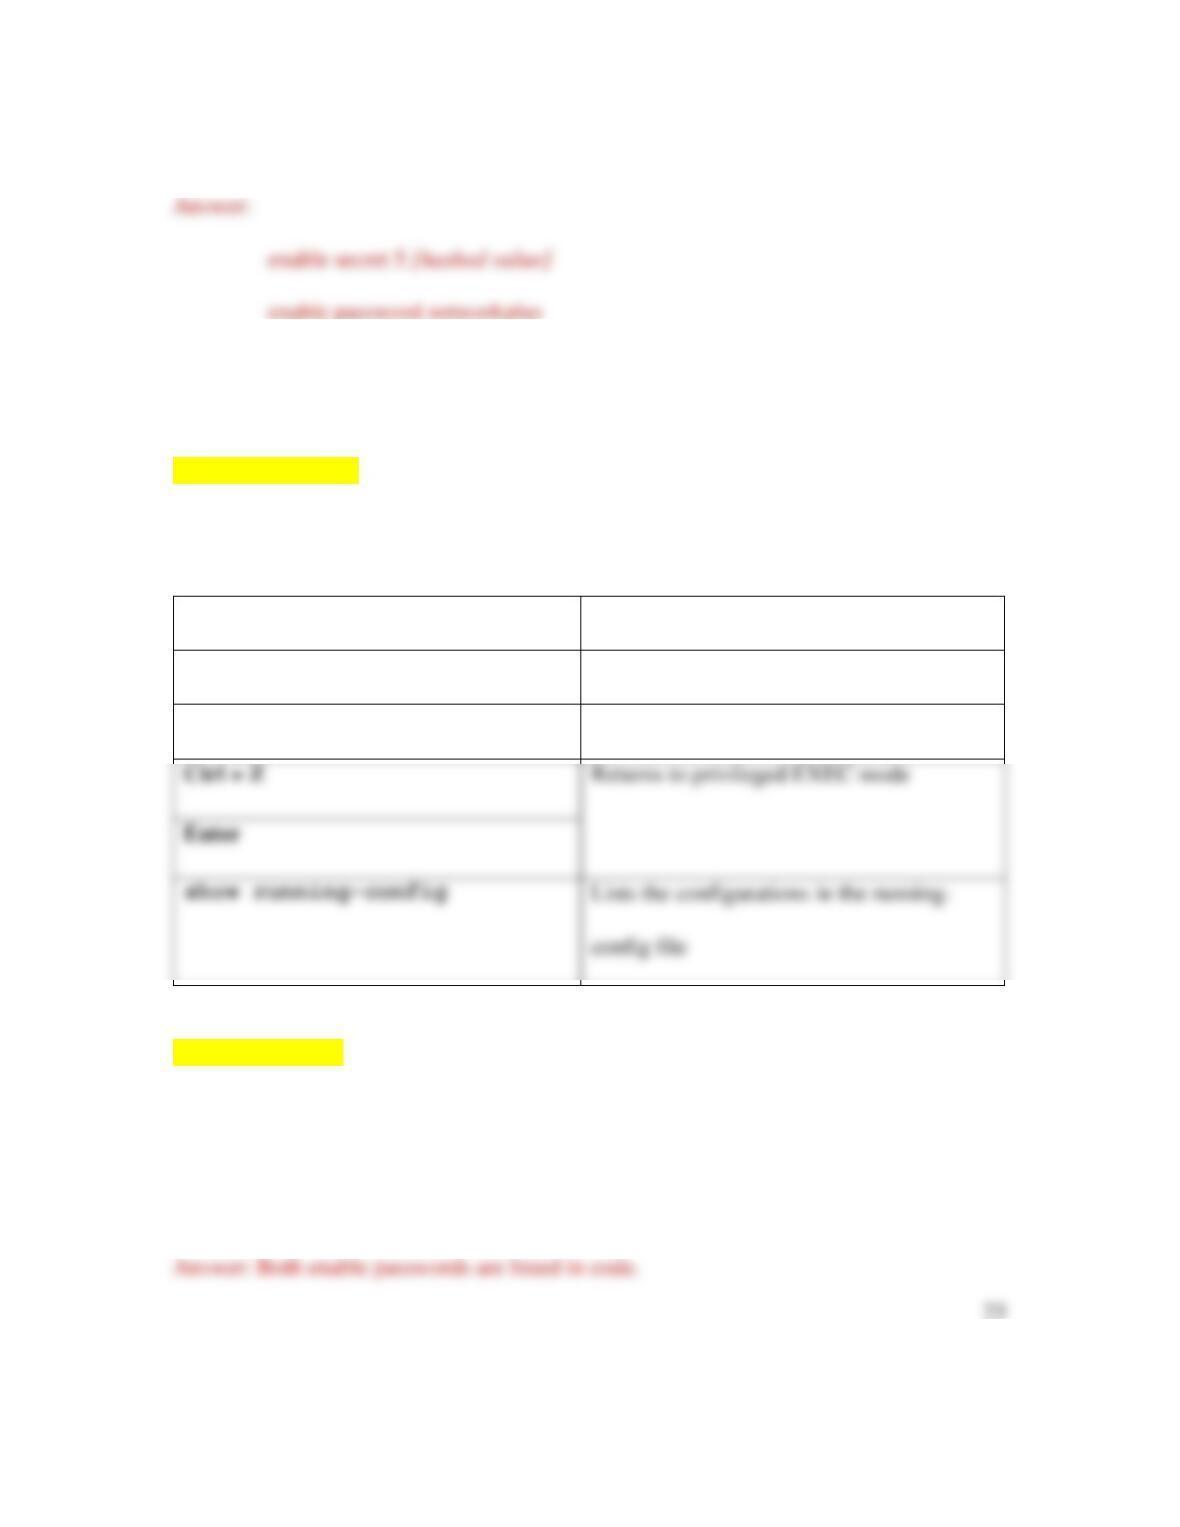
11. What enable passwords are shown in the running-config file?
12. You can hash existing passwords on a router, rather than having to go back and
reconfigure each insecure password. Enter the commands listed in Table 9-7.
[[Begin Table 9-7]]
Table 9-7 Hash existing passwords
Command
Purpose
configure terminal
Enters global configuration mode
service password–encryption
Encrypts any unencrypted passwords
[[End Table 9-7]]
13. What do you notice now about the two enable passwords? What about the two
user account passwords?

24
14. Compare the complexity of the codes for the passwords that were originally
stored in plain text with the passwords that were originally hashed. The secret
passwords show a much more complex code. Notice the 5 in front of the secret
passwords, which indicates the MD5 hash was used. Also notice the 7 in front of
the other passwords. These Type 7 passwords are easily cracked. In your browser,
go to packetlife.net/toolbox and click Type 7 Reverser. Copy and paste the
Type 7 password string for each of the Type 7 passwords in Packet Tracer into the
Type 7 hash box on the website. Note that you will need to select and then right-
click each string instead of using the Ctrl + C shortcut to copy each string into
your Clipboard. After pasting each string into the hash box, click Reverse. Do the
values match your original plain text passwords? What happens when you paste a
Type 5 password string into the hash box?
15. To save these configurations, enter the command copy run start, and then
press Enter again.
16. Make some notes on your Wikidot website about your activities in Packet Tracer
for this project.

25
Capstone Project 9-2: Install Kali Linux in a VM
In Project 9-2 in this chapter, you researched Kali Linux, which is a Linux distro that
comes loaded with dozens of penetration testing tools. In this project, you download the
Kali Linux image file and install it in a VM.
[BEGIN CAUTION]
Caution
It’s highly illegal to perform penetration testing procedures on a network that you do not
own or have specific permission to test. If you choose to use the penetration testing tools
included in Kali Linux, this is best done on your own, home network where you own the
networking equipment and pay the bill yourself.
If you use a network that you do not own, be sure to obtain explicit permission from the
network owner, preferably in writing, signed, and dated. If you practice using the pen
testing tools in a school lab, be sure to follow your instructor’s directions carefully.
[END CAUTION]
Complete the following steps:

26
1. In your browser, go to kali.org . Find the downloads for the Kali Virtual Images.
2. Import the Kali Linux image into your hypervisor by following these steps, which
differ from the way you created VMs previously:
• In VirtualBox, click File, Import Appliance. Locate the downloaded
image, and click Open. Accept the default settings and click Import to
complete the process. You might need to disable USB 2.0 support in order
to start the VM in VirtualBox. If so, open the VM’s Settings window,
click USB, and select the USB 1.1 (OHCI) Controller, as shown in
Figure 9-23.
• In VMware, you first have to unzip the downloaded image. However, this
requires an extraction app from 7-zip.org. Alternatively, you might be able
to use the VirtualBox image. When you’re ready, in VMware click Open
a Virtual Machine, locate the downloaded image, and click Open.
Accept the default settings to complete the process.
• In Hyper-V, you first have to unzip the downloaded image. However, this
requires an extraction app from 7-zip.org. When you’re ready, click
Import Virtual Machine, click Next, locate the file, and continue
through the steps on-screen. Alternatively, you might prefer to install the

27
Kali Linux ISO into a new VM as you have done with other projects in
this text. Either approach will likely require some troubleshooting, so be
sure to search online for help if you get stuck.
3. Start and sign in to the Kali Linux VM. The virtual images of Kali Linux are all
configured with the default username root and password toor.
4. For this project, we’ll take a quick tour around the Kali Linux desktop, as shown
in Figure 9-24. You can explore the tools on your own if you want to. Make sure
that you own the network you’re penetration testing, or make sure you have
written permission from the network owner before using any of the tools provided
in Kali Linux.
Answer the following questions:
• Open the File System window. What three places are listed by default?
Close the File System window.
• Open the Terminal Emulator window. What is the default command
prompt?
• Ping Google’s public DNS server (8.8.8.8). Is the ping successful? Press
Ctrl+C to stop the output. Close the Terminal window.

28
• Click Applications at the top of the screen. How many categories of tools
are available?
• You have already used one of these tools in earlier labs. What is the first
category nmap is listed under?
• Click root at the top of the screen and click Shut Down to power down
the VM.
5. Add some notes to your Wikidot website about the new VM installation.