Lab Exercise – DNS
Objective
DNS (Domain Name System) is the system and protocol that translates domain names to IP addresses
and more. DNS is covered in §7.1 of your text. Review that section before doing this lab.
Requirements
Wireshark: This lab uses Wireshark to capture or examine a packet trace. A packet trace is a record of
traffic at some location on the network, as if a snapshot was taken of all the bits that passed across a
particular wire. The packet trace records a timestamp for each packet, along with the bits that make up
dig: This lab uses dig to issue DNS request and observe DNS responses. dig is a flexible, command–line
tool for querying remote DNS servers that replaces the older nslookup program. It comes installed on
Network Setup
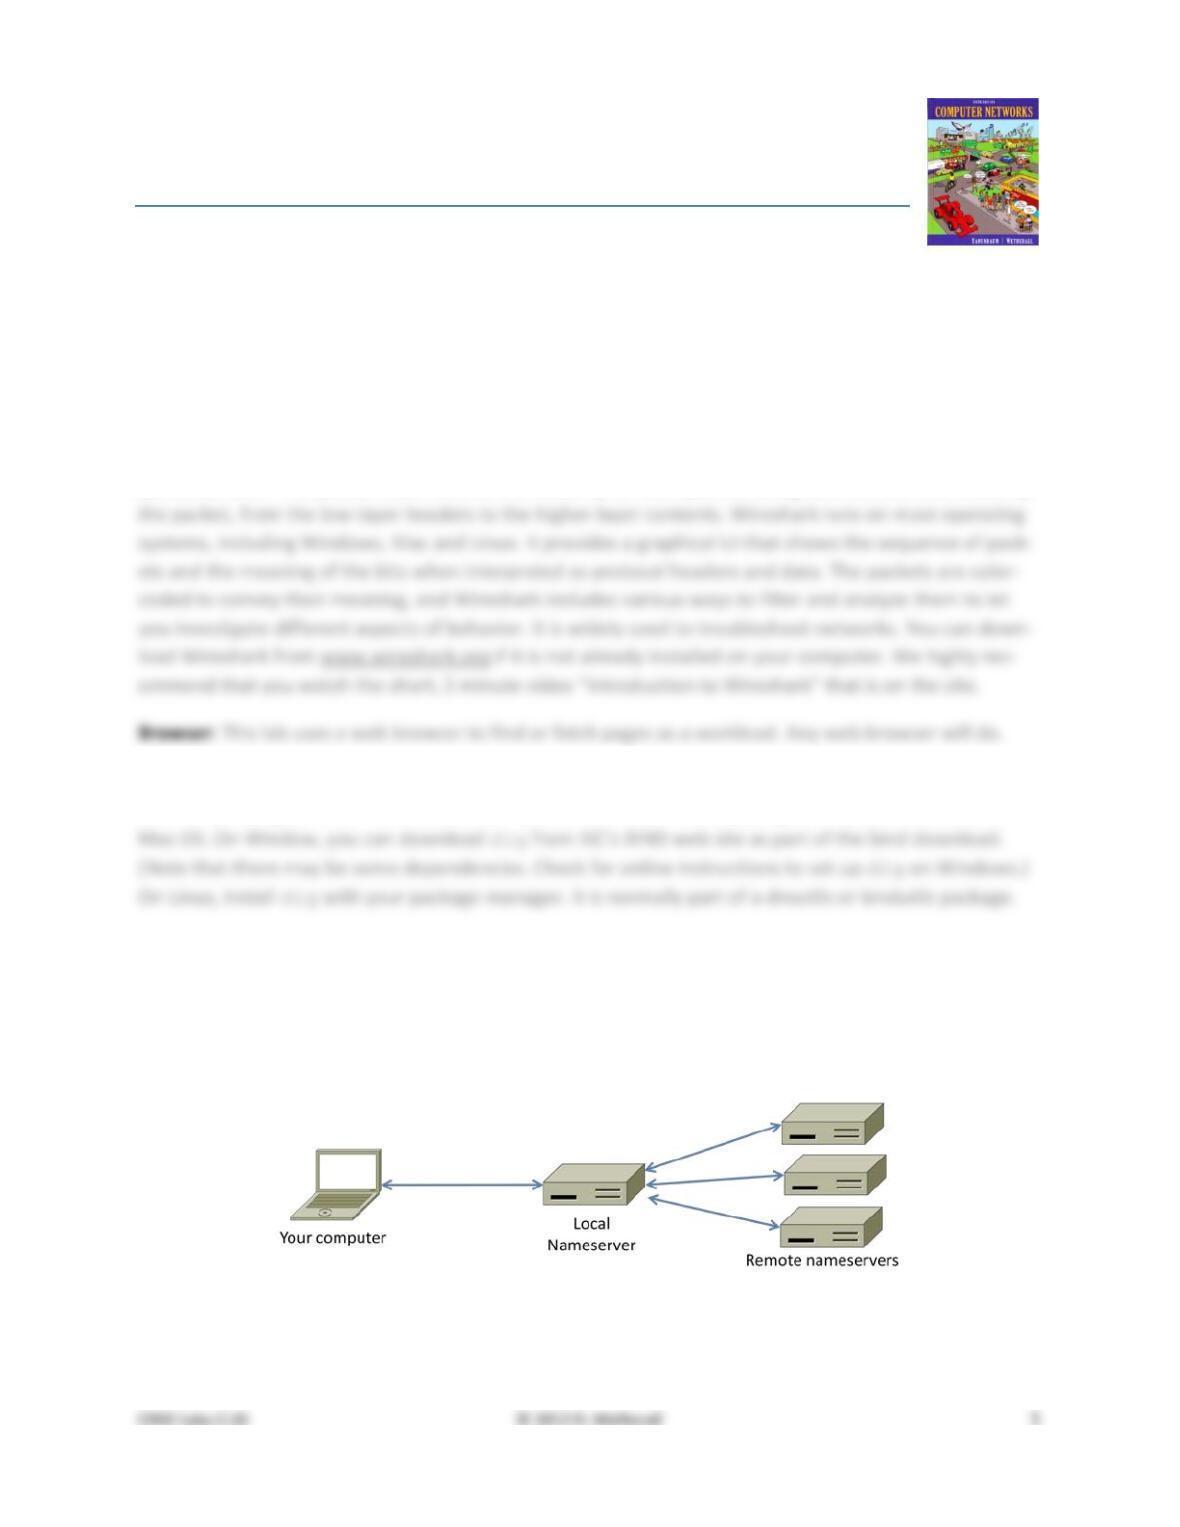
In a typical network, your computer contacts a local DNS nameserver to resolve domain names to IP ad-
dresses. The local nameserver may be another computer in your company network, a computer at your
ISP, or your wireless AP. It exchanges a series of messages with remote DNS nameservers all over the In-
ternet to perform the resolution. The setup is as shown in the figure below.
Figure 1: Typical network setup for DNS

CN5E Labs (1.0) © 2012 D. Wetherall 2
Step 1: Manual Name Resolution
Before we look at how your computer uses the DNS, we will see how a local nameserver resolves a DNS
name, i.e., we will interact with remote nameservers. To do this exercise, you will pretend to be the lo-
cal nameserver and issue requests to remote nameservers using the dig tool.
Pick a domain name to resolve, such as that of your web server. We will use www.uwa.edu.au. Find
the IP address of one of the root nameservers by searching the web. For example, the Wikipedia article
on root name servers includes the IP address of the root nameservers a through m. Any one of these
should do, as they hold replicated information. You need this information to begin the name resolution
process, and nameservers are provided with it as part of their configuration.
Use dig to issue a request to a root nameserver to perform the first step of the resolution. You are as-
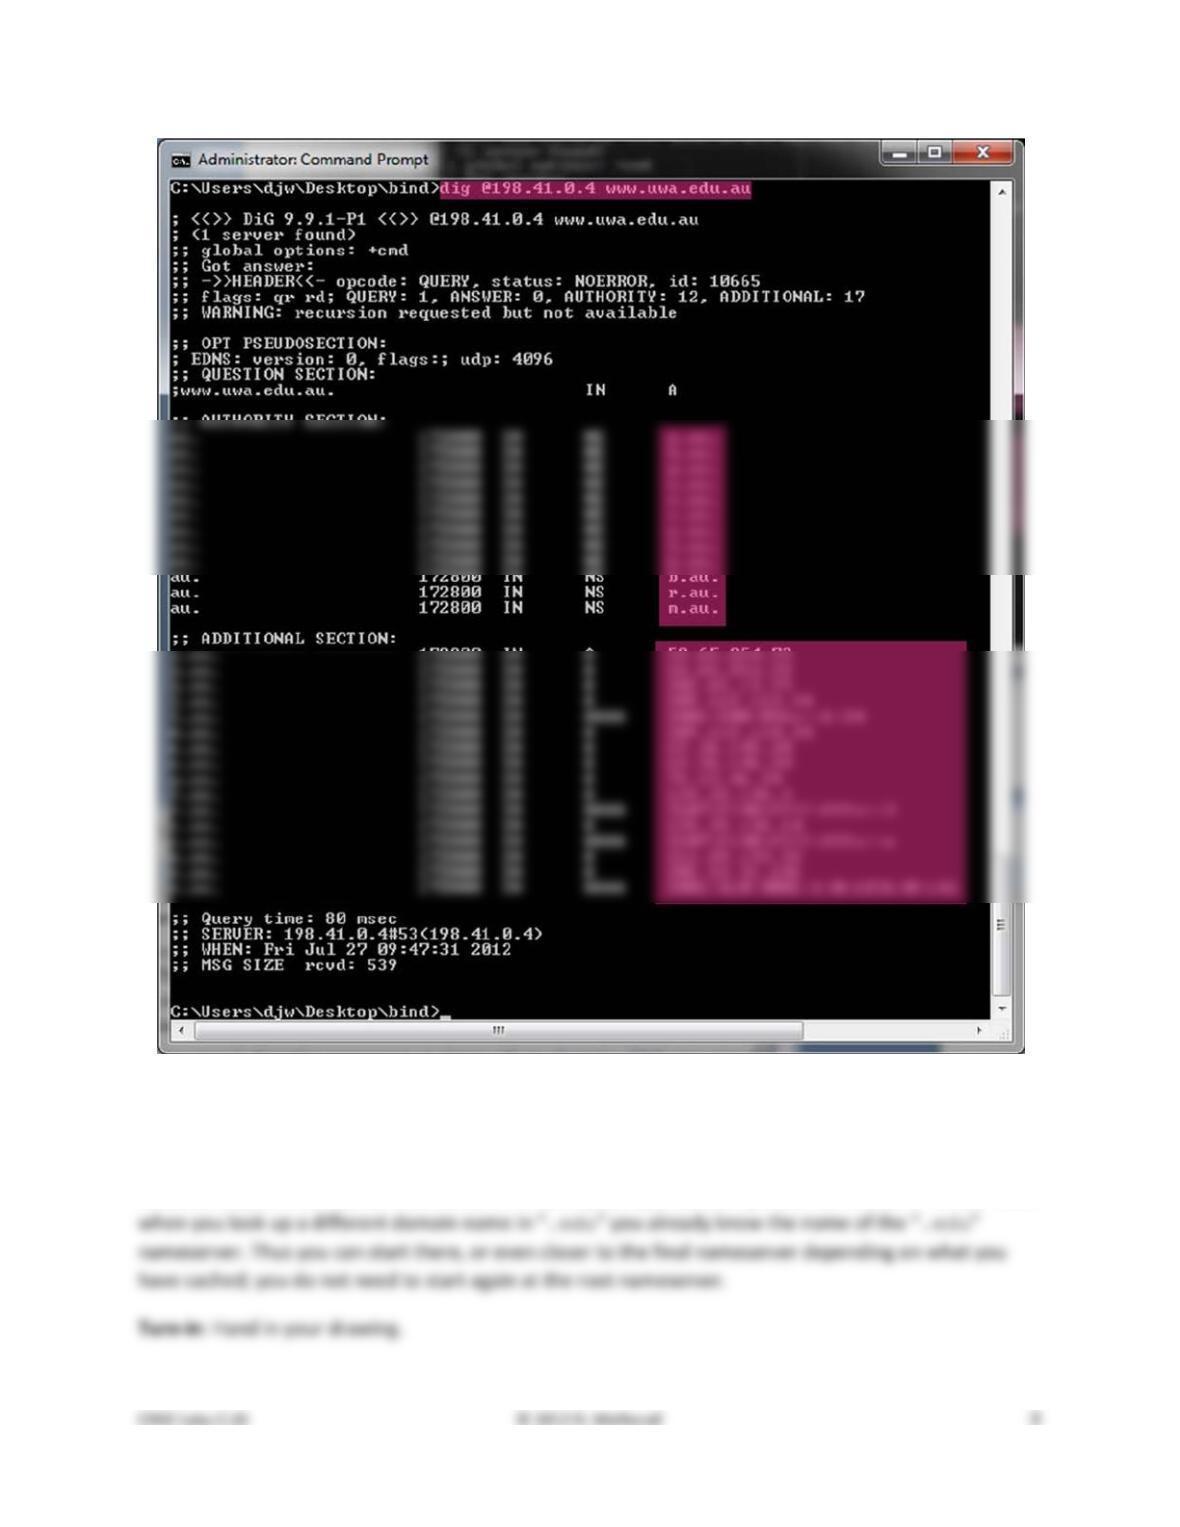
Figure 2: Using dig to query a nameserver
Draw a figure that shows the sequence of remote nameservers that you contacted and the domain for
which they are responsible. Note that future name resolutions are likely to be a much shorter sequence
because they can use cached information. For example, if you looked up a domain name in “.edu” then

Step 2: Capture a Trace
Capture a trace of your browser making DNS requests as follows; alternatively, you may use a supplied
trace. Now that we are familiar with the process of name resolution, we will inspect the details of DNS
traffic. To generate DNS traffic you will both repeat the dig commands, and browse web sites.
1. Close all unnecessary browser tabs and windows. Browsing web sites will generate DNS traffic as
2. Launch Wireshark and start a capture with a filter of “udp port 53”. We use this filter be-
cause there is no shorthand for DNS, but DNS is normally carried on UDP port 53. Your capture
window should be similar to the one pictured below, other than our highlighting. Select the in-
3. Repeat the dig commands from the previous step. This time, you should see the DNS request
and reply packets that correspond to your commands captured in the trace window. Note that
4. Wait 10 seconds, then open your browser and browse a variety of sites. Using your browser will
5. Stop the capture when you have a good sample of DNS traffic. We would like enough traffic to
see a variety of behavior. DNS traffic is generated fairly quickly as you browse so it should only
take a short while to collect this DNS traffic.
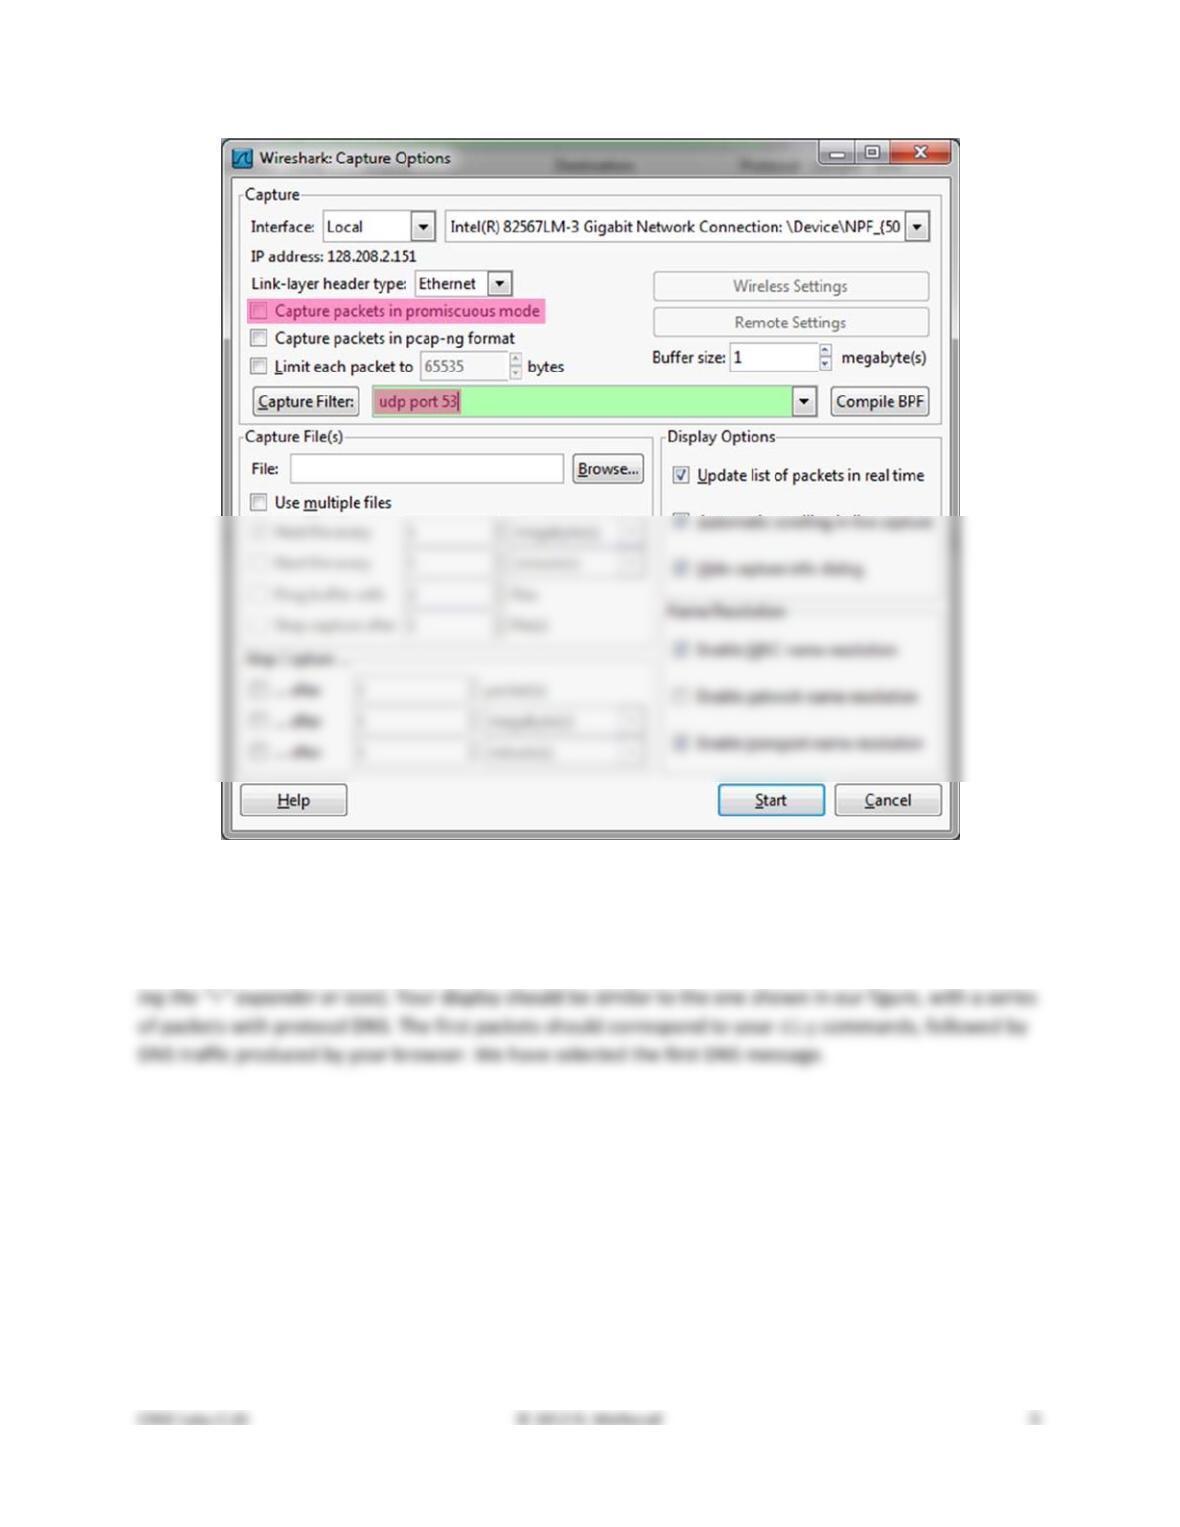
Figure 3: Setting up the capture options
Step 3: Inspect the Trace
To explore the details of DNS packets, select a DNS query expand its Domain Name System block (by us-
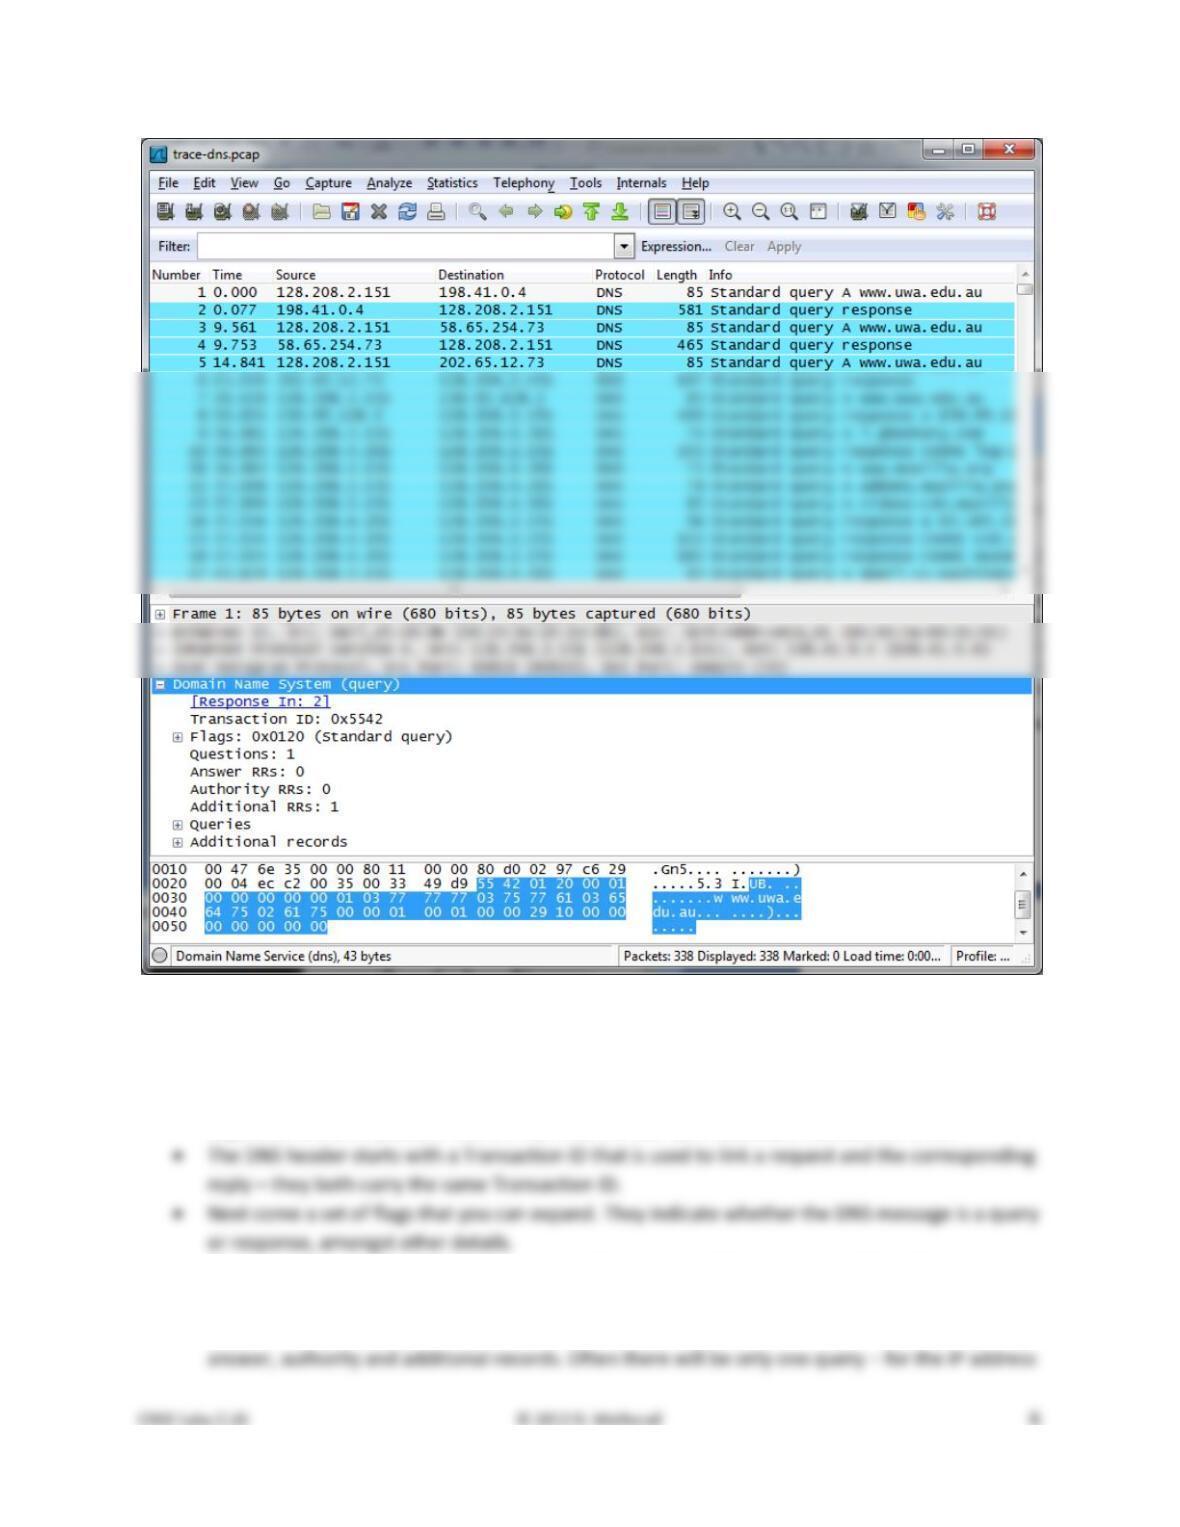
Figure 3: Trace of DNS traffic showing the details of the DNS header
Look for the following details:
• The DNS block follows the IP and UDP blocks. This is because DNS messages are carried in UDP
segments within IP packets. You will see that the UDP port used by a nameserver is 53.
• Then come the number of query, answer, authority and additional records. These fields con-
clude the header.
• After the DNS header, the remainder of the message consists of the indicated number of query,

of the domain name we are seeking – but there may be many of the other records. These rec-
ords are grouped in sections, such as the Authority section for all of the authority records. Each
Step 4: Details of DNS Messages
Select the first DNS query that corresponds to your dig commands and expand its DNS block. Likely this
query is the first packet in your trace, with the first several packets corresponding to your dig com-
Look at the DNS header, and answer the following questions:
1. How many bits long is the Transaction ID? Based on this length, take your best guess as to how
2. Which flag bit and what values signifies whether the DNS message is a query or response?
3. How many bytes long is the entire DNS header? Use information in the bottom status line when
you select parts of the packet and the bottom panel to help you work this out.
Now examine the responses to the dig DNS queries you made. The initial response should have provid-
Look at the body of the DNS response messages, and answer the following questions:
4. For the initial response, in what section are the names of the nameservers carried? What is the
Type of the records that carry nameserver names?
5. Similarly, in what section are the IP addresses of the nameservers carried, and what is the Type
of the records that carry the IP addresses?
6. For the final response, in what section is the IP address of the domain name carried?

Step 5: DNS Response Time
To conclude this lab, we will look at the DNS response time of the DNS queries made by your browser.
This is your normal DNS usage, in which your computer sends a single query and receives the answer in
the response. The response time is the delay between when your computer sends the query to the local
nameserver and when it receives the response from the local nameserver. This time includes the time
taken by the local nameserver to contact remote nameservers, if the answer is not cached. Since this re-
sponse time can delay connections to sites, it should be as small as possible.
Proceed as follows to generate an “IO Graph” of the DNS response times. IO graphs are a standard fea-
ture of Wireshark available under the Statistics menu. By default, this graph shows the rate of packets
over time. We will tweak it to show the DNS response time over the trace with the following changes:
• On the x–axis, adjust the tick interval and pixels per tick for viewing. The tick interval should be
small enough to see into the behavior over the trace. One second is probably a good choice for
• Enter “dns.time” into the calculation box and set the pull–down menu to be “MAX(*)”.
dns.time is a virtual field calculated by Wireshark from the query and response messages. It
We expect that you will see many small DNS response times, and a scattering of larger DNS response
times. In our graph, most times are very small, likely because the correct answer is cached by the local
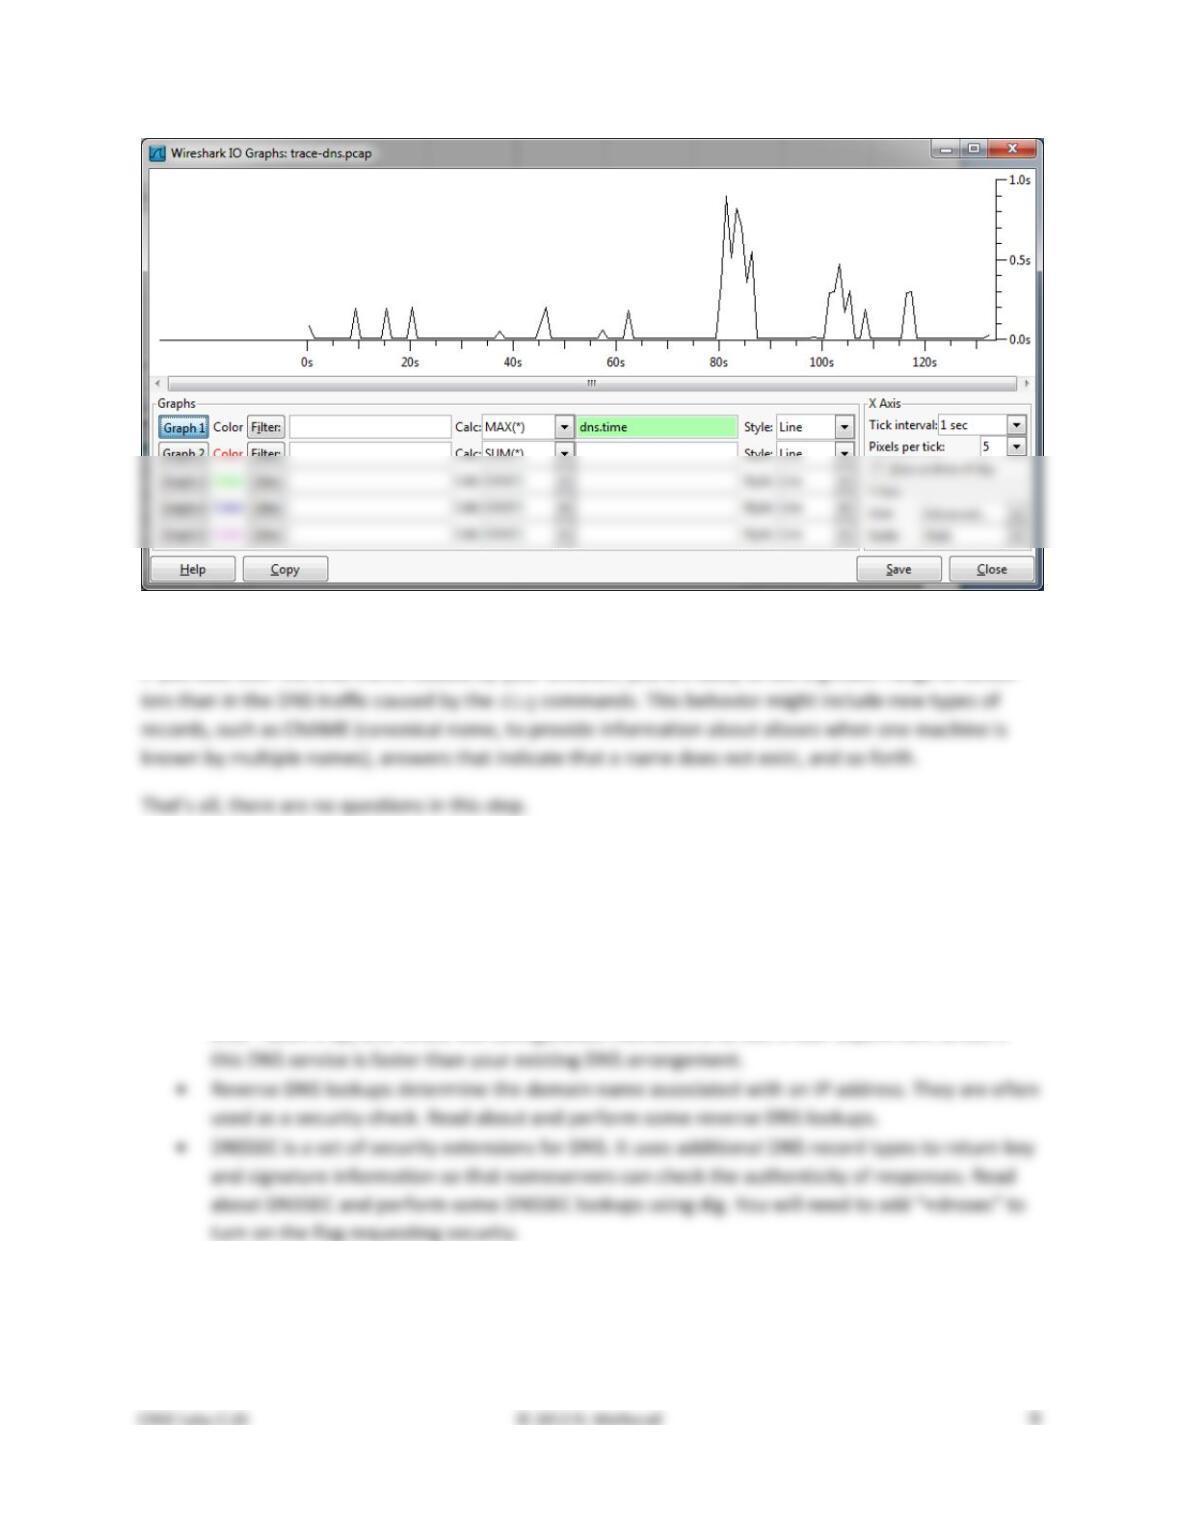
Figure 4: DNS response time via an IO graph
If you look over the DNS traffic caused by your browser, you are likely to see a greater range of behav-
Explore Your Network
We encourage you to explore DNS on your own once you have completed this lab. Some ideas:
• Look up other types of DNS records, such as MX to find the mail server for a domain, and AAAA
to find the IPv6 address of a domain.
• Google provides an alternate DNS nameserver system that you may use called “Google Public
DNS”. Look it up, and follow the configuration instructions to test it out. Experiment to see if
[END]
Solutions – DNS
The solutions below are based on our capture and use of tools. Your answers will differ in the details if
they are based on your own capture and use of tools in a different network setting. Nonetheless, we ex-
pect our solutions to help you understand whether your answers are correct.
Step 1: Manual Name Resolution
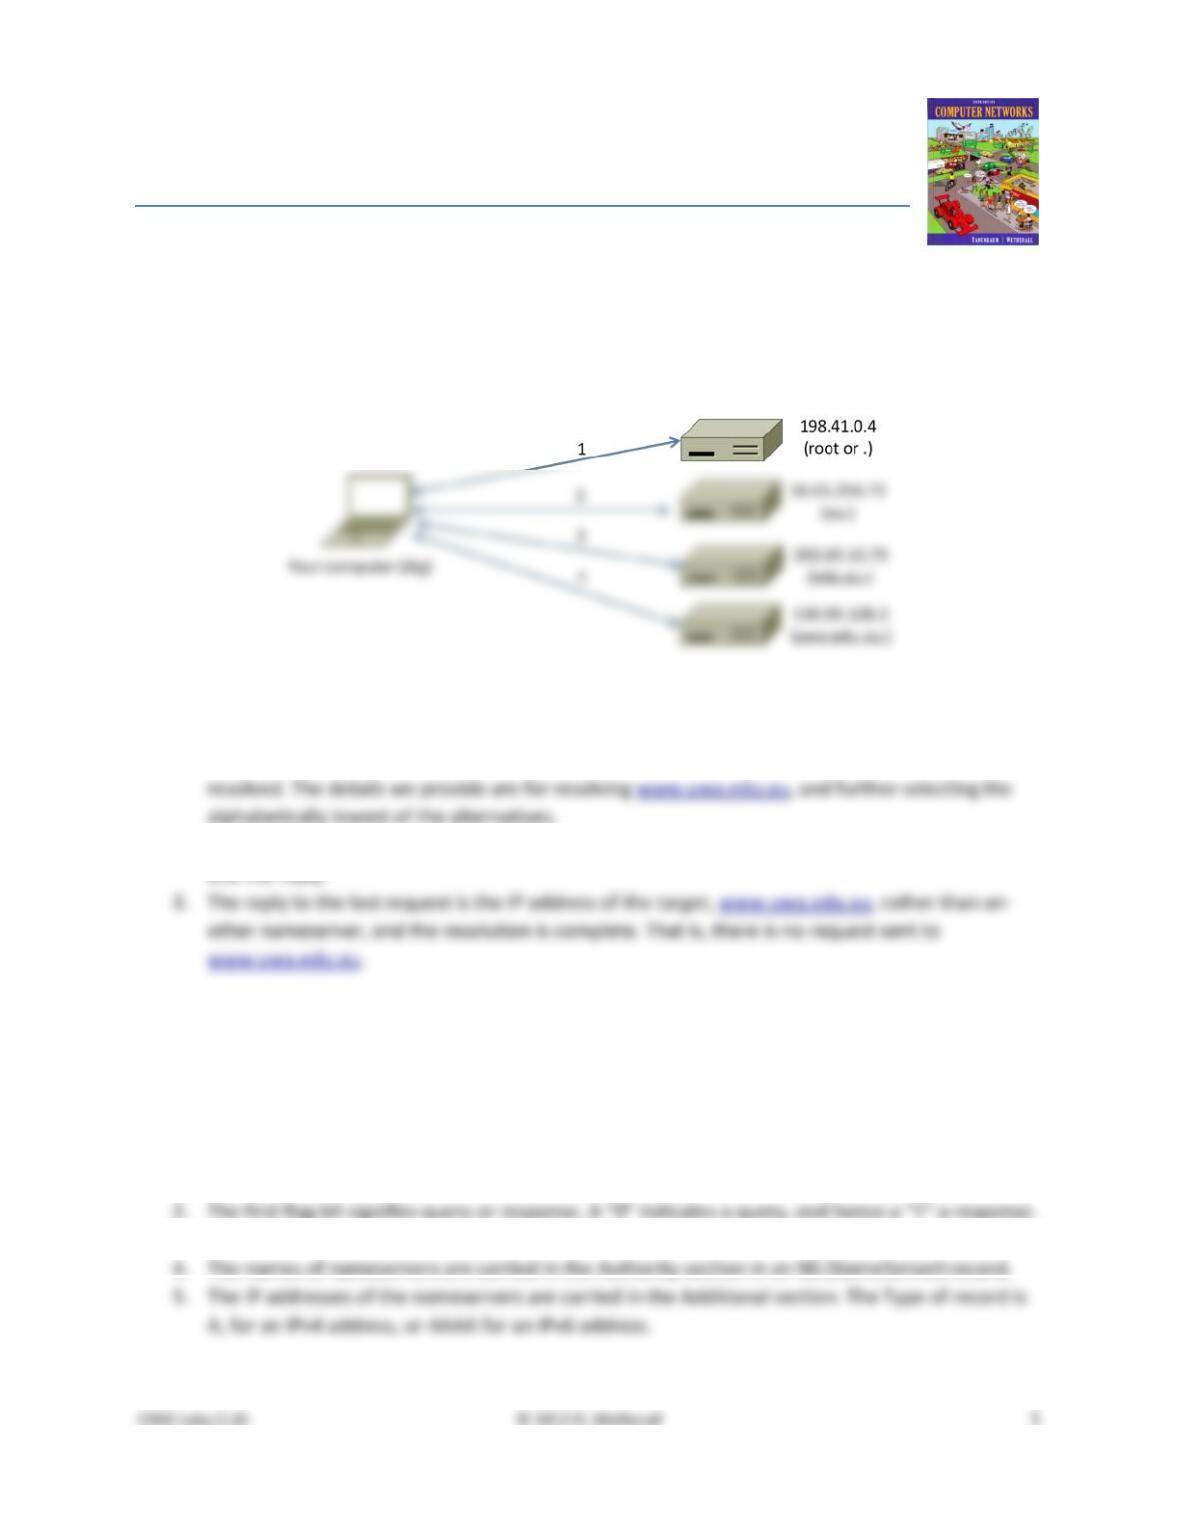
Figure 1: Sequence of namservers in resolving www.uwa.edu.au
Notes:
1. The IP addresses and domains for the nameservers depend on the domain name that is being
2. The requests are numbered in the order they are sent; each arrow denotes both the request
Step 4: Details of DNS Messages
Answers to the questions:
1. The Transaction ID is 16 bits long, which makes collisions unlikely,. Since the host computer is
setting this value, it can use all 2^16 choices before repeating. This means that 2^16 que-
ry/response pairs would need to be outstanding at the same time to cause a collision. For a
normal computer, this is an extremely or implausibly high DNS workload.
3. The DNS header is 12 bytes long.