Lab Exercise – ARP
Objective
To see how ARP (Address Resolution Protocol) works. ARP is an essential glue protocol that is used to
join Ethernet and IP. It is covered in §5.6.4 of your text. Review the text section before doing this lab.
Requirements
Wireshark: This lab uses the Wireshark software tool to capture and examine a packet trace. A packet
trace is a record of traffic at a location on the network, as if a snapshot was taken of all the bits that
passed across a particular wire. The packet trace records a timestamp for each packet, along with the
bits that make up the packet, from the lower–layer headers to the higher–layer contents. Wireshark runs
on most operating systems, including Windows, Mac and Linux. It provides a graphical UI that shows the
arp: This lab uses the “arp” command–line utility to inspect and clear the cache used by the ARP proto-
col on your computer. arp is installed as part of the operating system on Windows, Linux, and Mac
computers, but uses different arguments. It requires administrator privileges to clear the cache.
ifconfig / ipconfig: This lab uses the “ipconfig” (Windows) or “ifconfig” (Mac/Linux) command–
route / netstat: This lab uses the “route” or “netstat” command–line utility to inspect the routes
used by your computer. A key route is the default route (or route to prefix 0.0.0.0) that uses the default
Network Setup
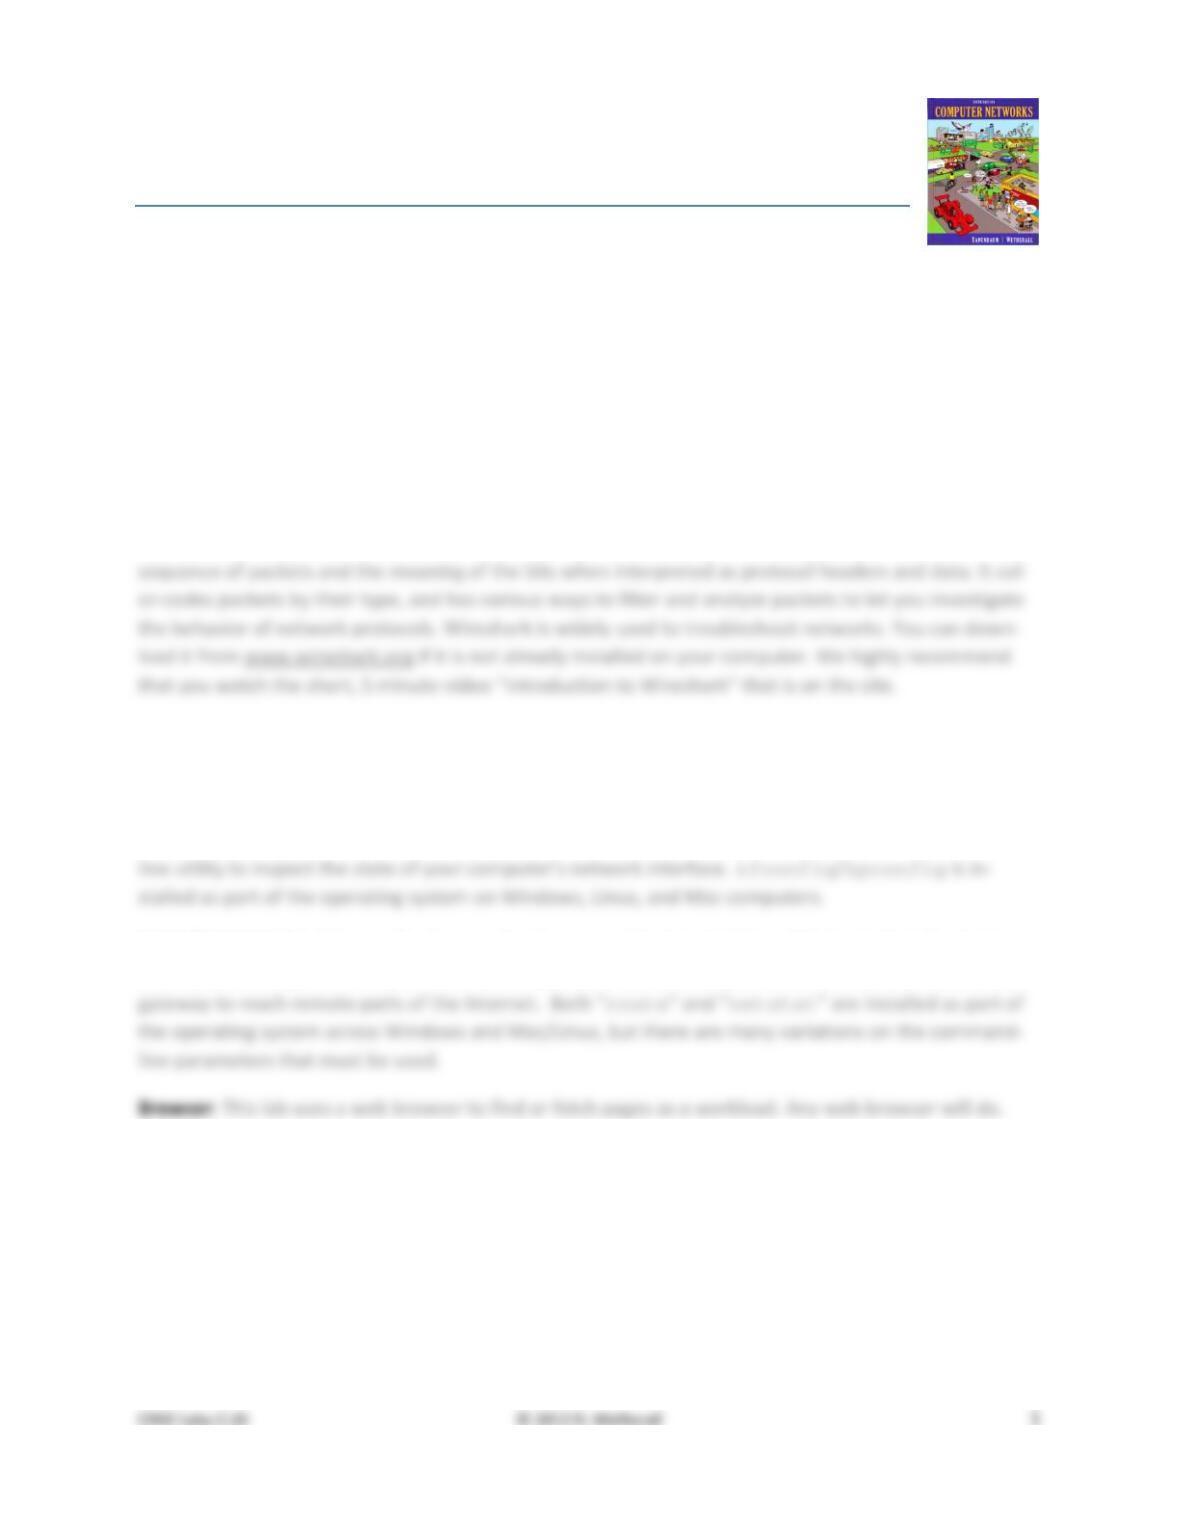
We want to observe the ARP protocol in action. Recall that ARP is used to find the Ethernet address that
corresponds to a local IP address to which your computer wants to send a packet. A typical example of a
local IP address is that of the local router or default gateway that connects your computer to the rest of
the Internet. Your computer caches these translations in an ARP cache so that the ARP protocol need
only be used occasionally to do the translation. The setup from the viewpoint of your computer is as
shown in the example below.
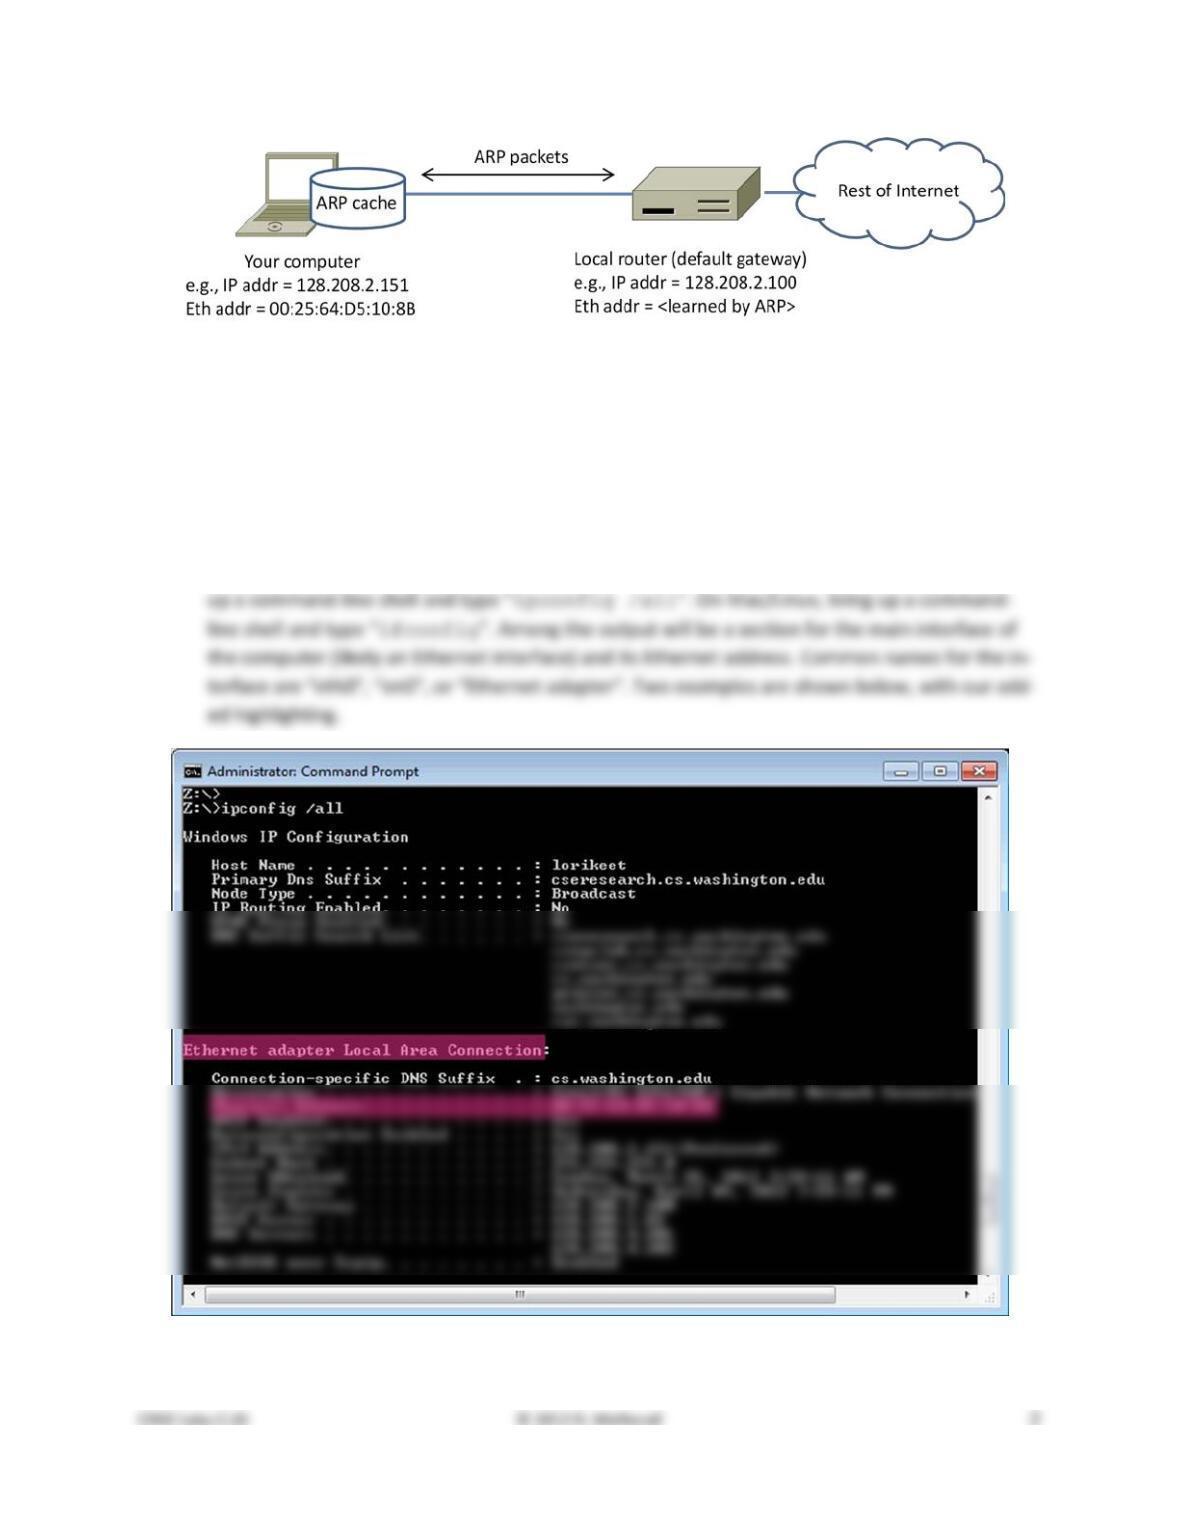
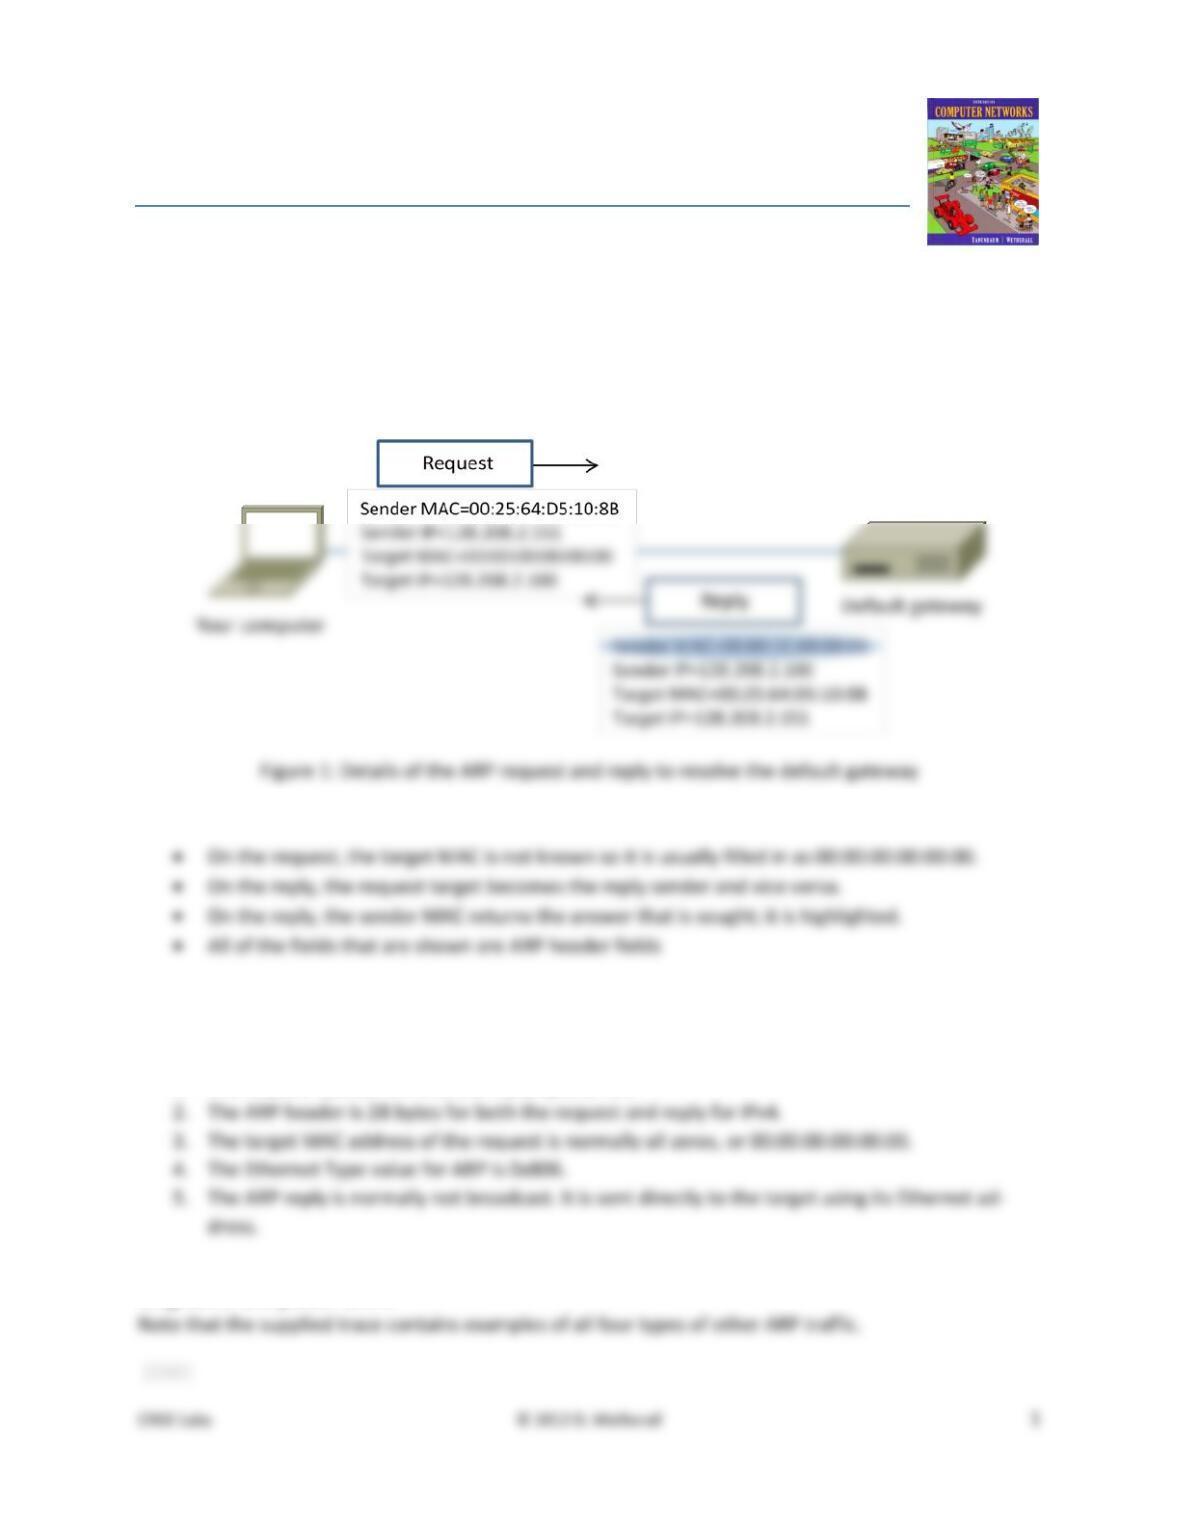
Figure 1: Network setup under which we will study ARP
Step 1: Capture a Trace
Proceed as follows to capture a trace of ARP traffic; alternatively, you may use a supplied trace. To gath–
er ARP packets, we will cause your computer to send traffic to the local router when it does not know
the router’s Ethernet address – your computer will then use ARP to discover the Ethernet address.
1. Find the Ethernet address of the main network interface of your computer with the ifconfig /
ipconfig command. You will want to know this address for later analysis. On Windows, bring
Figure 2: Finding the computer’s Ethernet address with ipconfig (Windows)
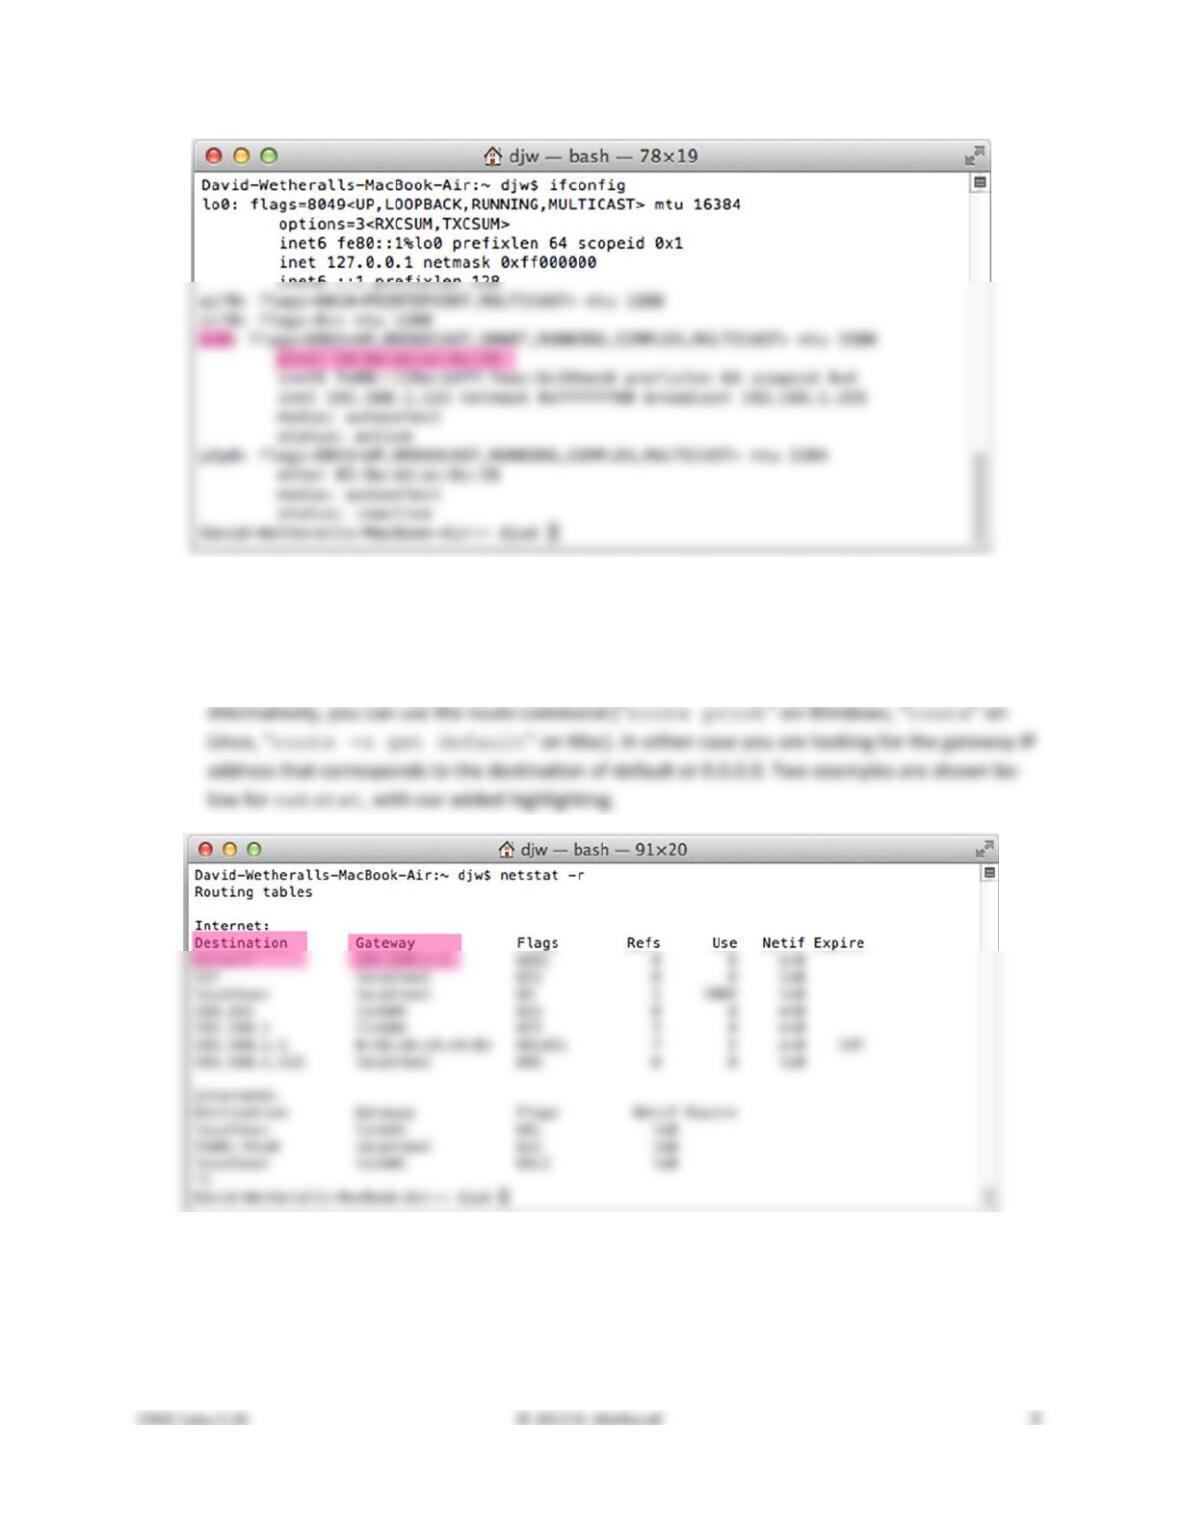
Figure 3: Finding the computer’s Ethernet address with ifconfig (Mac)
2. Find the IP address of the local router or default gateway that your computer uses to reach the
rest of the Internet using the netstat / route command. You should be able to use the
netstat command (“netstat –r” on Windows, Mac and Linux, may require ctrl–C to stop).
Figure 4: Finding the default gateway IP address with netstat (Mac)
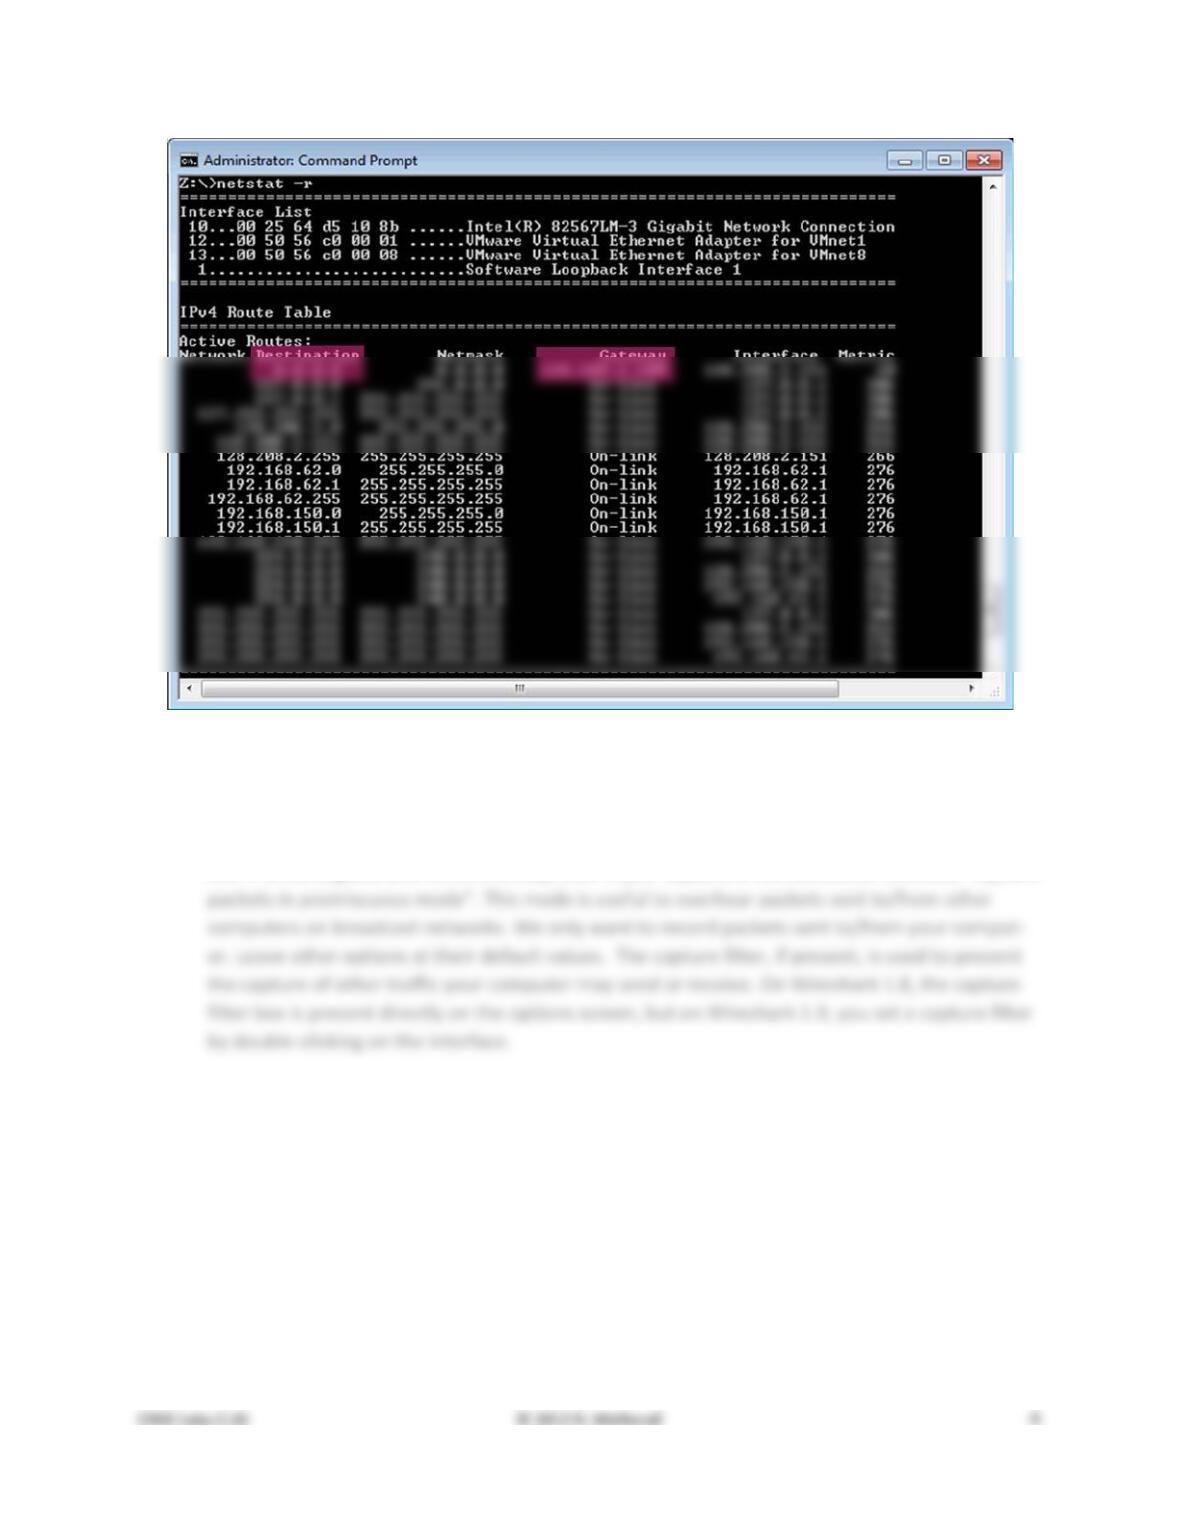
Figure 5: Finding the default gateway IP address with netstat (Windows)
3. Launch Wireshark and start a capture with a filter of “arp”. Your capture window should be
similar to the one pictured below, other than our highlighting. Select the interface from which to
capture as the main wired or wireless interface used by your computer to connect to the Inter-
net. If unsure, guess and revisit this step later if your capture is not successful. Uncheck “capture
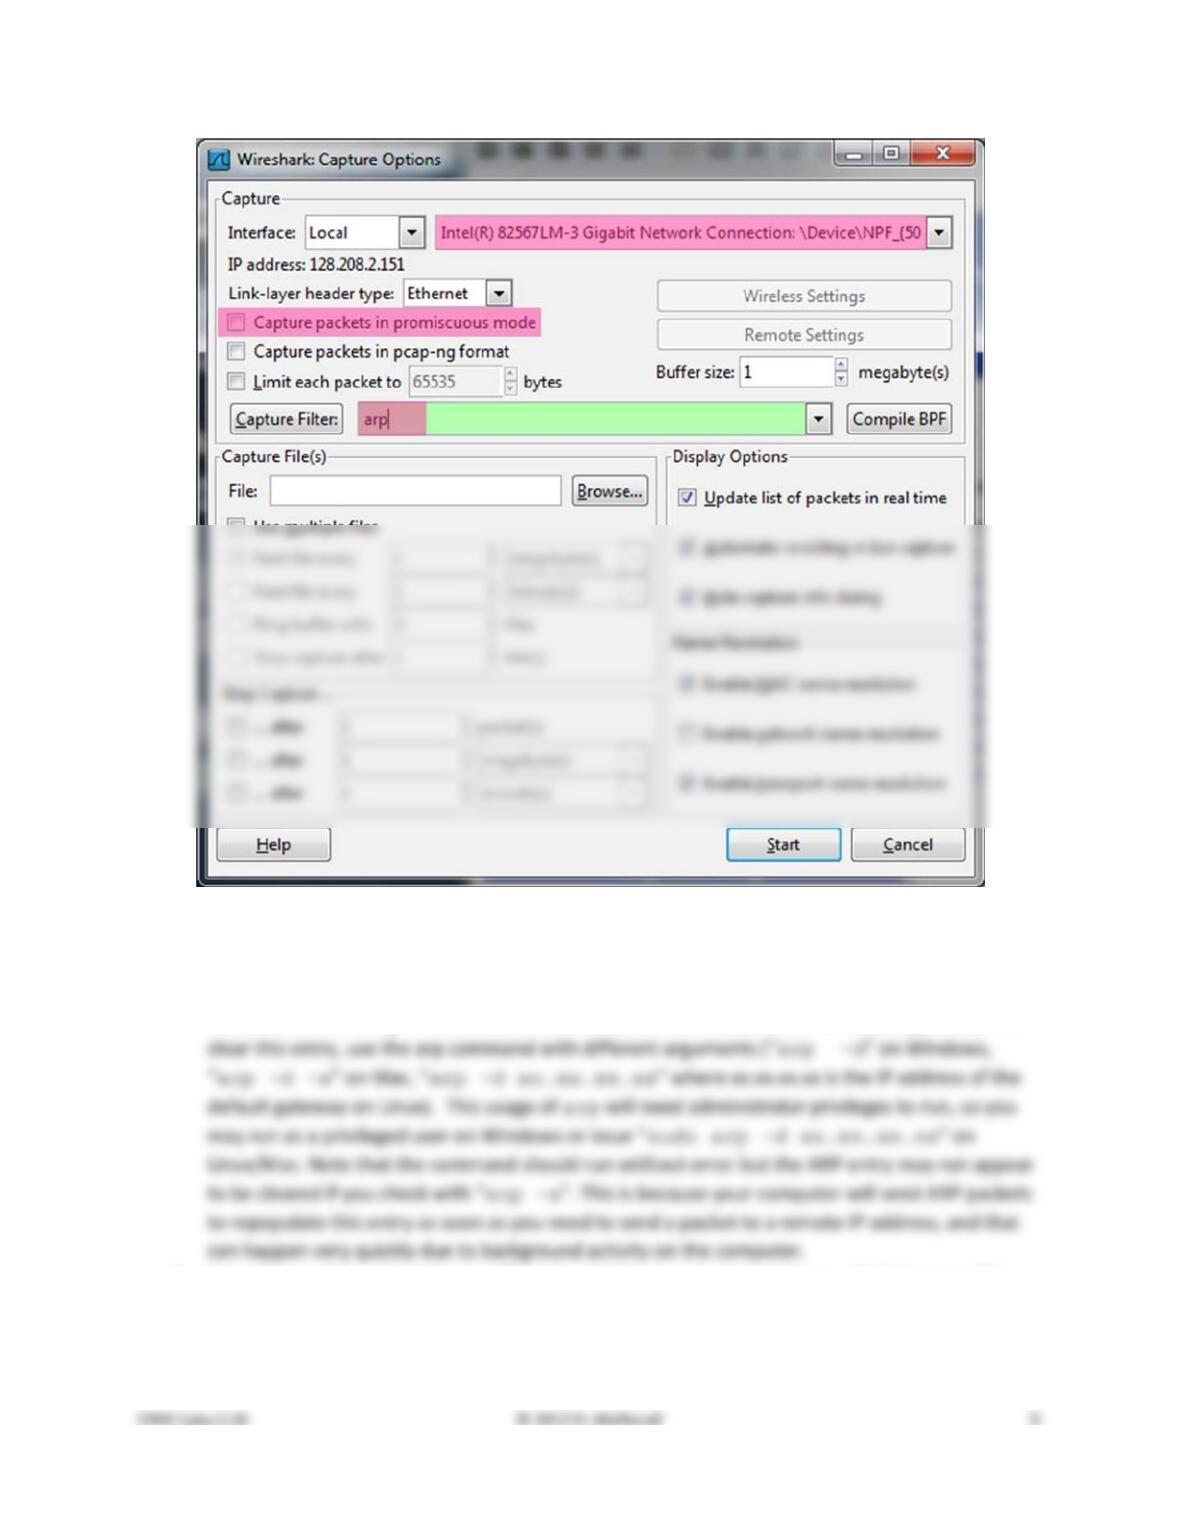
Figure 4: Setting up the capture options
4. When the capture is started, use the “arp” command to clear the default gateway from the ARP
cache. Using the command “arp –a” will show you the contents of the ARP cache as a check
that you can run “arp”. You should see an entry for the IP address of the default gateway. To
5. Now that you have cleared your ARP cache, fetch a remote page with your Web browser. This
will cause ARP to find the Ethernet address of the default gateway so that the packets can be
sent. These ARP packets will be captured by Wireshark. You might clear the ARP cache and fetch
a document a couple of times. Hopefully there will also be other ARP packets sent by other
Step 2: Inspect the Trace
Now we can look at an ARP exchange! Since there may be many ARP packets in your trace, we’ll first
narrow our view to only the ARP packets that are sent directly from or to your computer.
Set a display filter for packets with the Ethernet address of your computer. You can do this by entering
an expression in the blank “Filter:” box near the top of the Wireshark window and clicking “Apply”. The

Figure 5: Capture of ARP packets, showing details of a request
Find and select an ARP request for the default gateway and examine its fields. There are two kinds of
ARP packets, a request and a reply, and we will look at each one in turn. The Info line for the request will
• Hardware and Protocol type are set to constants that tell us the hardware is Ethernet and the
• Next come the four key fields, the sender MAC (Ethernet) and IP and the target MAC (Ethernet)
Next, select an ARP reply and examine its fields. The reply will answer a request and have an Info line of
the form “xx.xx.xx.xx is at yy:yy:yy:yy:yy:yy”:
• The Hardware and Protocol type and sizes are as set as before.
Step 3: ARP request and reply
To show your understanding of an ARP exchange, draw a figure that shows the ARP request and reply
packets sent between your computer and the default gateway. Make it for the case we examined of your
Step 4: Details of ARP over Ethernet
To look at further details of ARP, examine an ARP request and ARP reply to answer these questions:
1. What opcode is used to indicate a request? What about a reply?
2. How large is the ARP header for a request? What about for a reply?
3. What value is carried on a request for the unknown target MAC address?
ARP packets are carried in Ethernet frames, and the values of the Ethernet header fields are chosen to
support ARP. For instance, you may wonder how an ARP request packet is delivered to the target com-
4. What Ethernet Type value which indicates that ARP is the higher layer protocol?
5. Is the ARP reply broadcast (like the ARP request) or not?
Turn–in: Hand in your answers to the above questions.
Explore on your own
We encourage you to explore ARP on your own once you have completed this lab. One suggestion is to
look at other ARP packets that may have been recorded in your trace; we only examined an ARP request
by your computer and the ARP reply from the default gateway.
To see if there is other ARP activity, make sure to clear any Ethernet address filter that is set. Other ARP
packets may exhibit any of the following kinds of behavior for you to explore:
• ARP requests broadcast by other computers. The other computers on the local network are also
Solutions – ARP
The solutions below are based on our capture and use of tools. Your answers will differ in the details if
they are based on your own capture and use of tools in a different network setting. Nonetheless, we ex-
pect our solutions to help you understand whether your answers are correct.
Step 4: ARP request and reply
There are several features to note:
Step 4: Details of ARP over Ethernet
Answers to the questions:
1. The request opcode is 1 and the reply opcode is 2.
Explore on your own