
Database Concepts
8th Edition
David M. Kroenke • David J. Auer • Scott L. Vandenberg • Robert C. Yoder
Instructor’s Manual
Prepared by David J. Auer
All Sections including Appendix E and Appendix H
The Access Workbench

All rights reserved. No part of this publication may be reproduced, stored in a retrieval system, or transmitted,
in any form or by any means, electronic, mechanical, photocopying, recording, or otherwise, without the prior
written permission of the publisher. Printed in the United States of America.
Instructor’s Manual to accompany:
Database Concepts (8th Edition)
David M. Kroenke • David J. Auer • Scott L. Vandenberg • Robert C. Yoder

All Sections – The Access Workbench
THE ACCESS WORKBENCH
Solutions to all the Access Workbench exercises, including those in Appendix E and
Appendix H, are found in this Solutions to all Sections: The Access Workbench, which is
a separate document within the Instructor’s Manual.
NOTES ON MICROSOFT WINDOWS 10
This book uses the Microsoft Windows 10 operating system as the basis for screenshots
and step-by-step instructions. However, with Windows 10, Microsoft has introduced a
continuous update system that has already resulted in some fundamental differences in
how different versions of Windows 10 look and operate.
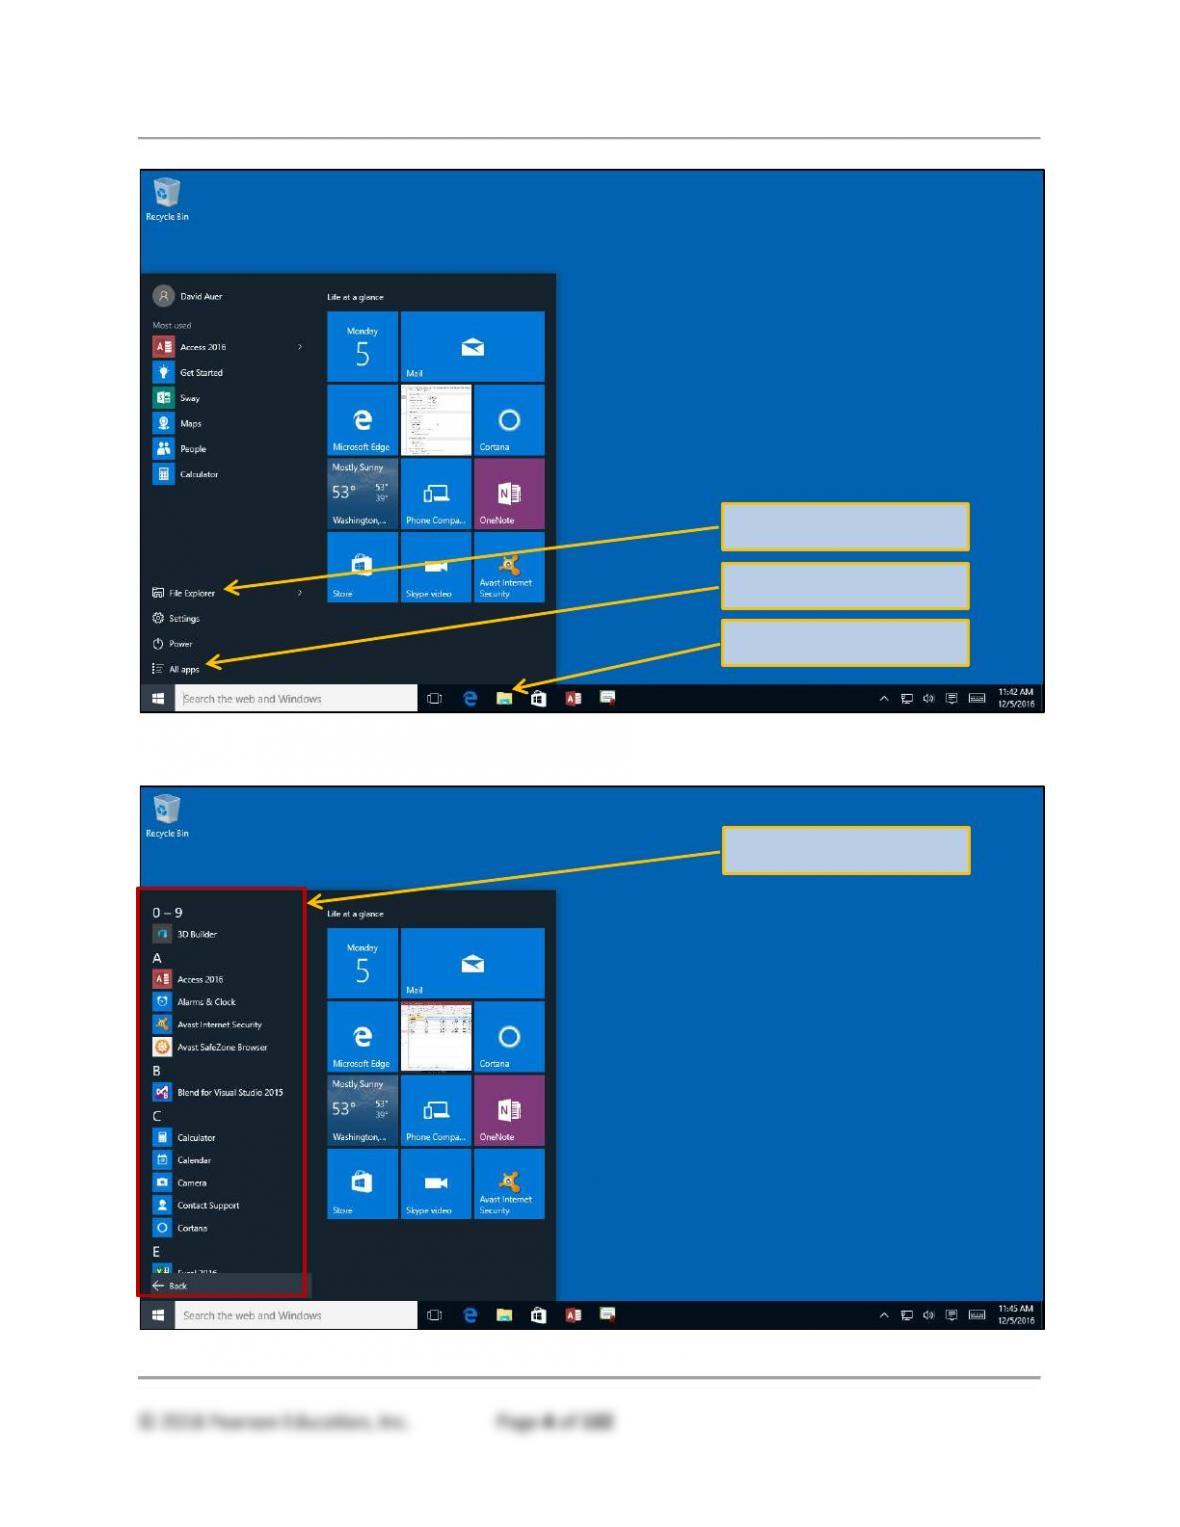
For example, in the original version of Microsoft Windows 10, clicking the Windows
Start button (or pressing the Windows key on the keyboard) displayed the menu shown
in Figure 1. In this menu, we need to click the All apps button in order to see the All
apps menu shown in Figure 2.
All Sections – The Access Workbench
Figure 1 – Windows 10 Main Menu
The All apps button
The File Explorer button
The File Explorer icon
The All apps menu
All Sections – The Access Workbench
Figure 2 – Windows 10 All Apps Menu
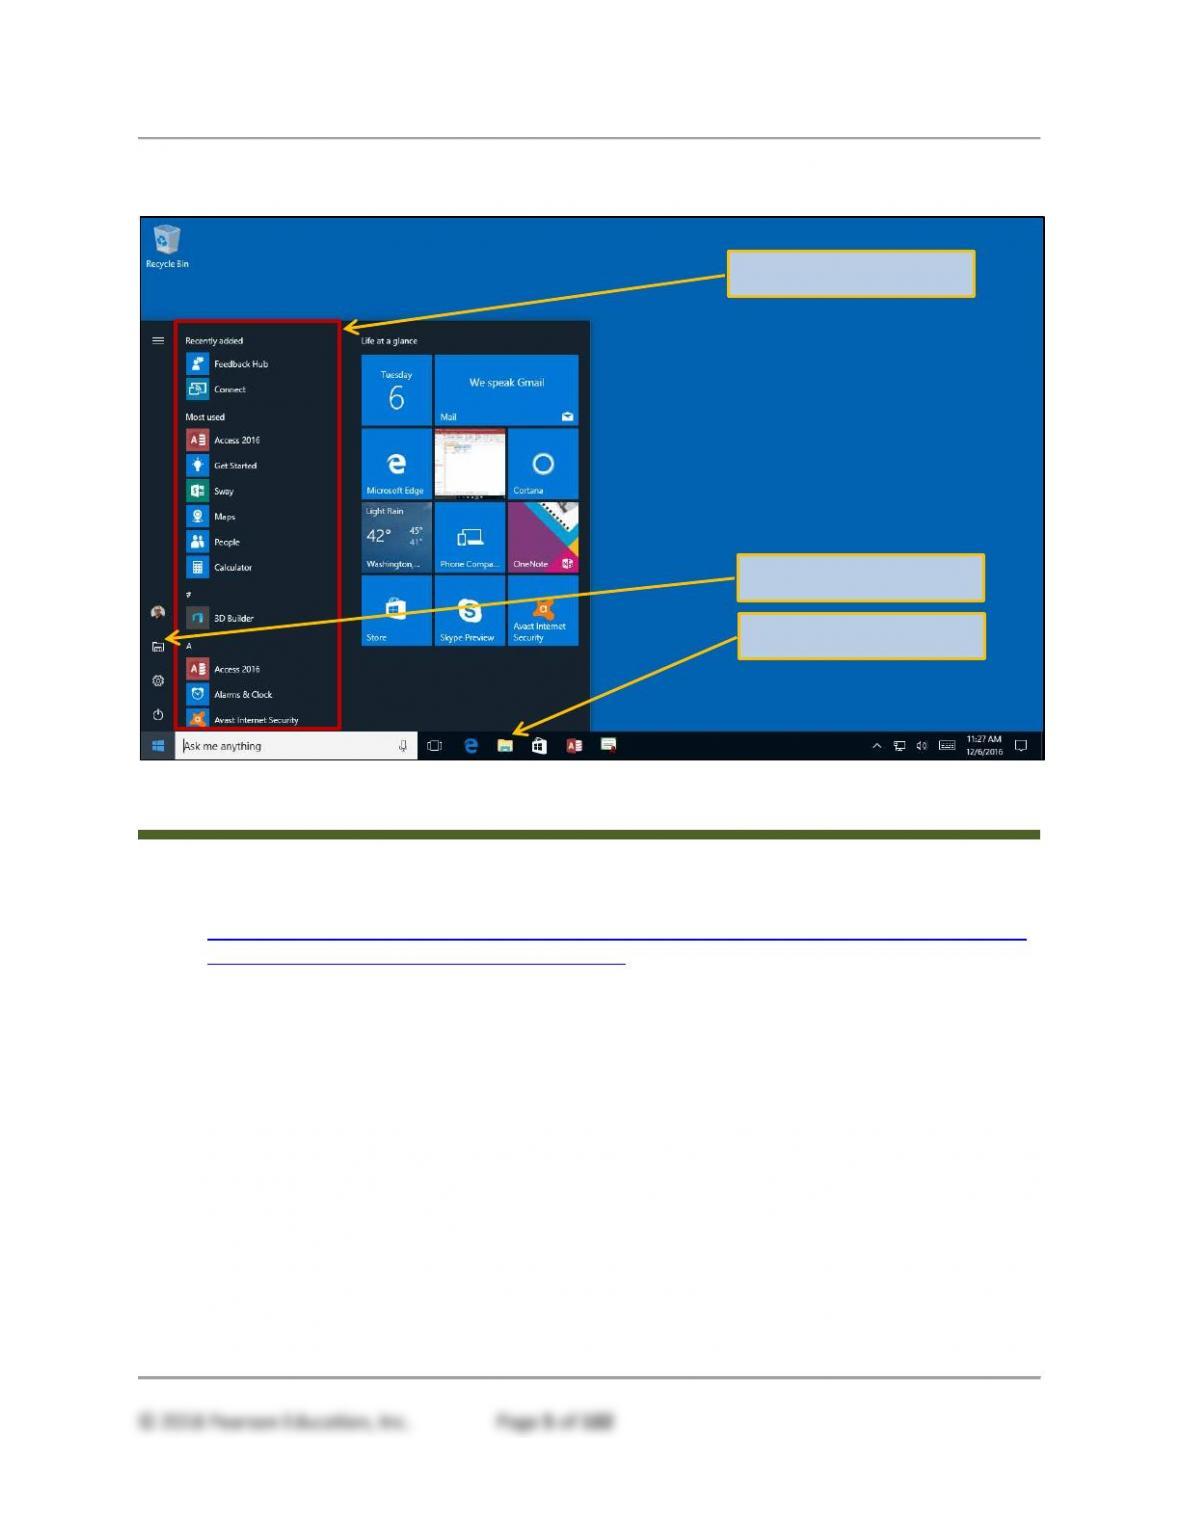
Figure 3 – Windows 10 Anniversary Update Main Menu with All Apps Menu Included
Microsoft then released the Windows 10 Anniversary Update (Feature update to
Windows 10, version 1607) (see the blog discussion at
https://blogs.windows.com/windowsexperience/2016/08/02/how-to-get-the-windows-10–
anniversary-update/#K1CZuiw4auiuE9A5.97 ). One of the changes introduced in the
Anniversary Update was a major change to the menu system. Now, as shown in
Figure 3, the All apps menu is immediately available when the Start button is used (or
when the keyboard Windows key is pressed).
Therefore, note that the step by step instructions in this book may need to be altered for
your use depending upon which version of Microsoft Windows 10 you or your students
are using!
We recommend that you update Windows 10 to the Windows 10 Anniversary Update
(Feature update to Windows 10, version 1607), and make sure it is patched with all
updates to that version (at a minimum patched to Windows 10 Version 1607 update for
August 23, 2016 (KB3176936), and the Windows 10 Version 1607 cumulative update for
September 29, 2016 (KB3194496). We also recommend using the 32-bit version of
Microsoft Office. This insures that all the examples discussed in this book will function
properly.
The All apps menu
The File Explorer button
The File Explorer icon

All Sections – The Access Workbench
SECTION ONE
CHAPTER OBJECTIVES
• Learn how to open Microsoft Access
• Learn how to create a Microsoft Access database
• Learn how to create a Microsoft Access table
• Learn how to populate a Microsoft Access table with data
• Learn how to create a Microsoft Access form based on a single table
• Learn how to create a Microsoft Access report based on a single table
CHAPTER ERRATA
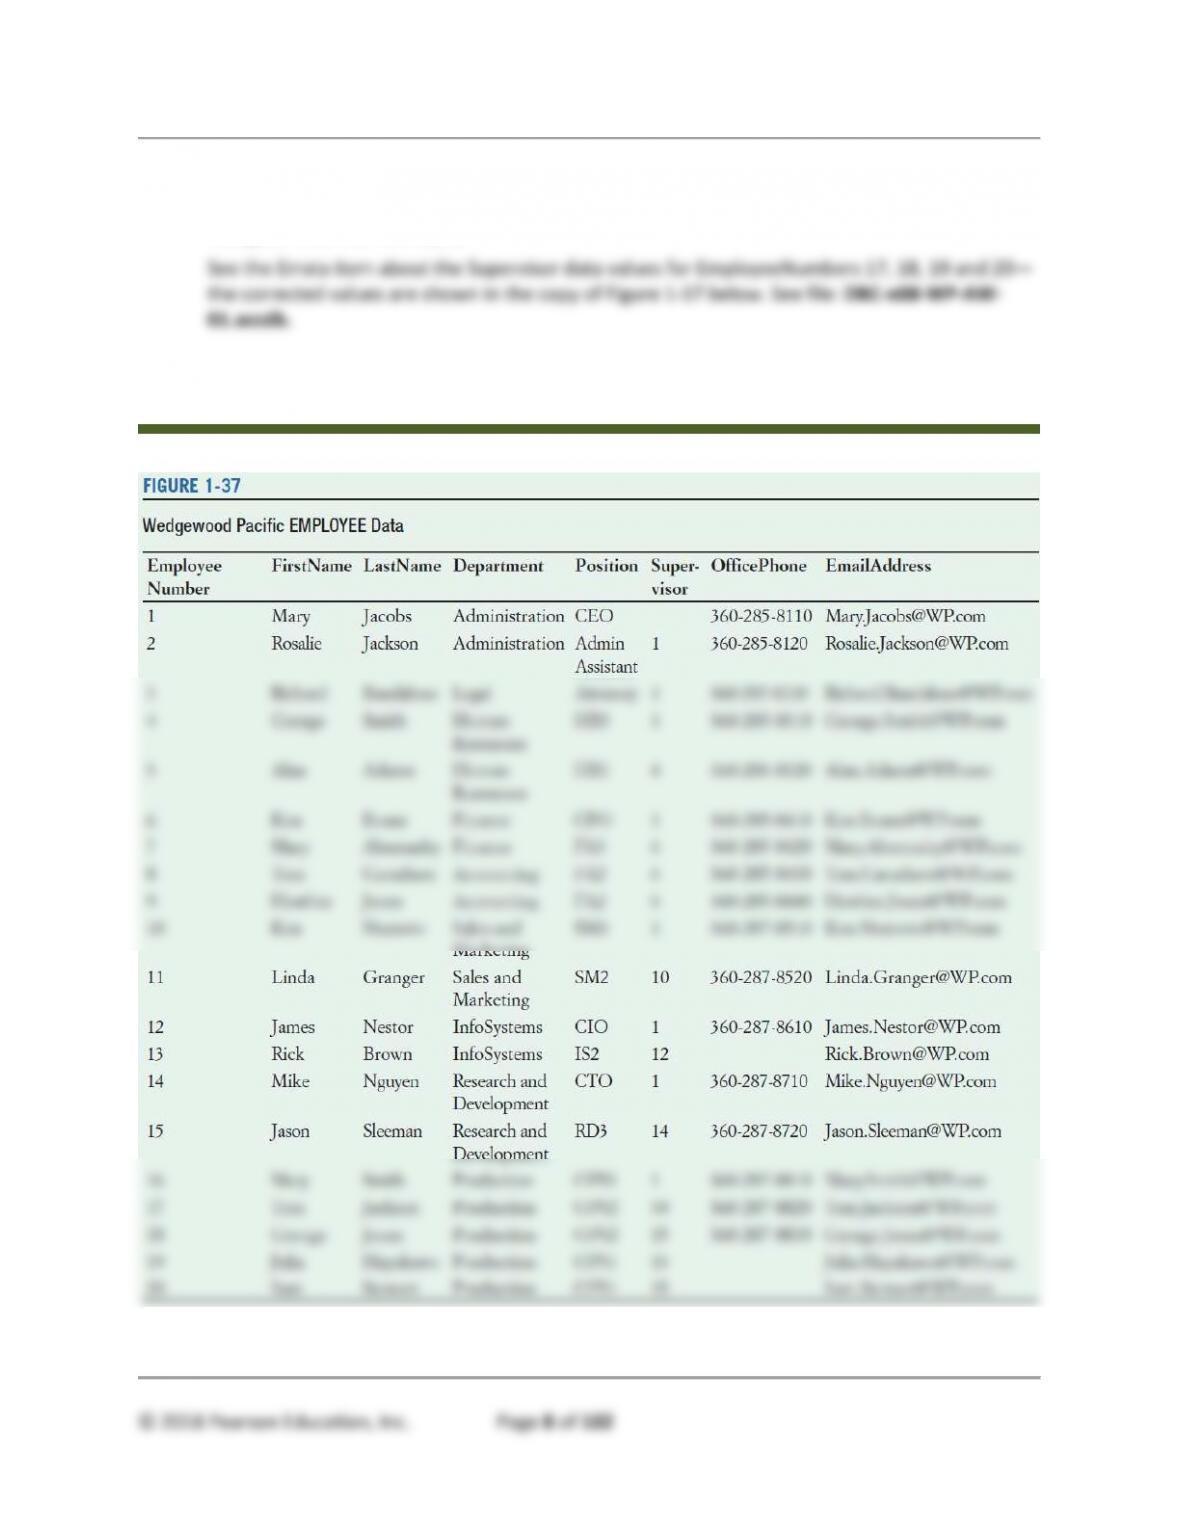
• [21-FEB-2107] – For consistency with the data shown in Figure 3-12, the last four
values of Supervisor in Figure 1-37 should be 14, 15, 15 and 15 instead of 16, 17,
17, and 17. Similarly, the OfficePhone values for employees with EmployeeNumber
10, 11, 12, and 13-18 have had the prefixes changed from “285” to “287”. Figure 1-
37 then appears as shown in the solution to question B.
TEACHING SUGGESTIONS
• This section of “The Access Workbench” is the basic introduction to Microsoft Access
for your students. Demonstrate Microsoft Access in class, and discuss each of the
operations covered in the text.
• Make sure your students actually work through The Access Workbench steps before
attempting the Access Workbench Exercises.
• Take some time to discuss and illustrate modifying forms and reposts that are
created by the wizards. These objects more often than not require at least minor
modifications such as widening a text box.
All Sections – The Access Workbench
ANSWERS TO ACCESS WORKBENCH EXERCISES
The Wedgewood Pacific (WP) company, founded in 1987 in Seattle, Washington, manufactures
and sells consumer drone aircraft. This is an innovative and rapidly developing market. In
January, 2016, the FAA said that 181,000 drones (out of the approximately 700,000 drones that
may have been sold during the 2015 Christmas season) had been registered under the new
FAA drone registration rules.1
WP currently produces three drone models, the Alpha III, the Bravo III, and the Delta IV. These
products are created by WP’s Research and Development group, and produced at WP’s
production facilities. WP manufactures some of the parts used in the drones, but also purchases
some parts from other suppliers.
The company is located in two buildings. One building houses the Administration, Legal,
Finance, Accounting, Finance, Human Resources, and Sales and Marketing departments, and
the second houses the Information Systems, Research and Development, and Production
departments. The company database contains data about employees; departments; projects;
assets, such as finished goods inventory, parts inventory, and computer equipment; and other
aspects of company operations.
A. Create a Microsoft Access database named WP in a Microsoft Access file named
WP.accdb.
See the file: DBC-e08-WP–AW-01.accdb.
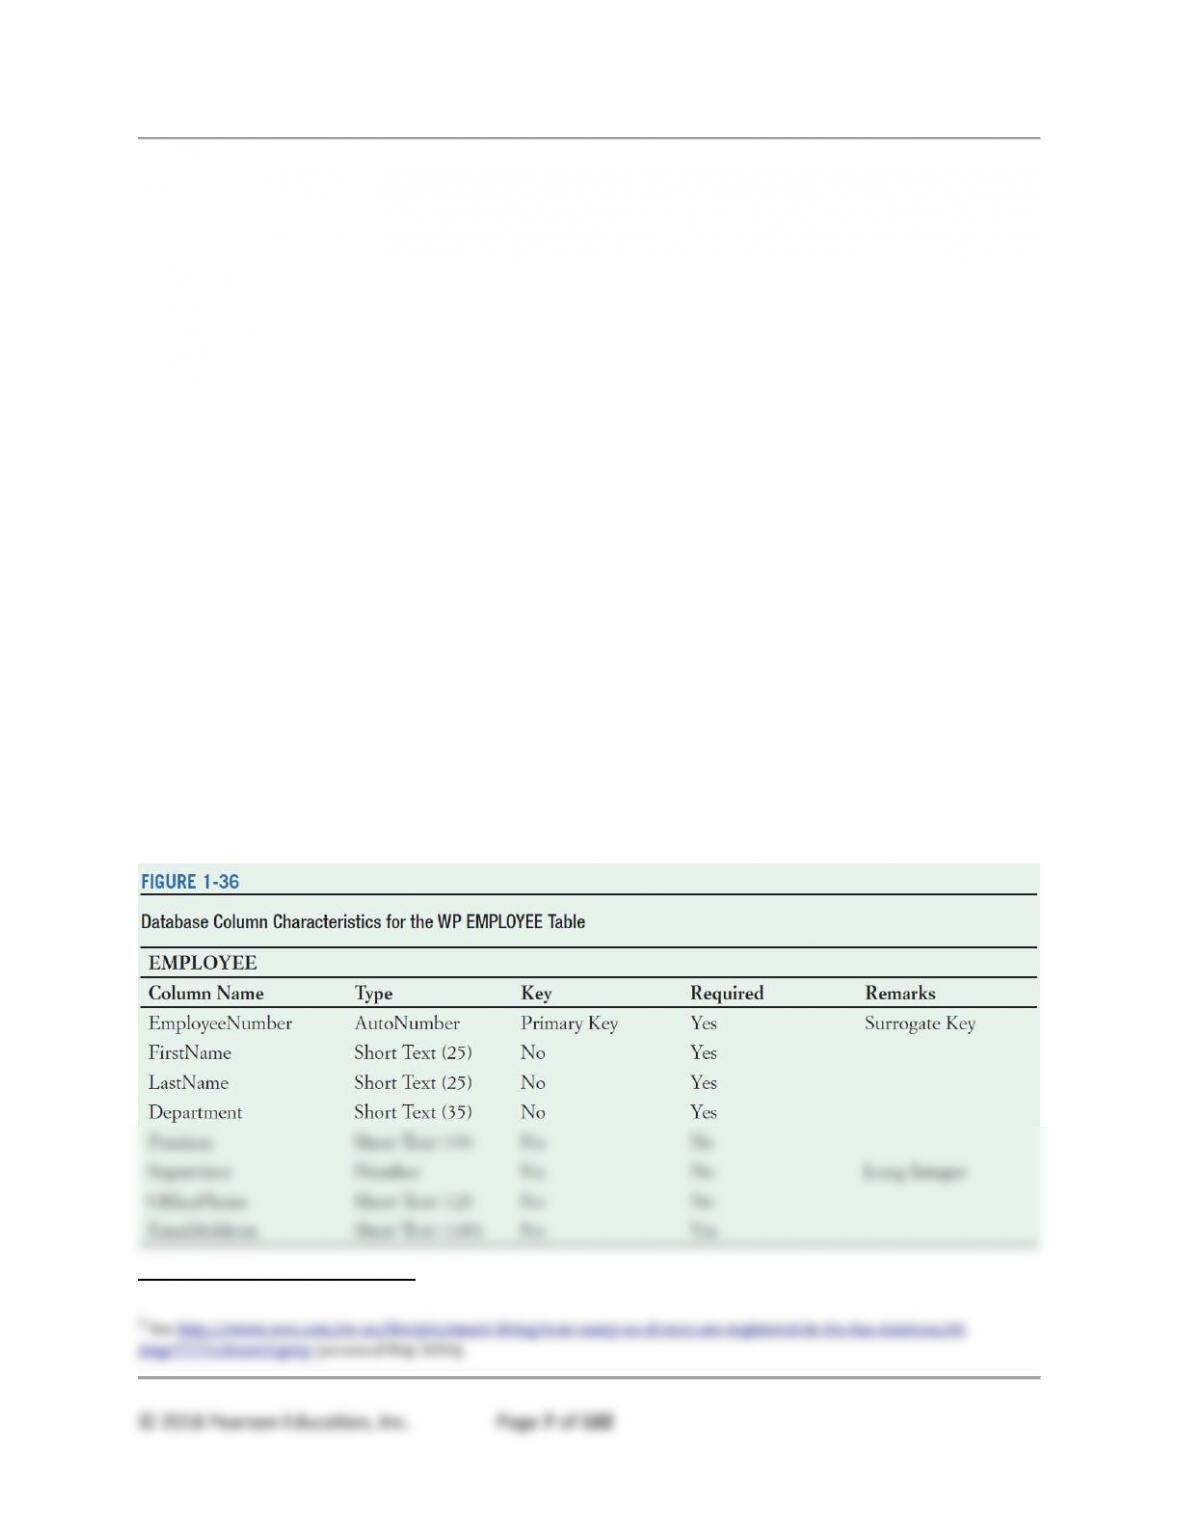
B. Figure 1-36 shows the column characteristics for the WP EMPLOYEE table. Using the
column characteristics, create the EMPLOYEE table in the WP database.
See the file: DBC-e08-WP–AW-01.accdb.
All Sections – The Access Workbench
C. Figure 1-37 shows the data for the WP EMPLOYEE table. Using Datasheet view, enter
the data for the first three rows of data in the EMPLOYEE table shown in Figure 1-33
into your EMPLOYEE table.
All Sections – The Access Workbench
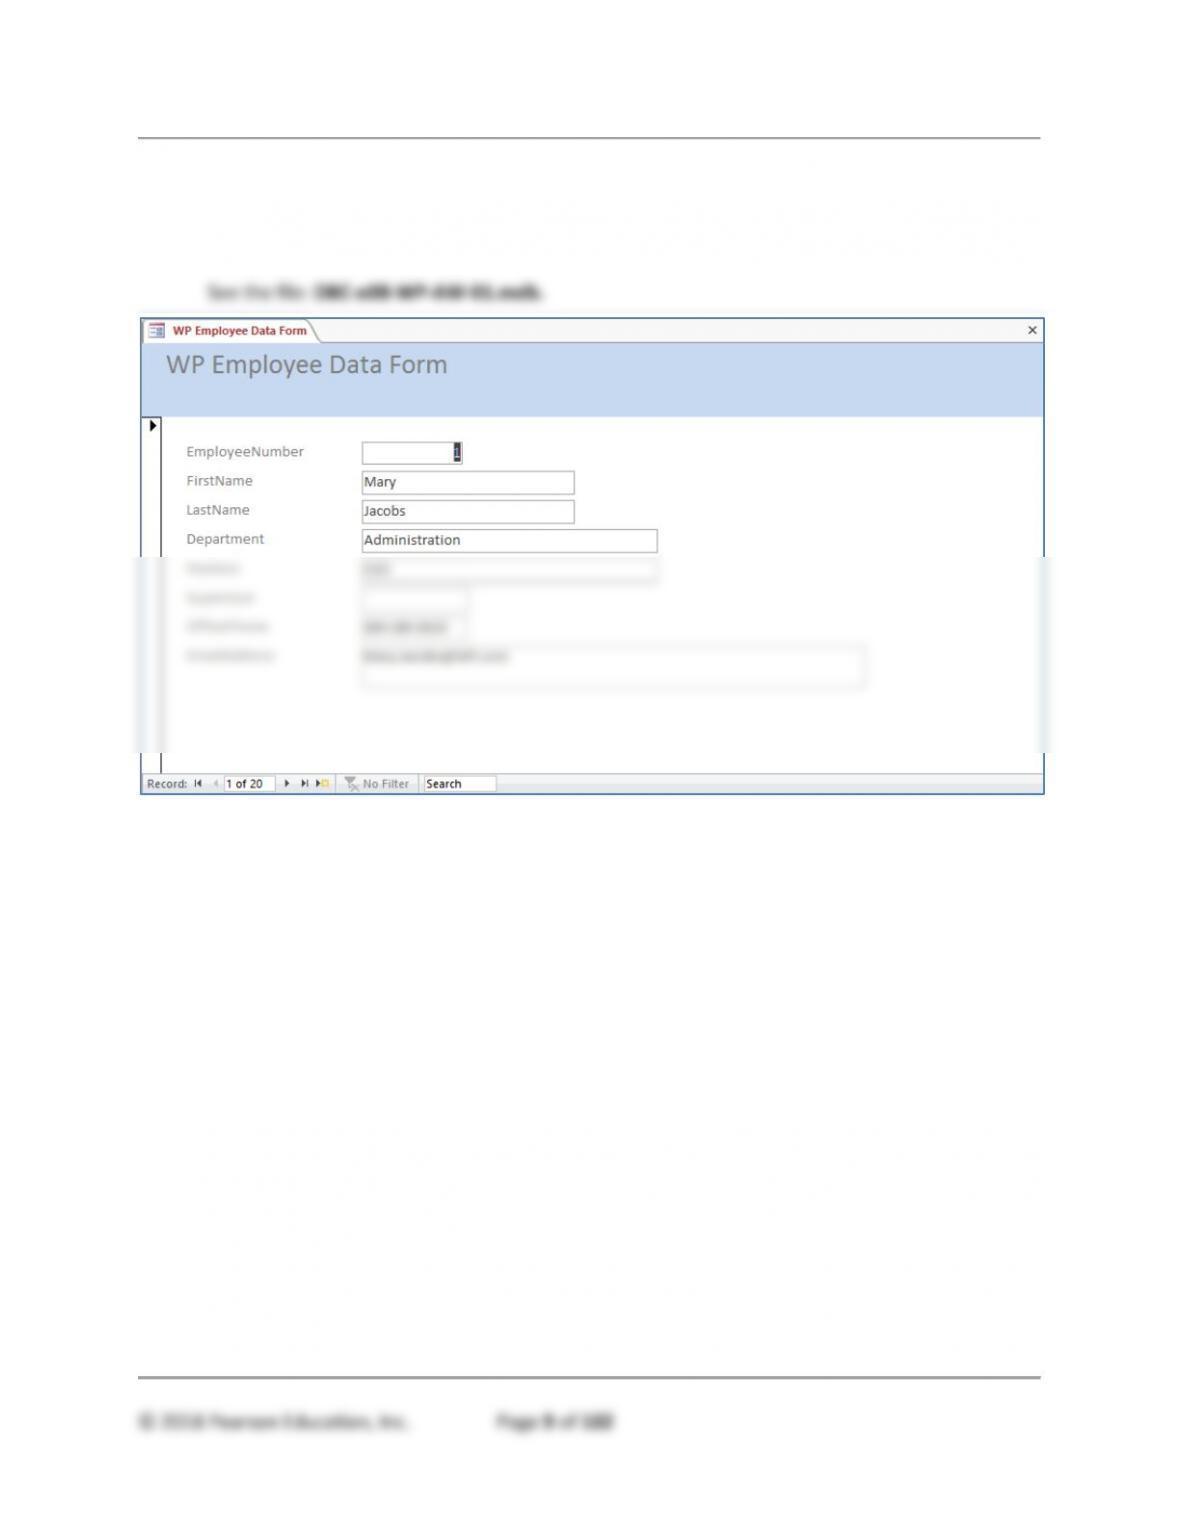
D. Create a data input form for the EMPLOYEE table and name it WP Employee Data
Form. Make any adjustments necessary to the form so that all data display properly.
Use this form to enter the rest of the data in the EMPLOYEE table shown in Figure 1-33
into your EMPLOYEE table.
All Sections – The Access Workbench
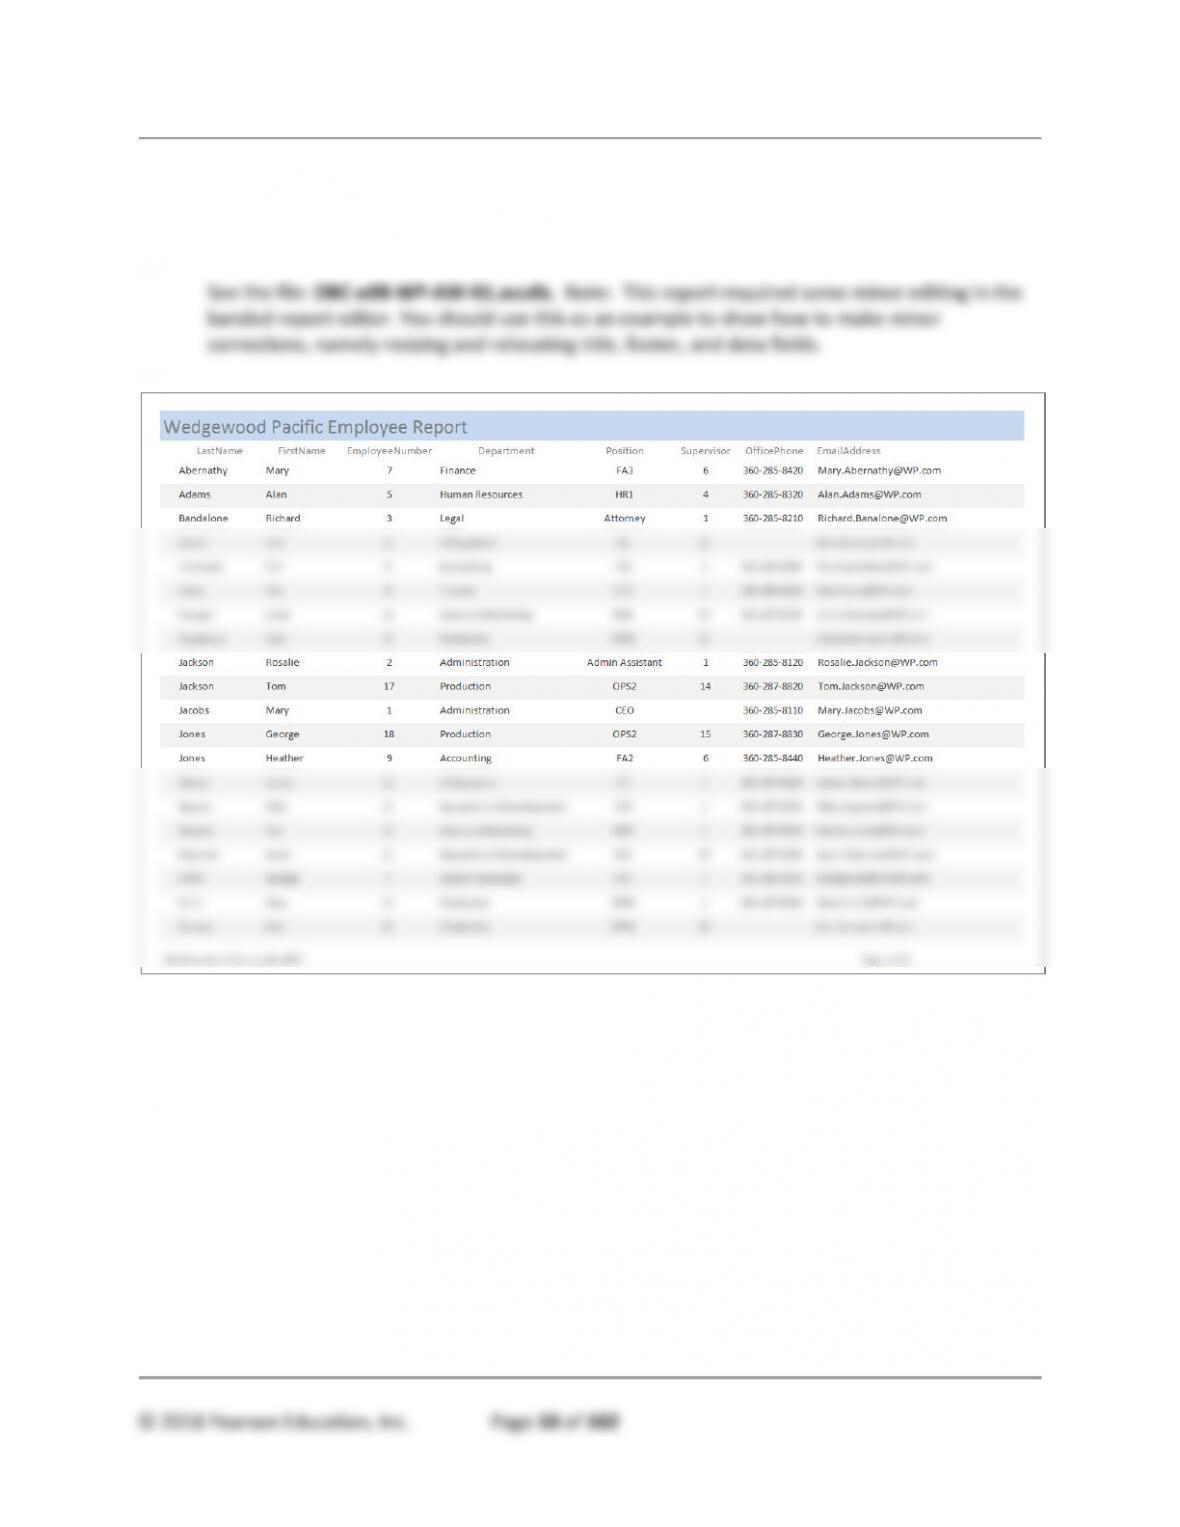
E. Create a report named Wedgewood Pacific Employee Report that presents the data
contained in your EMPLOYEE table sorted first by employee last name and second by
employee first name. Make any adjustments necessary to the report so that all headings
and data display properly. Print out a copy of this report.
All Sections – The Access Workbench
SECTION TWO
CHAPTER OBJECTIVES
• Learn how to create relationships between Microsoft Access tables
CHAPTER ERRATA
• [21-FEB-2107] – For consistency with the data shown in Figure 3-12, the data in
Figure 2-28 should appear as shown here:
TEACHING SUGGESTIONS
• This section of “The Access Workbench” is the basic introduction to creating
relationships between tables. Demonstrate the Microsoft Access Relationship
window in class, and discuss each of the operations covered in the text.
• Make sure your students actually work through The Access Workbench steps before
attempting the Access Workbench Exercises.
• You may want to introduce the idea of cascading updates and deletes at this point.
Cascading updates definitely apply to the relationships between some tables in this
database because DepartmentName is a non-surrogate primary key. For example,
see question C below.
• The concept illustrated in question G is very important. Be sure your students
understand the proper order for populating primary keys and foreign keys.
All Sections – The Access Workbench
ANSWERS TO ACCESS WORKBENCH EXERCISES
In the “Access Workbench Exercises” in Chapter 1, we created a database for the Wedgewood
Pacific (WP) of Seattle, Washington, and created and populated the EMPLOYEE table. In this
exercise, we will build the rest of the tables needed for the database, create the referential
integrity constraints between them, and populate them.
The full set of normalized tables for the WP database is as follows:
The primary key of DEPARTMENT is DepartmentName, the primary key of EMPLOYEE is
EmployeeNumber, and the primary key of PROJECT is ProjectID. Note that the EMPLOYEE
table is the same as the table we have created, except that Department is now a foreign key. In
The referential integrity constraints are:
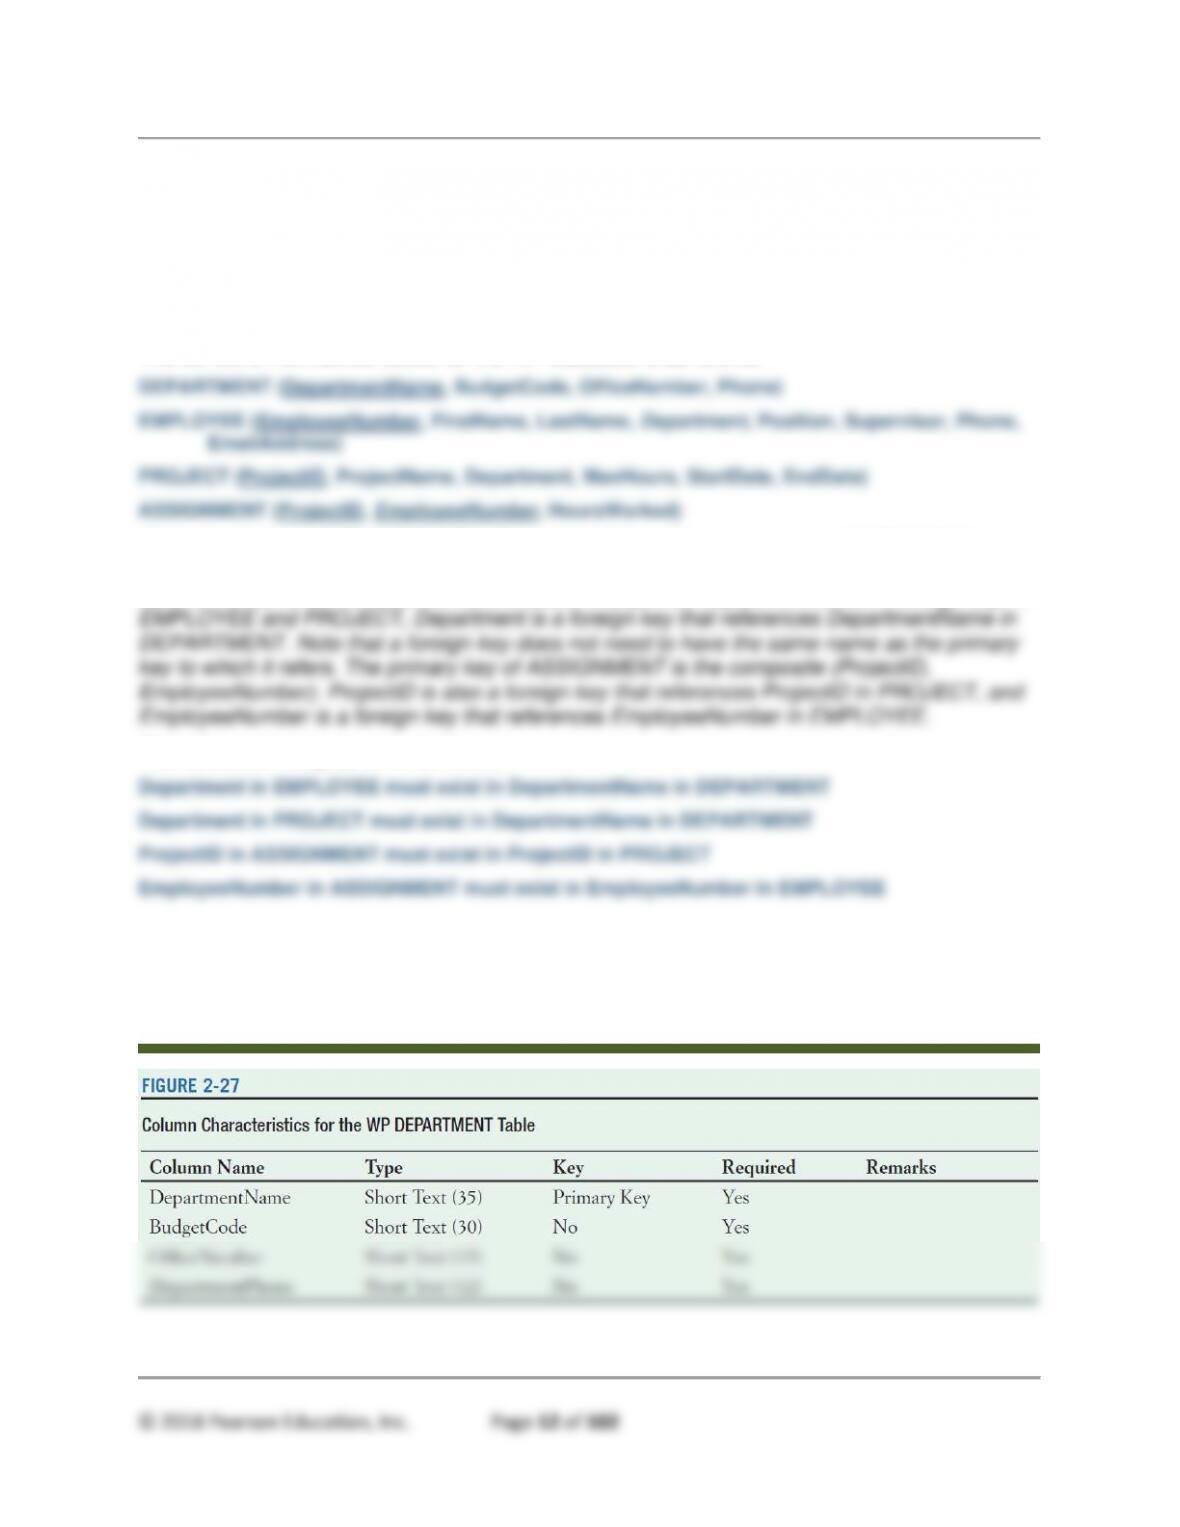
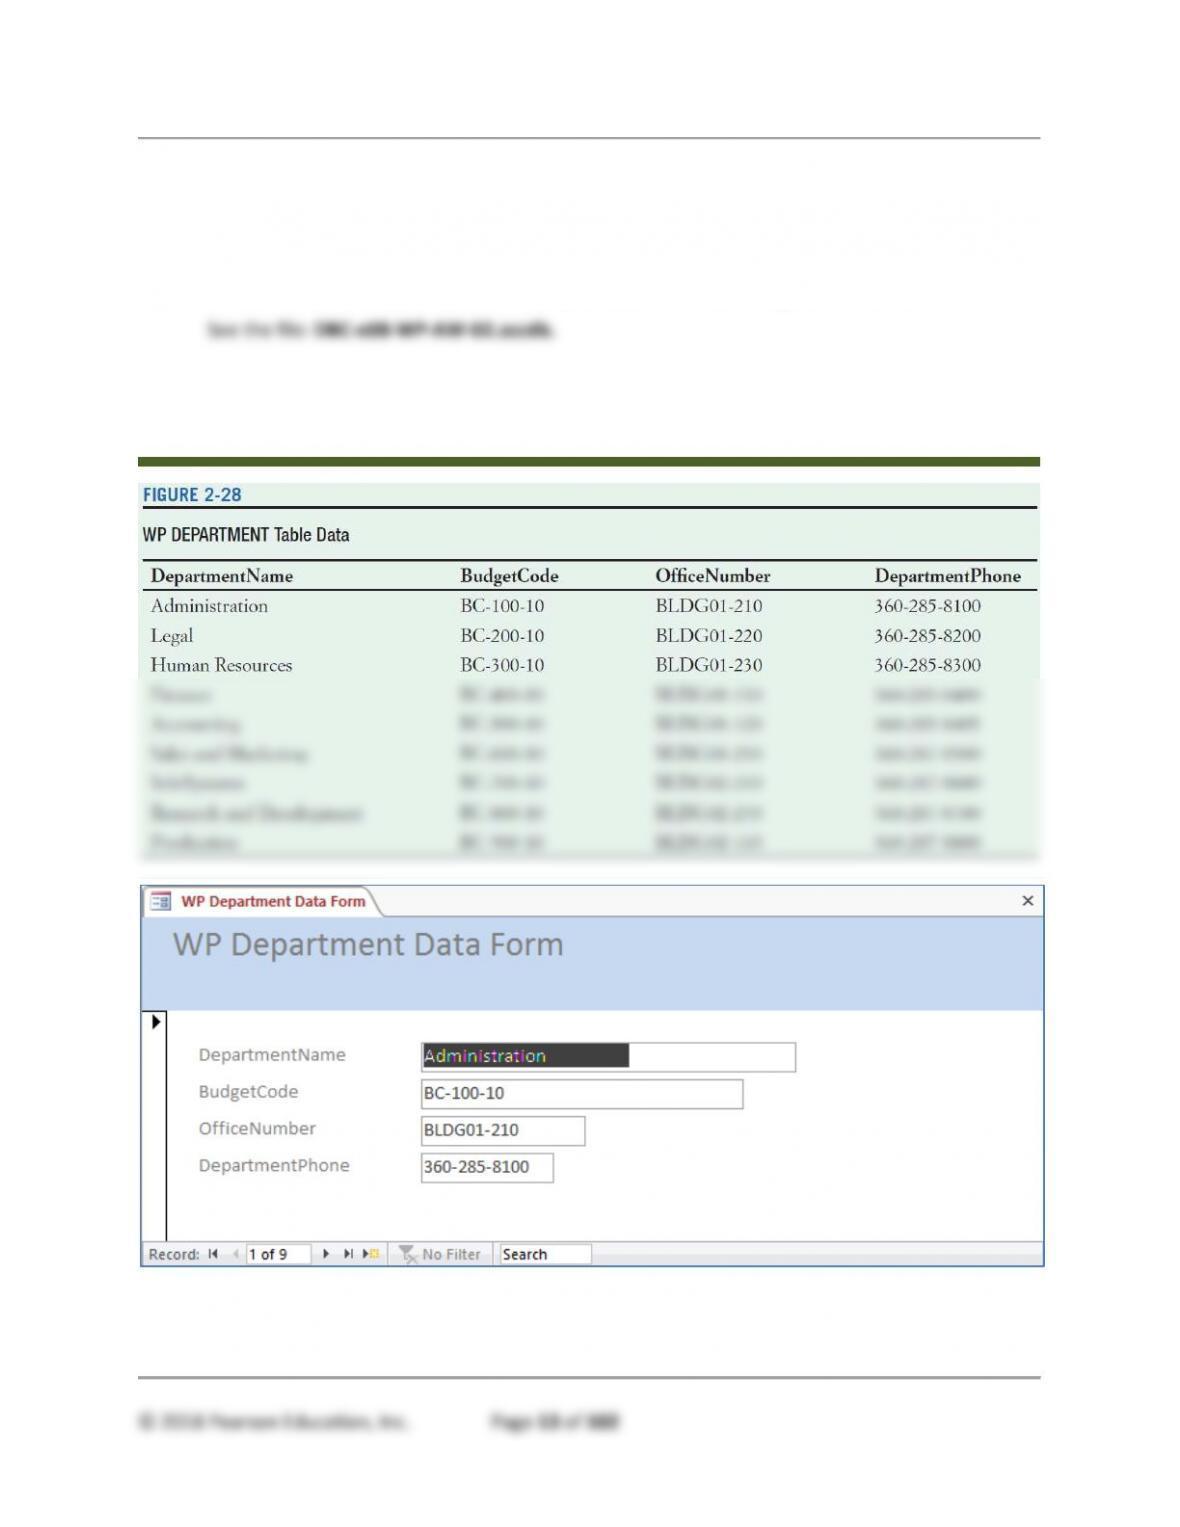
A. Figure 2-27 shows the column characteristics for the WP DEPARTMENT table. Using
the column characteristics, create the DEPARTMENT table in the WP.accdb database.
See the file: DBC-e08-WP–AW-02.accdb.
All Sections – The Access Workbench
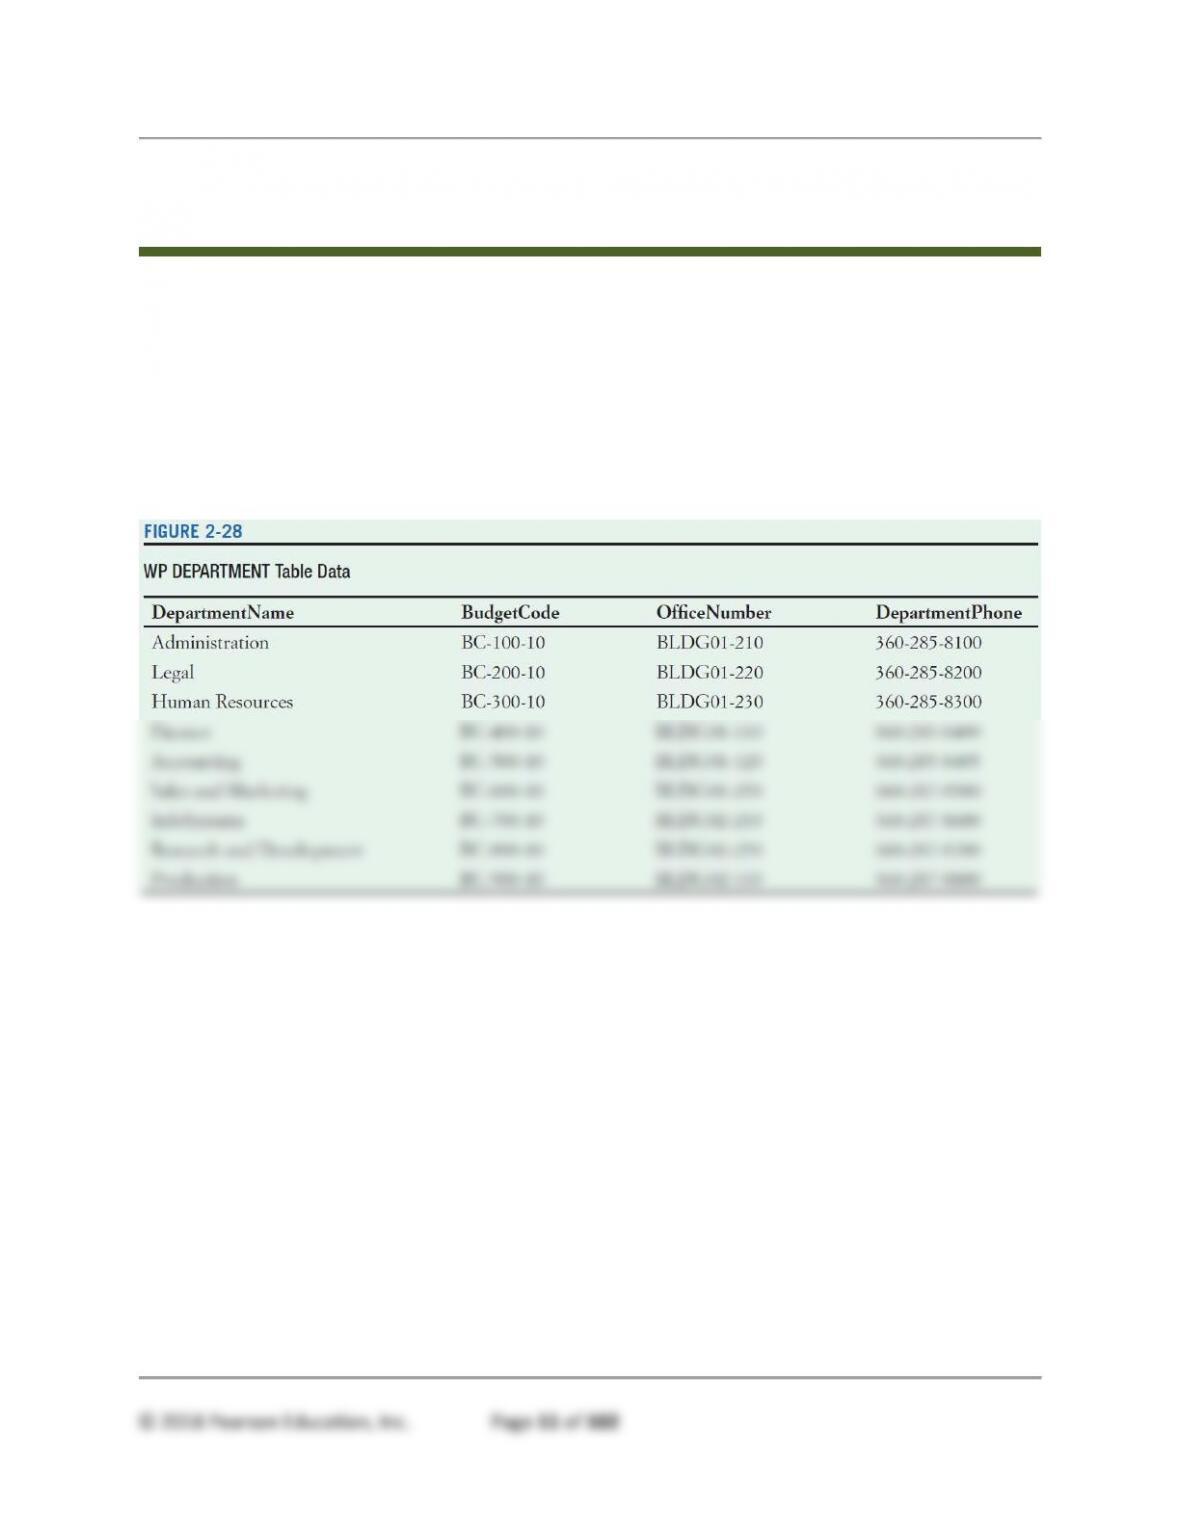
B. For the DEPARTMENT table, create a data input form named WP Department Data
Form. Make any necessary adjustments to the form so that all data displays properly.
Use this form to enter into your department table the data in the DEPARTMENT table
shown in Figure 2-28.
See the Errata item about the corrected data values as shown in Figure 2-28 below.
All Sections – The Access Workbench
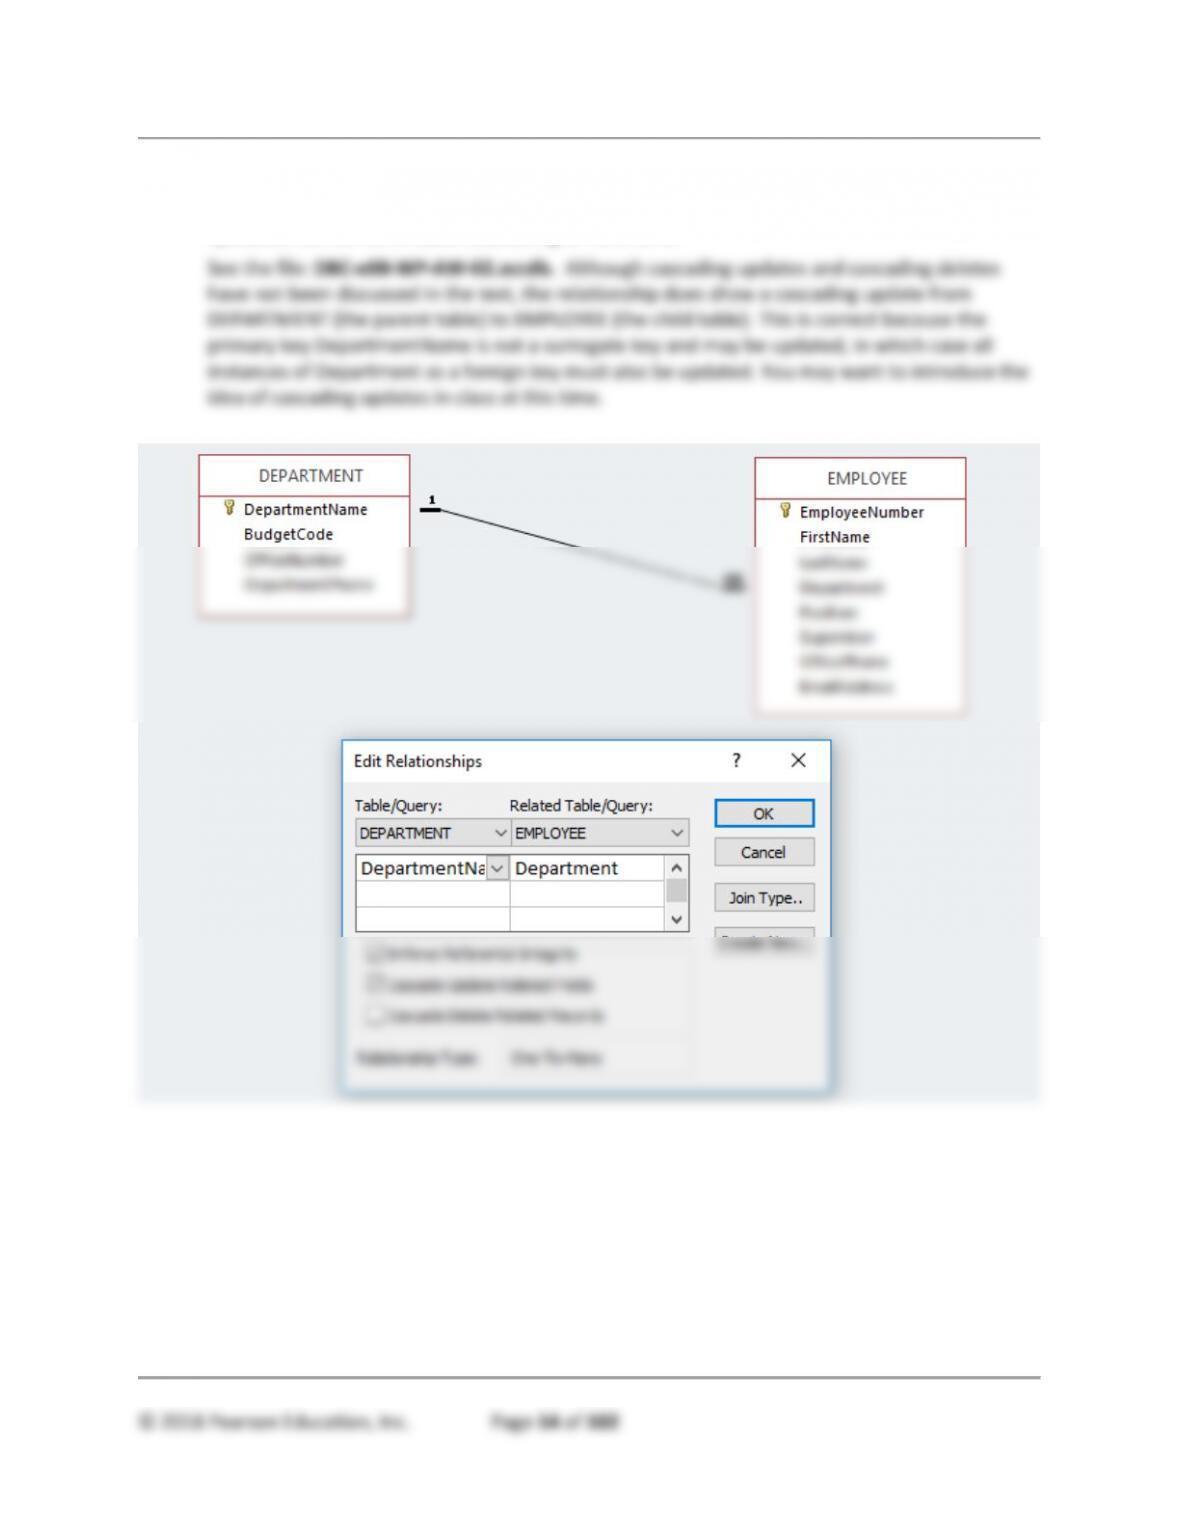
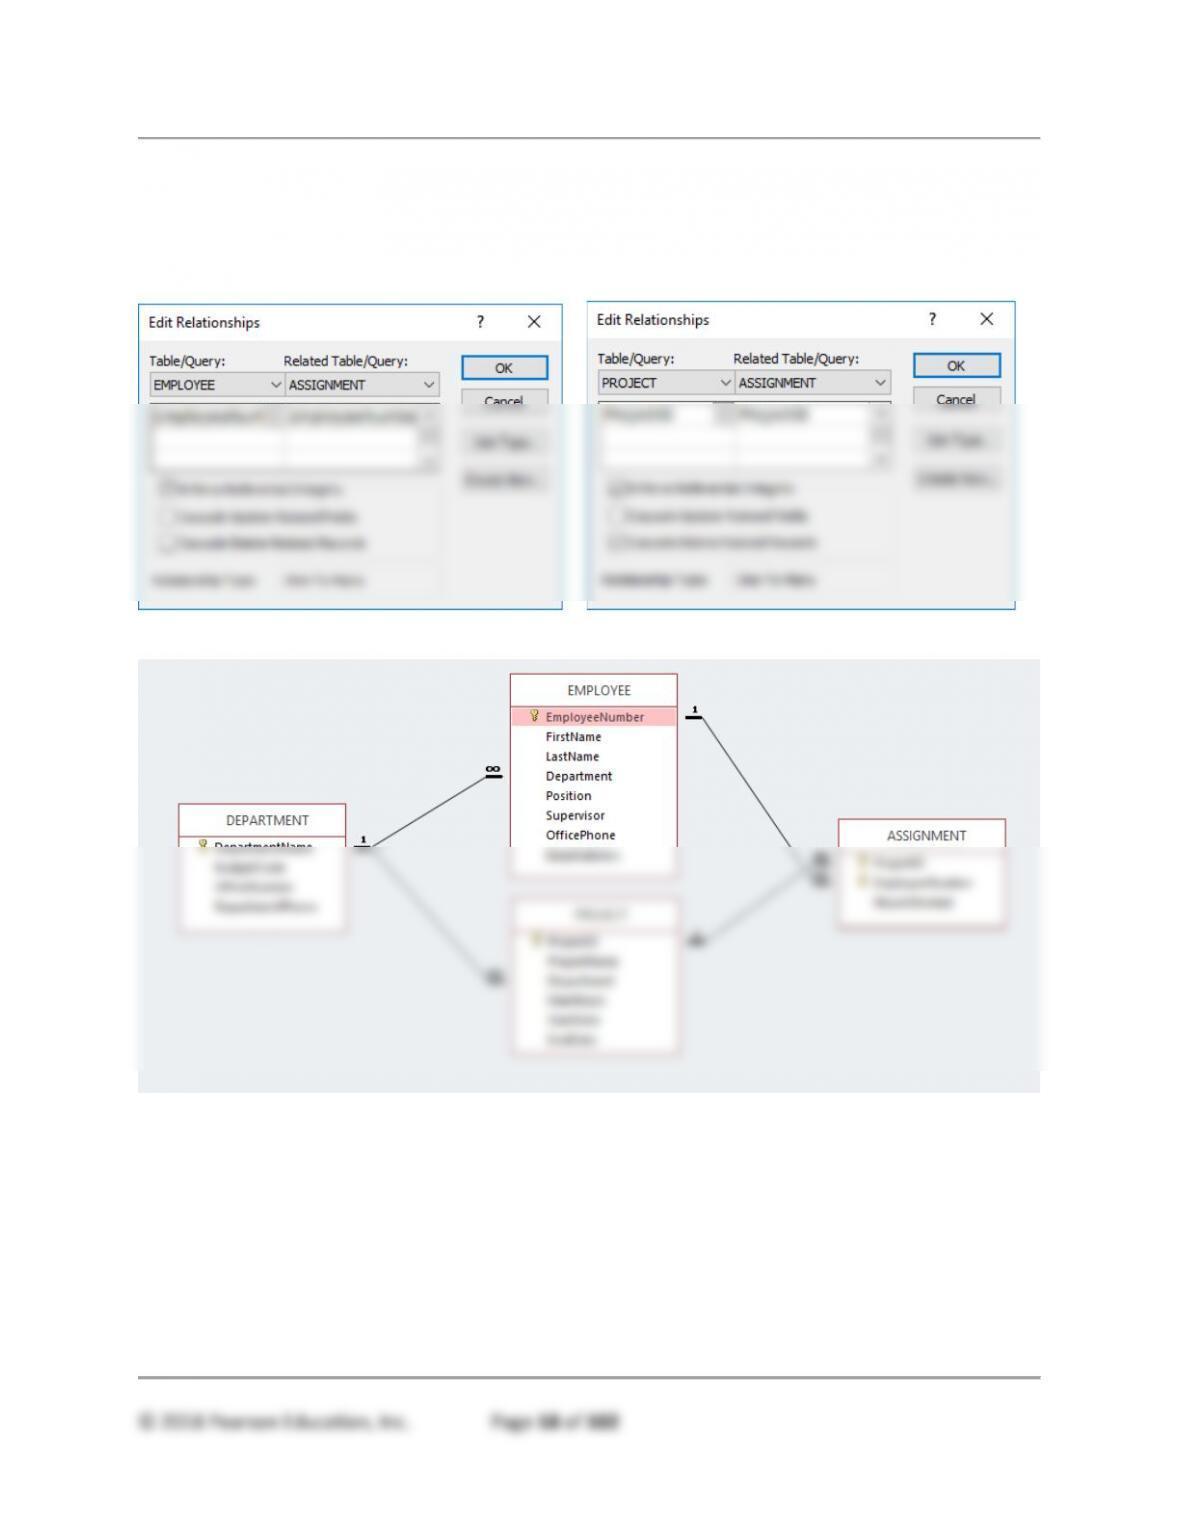
C. Create the relationship and referential integrity constraint between DEPARTMENT and
EMPLOYEE. Enable enforcing of referential integrity and enable cascading of data
updates, but do not enable cascading of deletions.
All Sections – The Access Workbench
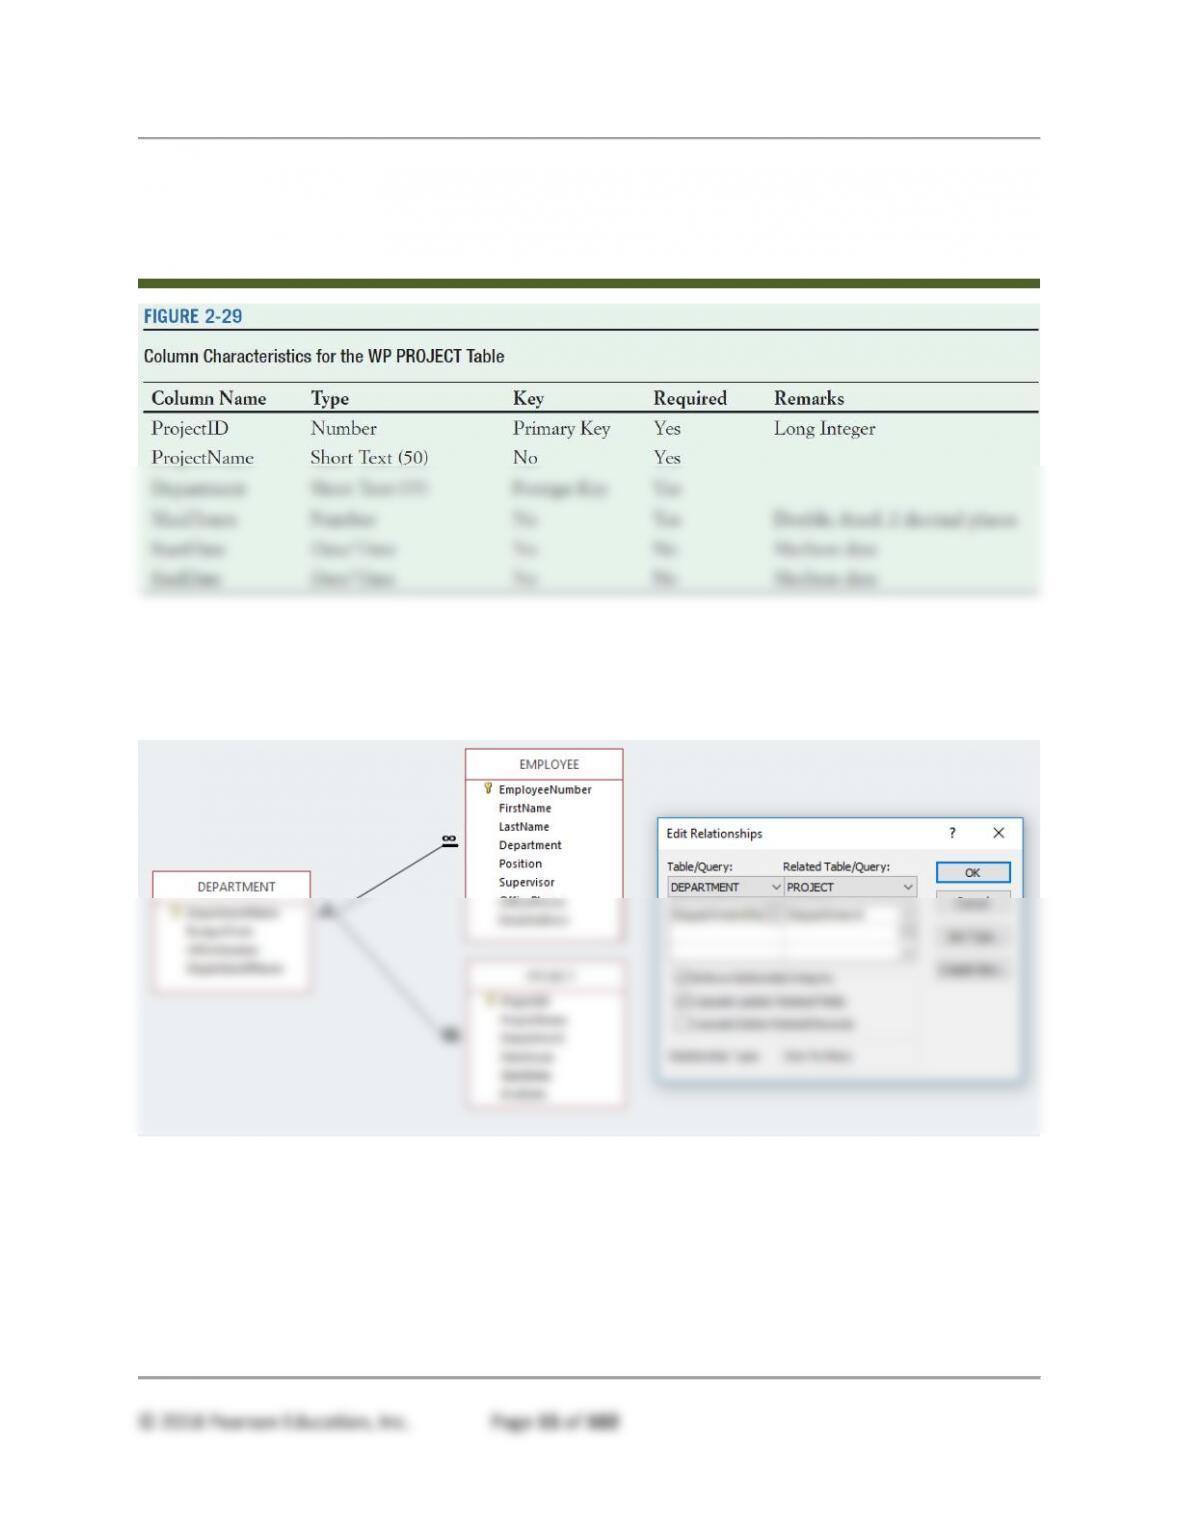
D. Figure 2-29 shows the column characteristics for the WP PROJECT table. Using the
column characteristics, create the PROJECT table in the WP.accdb database.
See the file: DBC-e08-WP–AW-02.accdb.
E. Create the relationship and referential integrity constraint between
DEPARTMENT and PROJECT. Enable enforcing of referential integrity and
enable cascading of data updates, but do not enable cascading of deletions.
All Sections – The Access Workbench
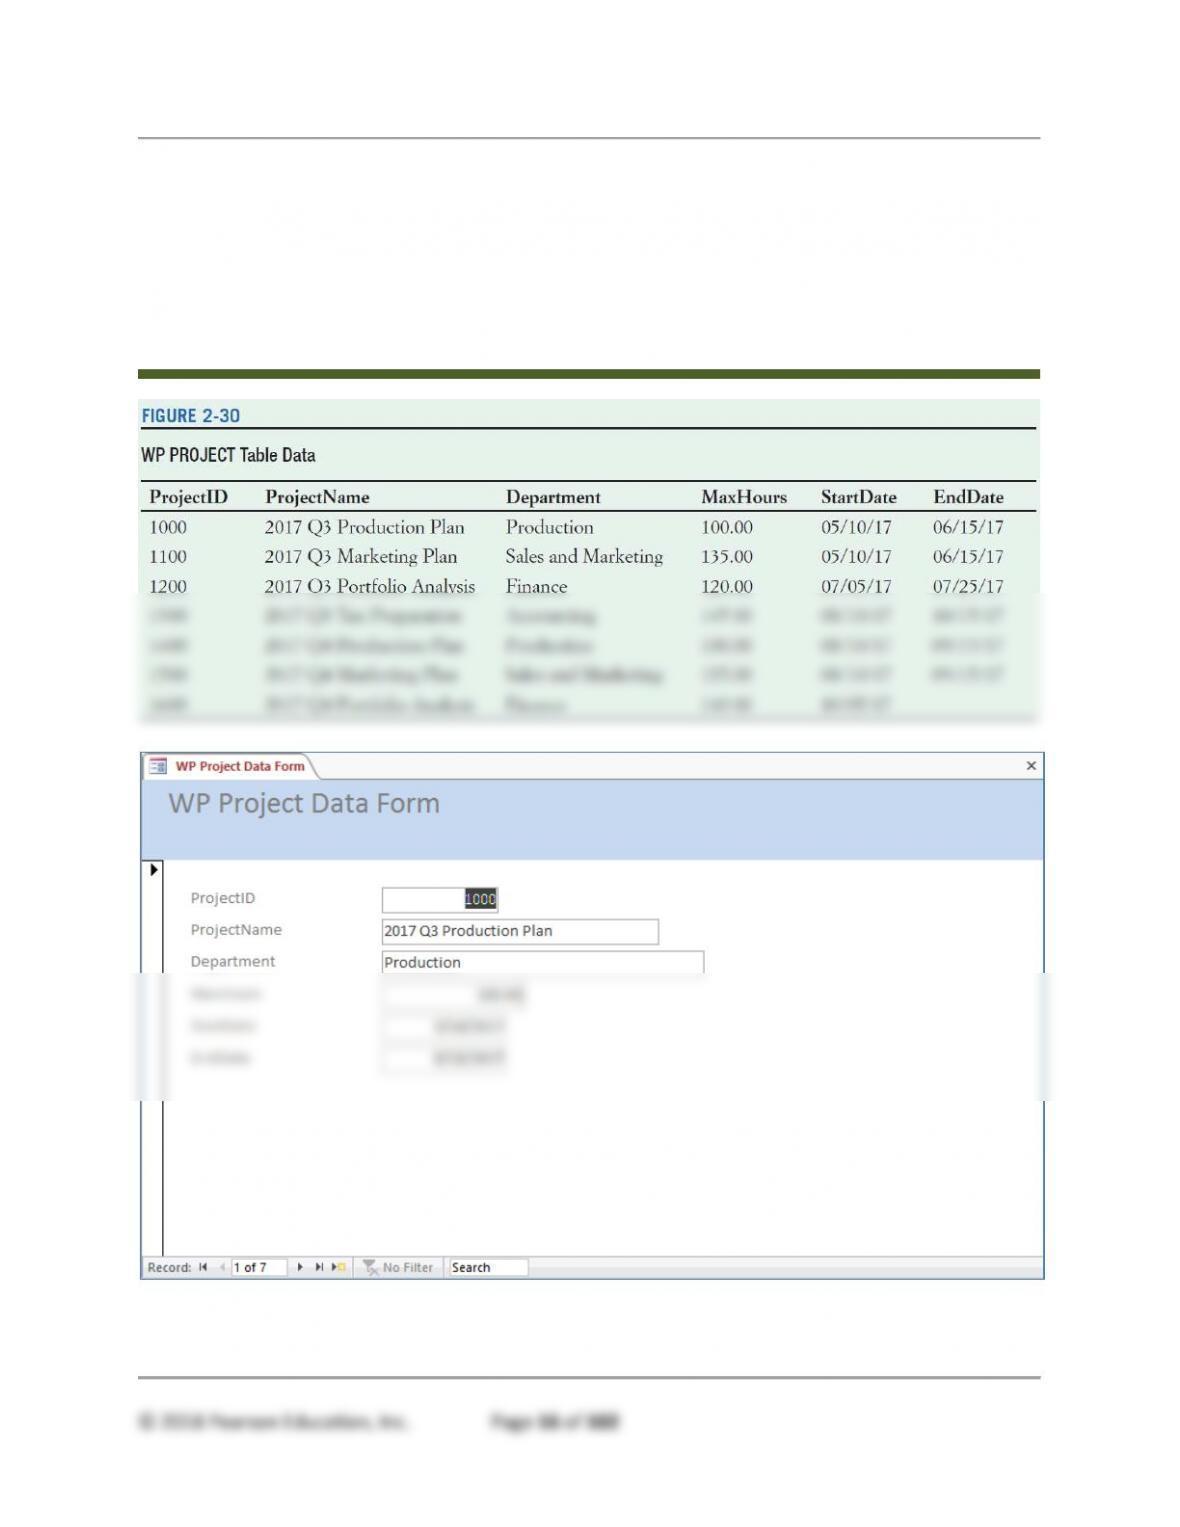
F. For the PROJECT table, create a data input form named WP Project Data Form. Make
any necessary adjustments to the form so that all data display properly. Use this form to
enter into your PROJECT table the data in the PROJECT table shown in Figure 2-30.
All Sections – The Access Workbench
G. When creating and populating the DEPARTMENT table, the data were entered into the
table before the referential integrity constraint with EMPLOYEE was created, but when
creating and populating the PROJECT table, the referential integrity constraint was
created before the data were entered. Why did the order of the steps differ? Which order
is normally the correct order to use?
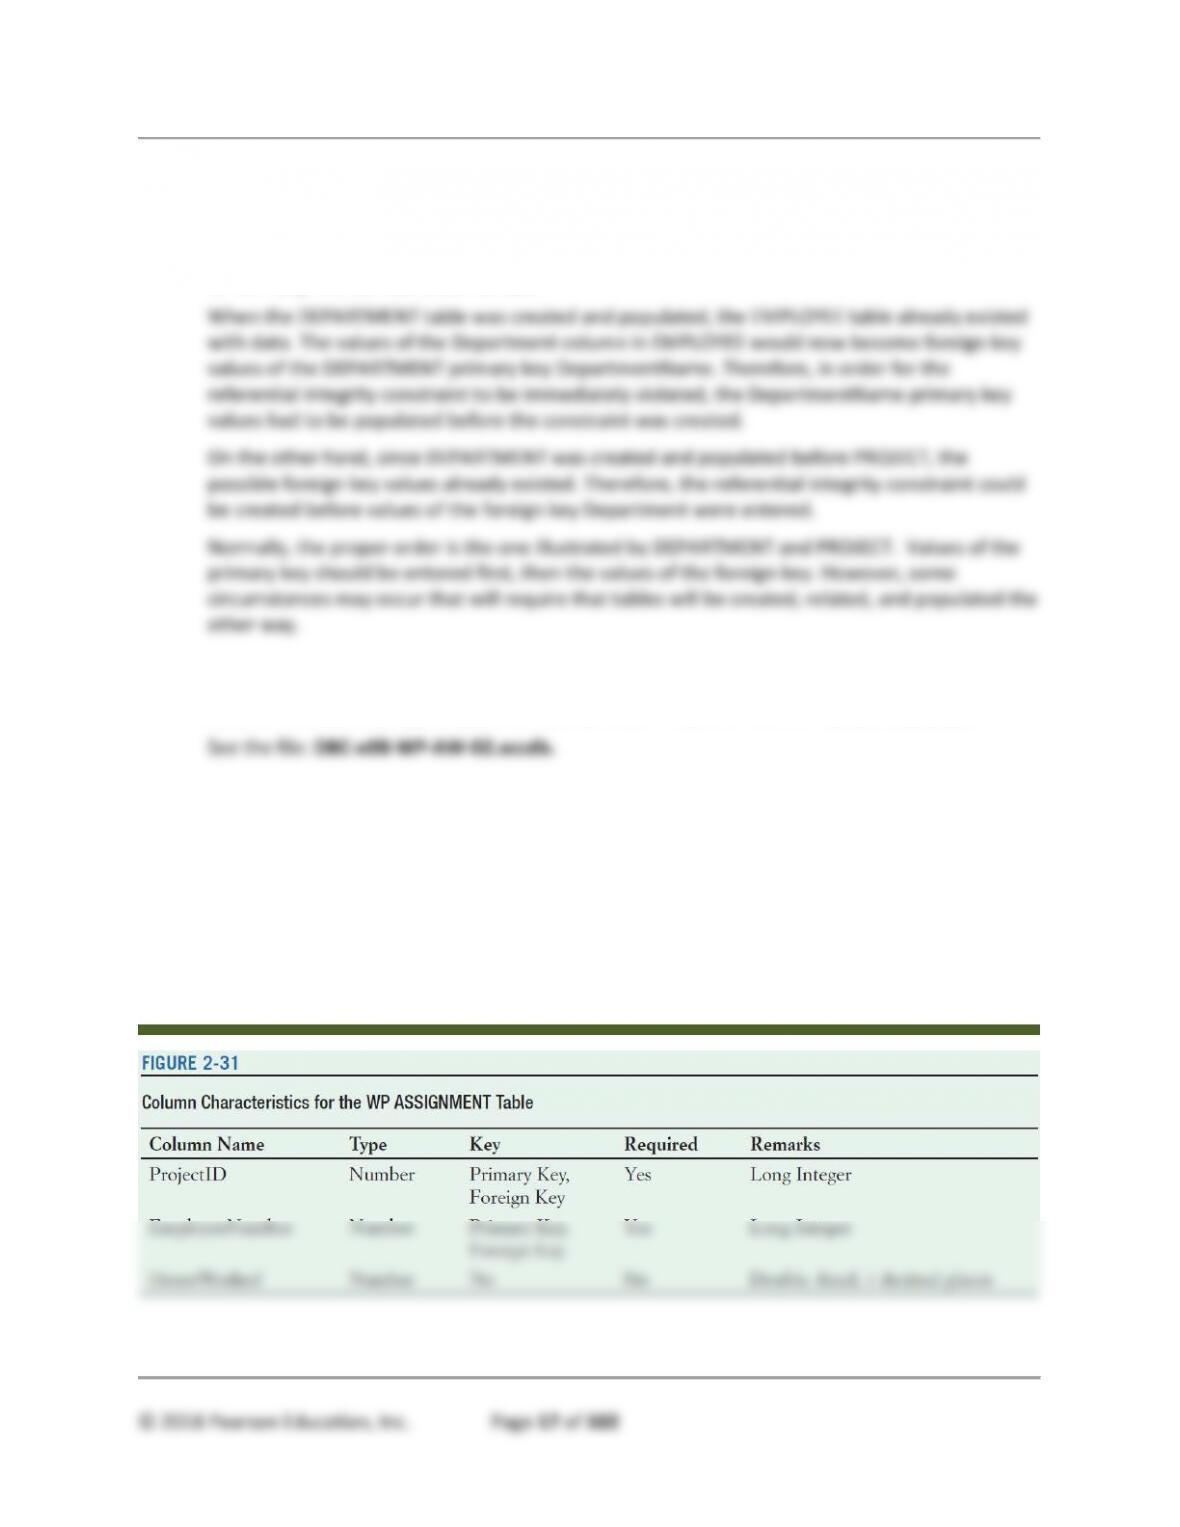
H. Figure 2-31 shows the column characteristics for the WP ASSIGNMENT table. Using the
column characteristics, create the ASSIGNMENT table in the WP.accdb database.
All Sections – The Access Workbench
I. Create the relationship and referential integrity constraint between ASSIGNMENT and
PROJECT, and between ASSIGNMENT and EMPLOYEE. When creating both relations,
enable enforcing of referential integrity, but do not enable cascading of data updates or
cascading of data from deleted records.
All Sections – The Access Workbench
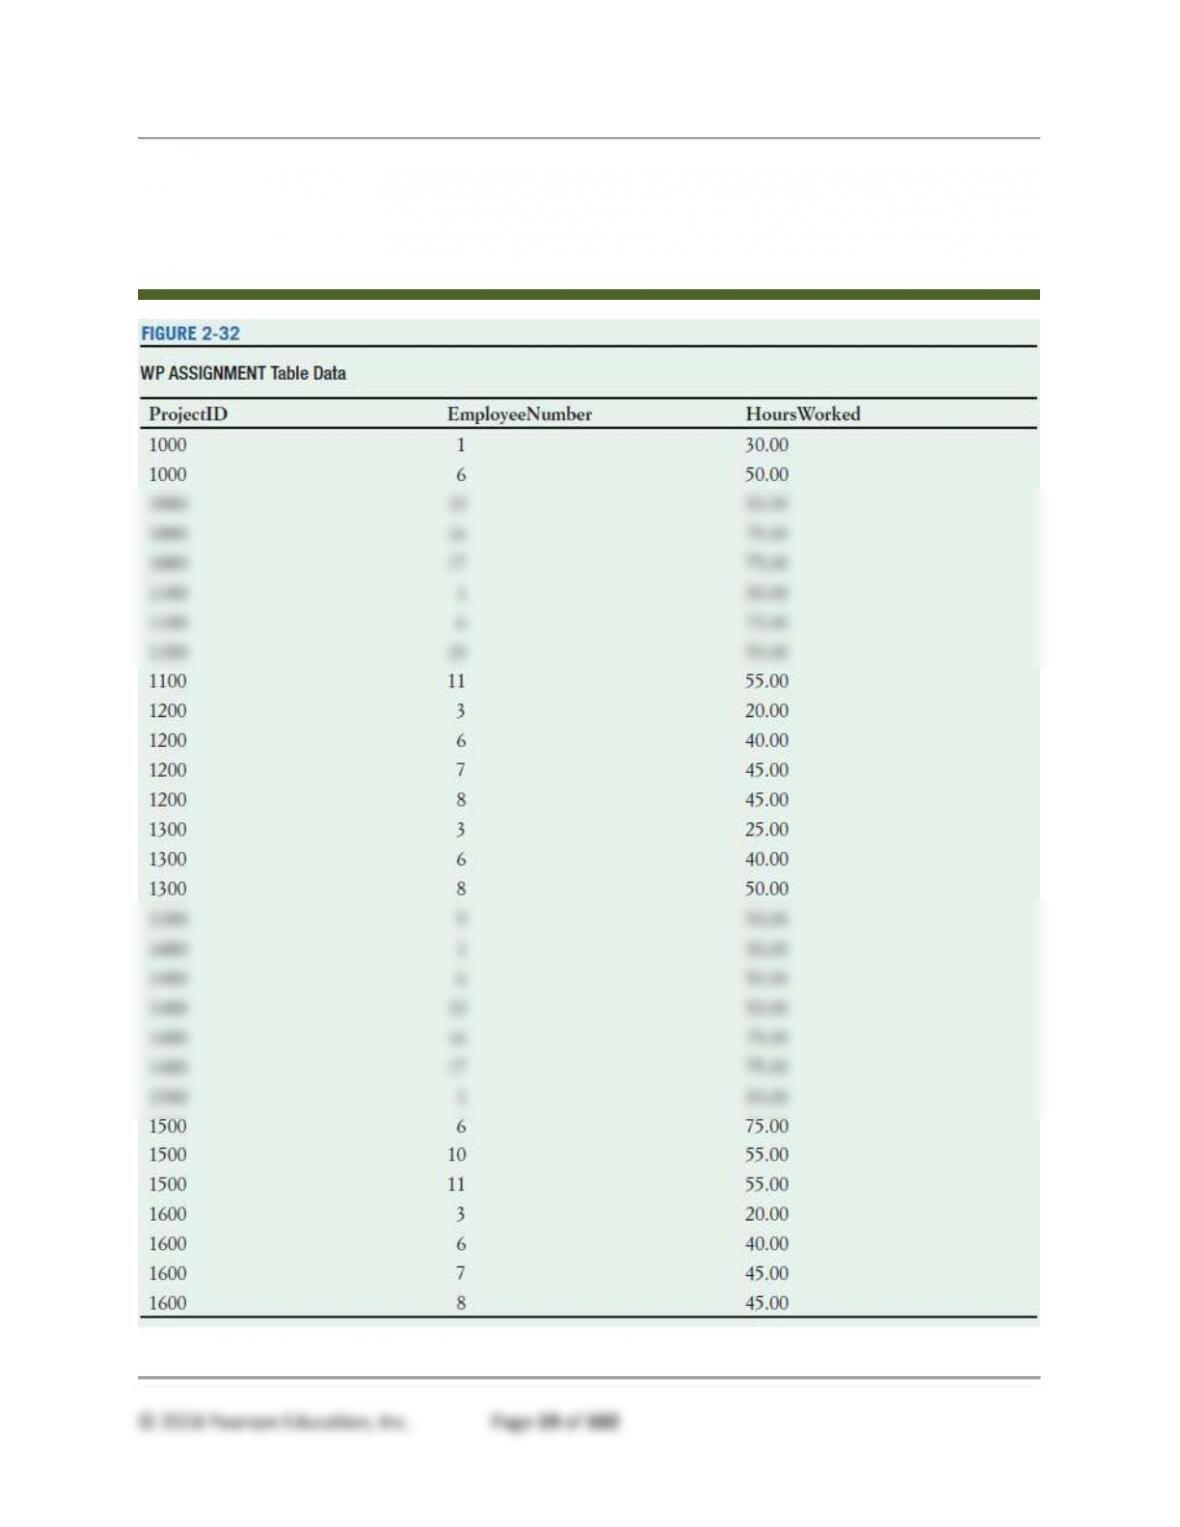
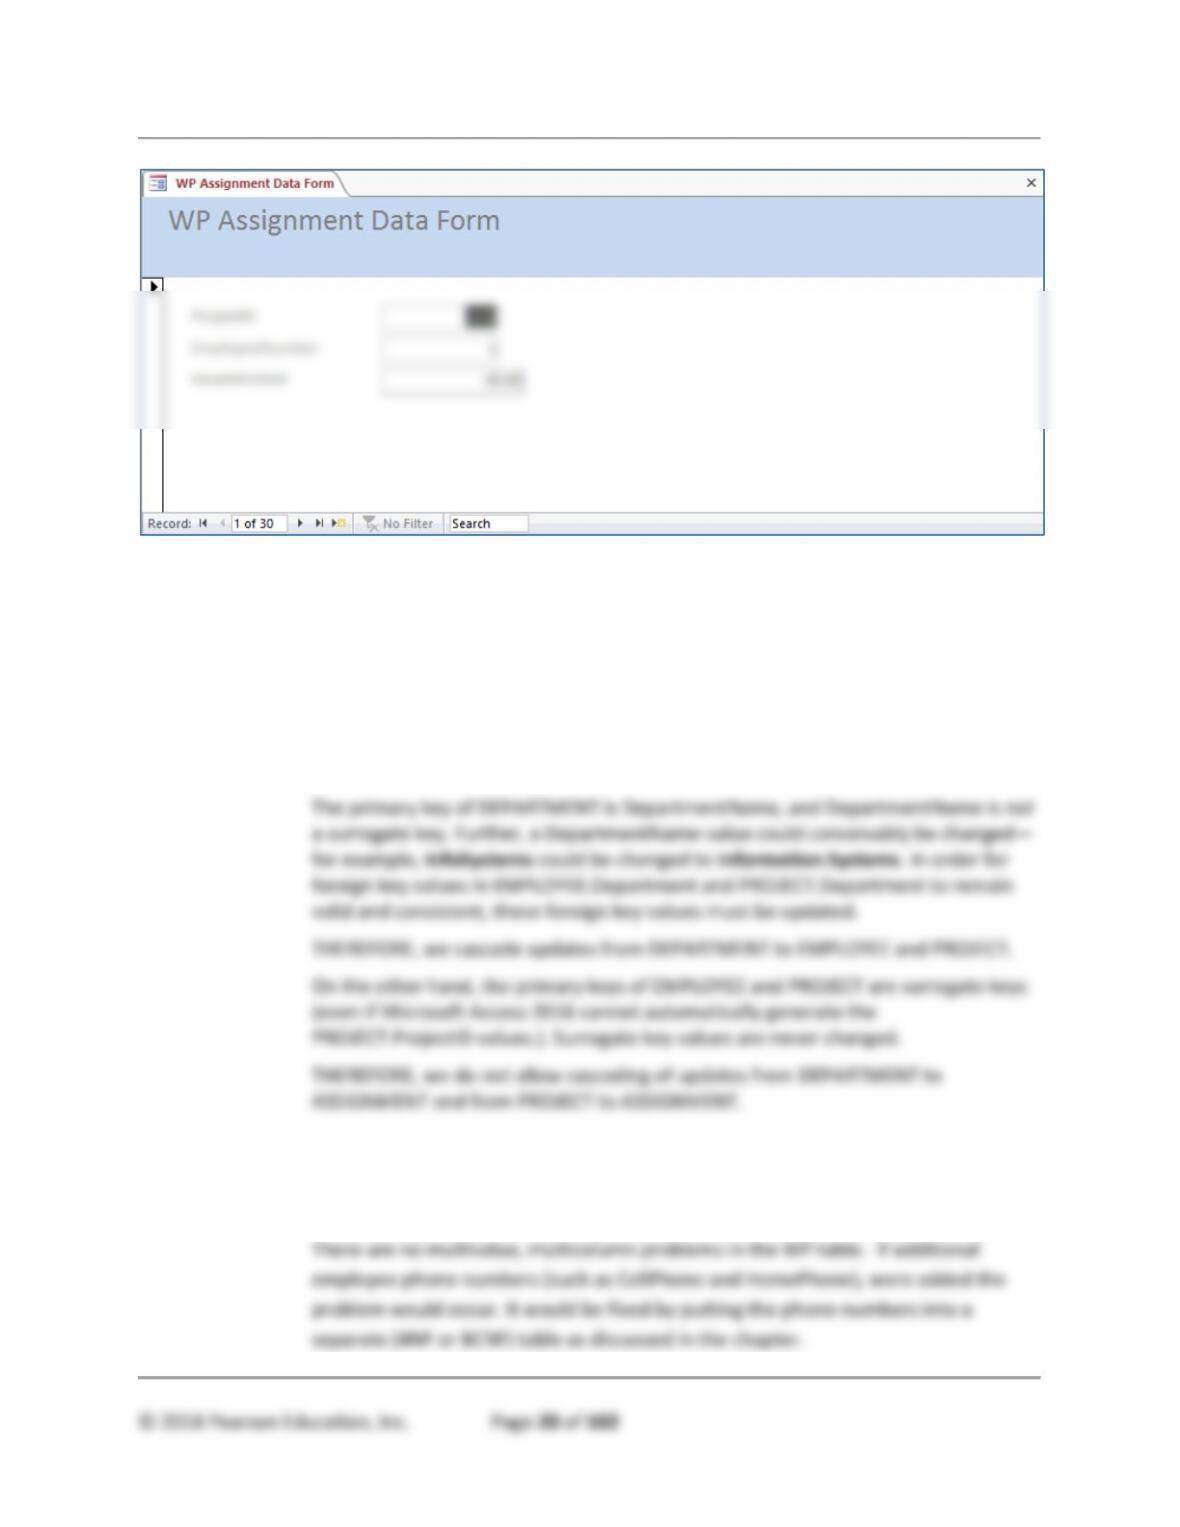
J. For the ASSIGNMENT table, create a data input form named WP Assignment Data
Form. Make any necessary adjustments to the form so that all data display properly. Use
this form to enter into your ASSIGNMENT table the data in the ASSIGNMENT table
shown in Figure 2-32.
All Sections – The Access Workbench
K. When creating the relationships between the database tables, we allowed the
cascading of data changes between some tables but not between others.
(Cascading means that changes to data in one table are also made to the
other table in the relationship.) The value of a primary key changes in this
case, and that change is then made in the values of the matching foreign key.
Why did we enable cascading of related field values between (1)
DEPARTMENT and EMPLOYEE and (2) DEPARTMENT and PROJECT but
not for (3) EMPLOYEE and ASSIGNMENT and (4) PROJECT and
ASSIGNMENT?
L. Does the multivalue, multicolumn problem exist in the current set of WP
tables? If so, how would you fix it? If not, what modifications to the
EMPLOYEE table would create the problem, and how you then fix this
problem?