
21
Exercise 5
Tool Operation and
Construction Techniques
OBJECTIVE
The objective of this exercise is to review proper exca-
vation tool operation and basic piping and carpentry
techniques.
Serious injury or death could result from
improper use of construction equipment. Read
and follow manufacturer’s instructions with
TEXTBOOK REFERENCE
Information related to this activity can be found in the
Landscape Construction textbook in Chapter 7, Basic
Construction Techniques and Equipment Operation.
INTRODUCTION
Landscape construction requires that the contractor
basic construction techniques are outlined in this
exercise.
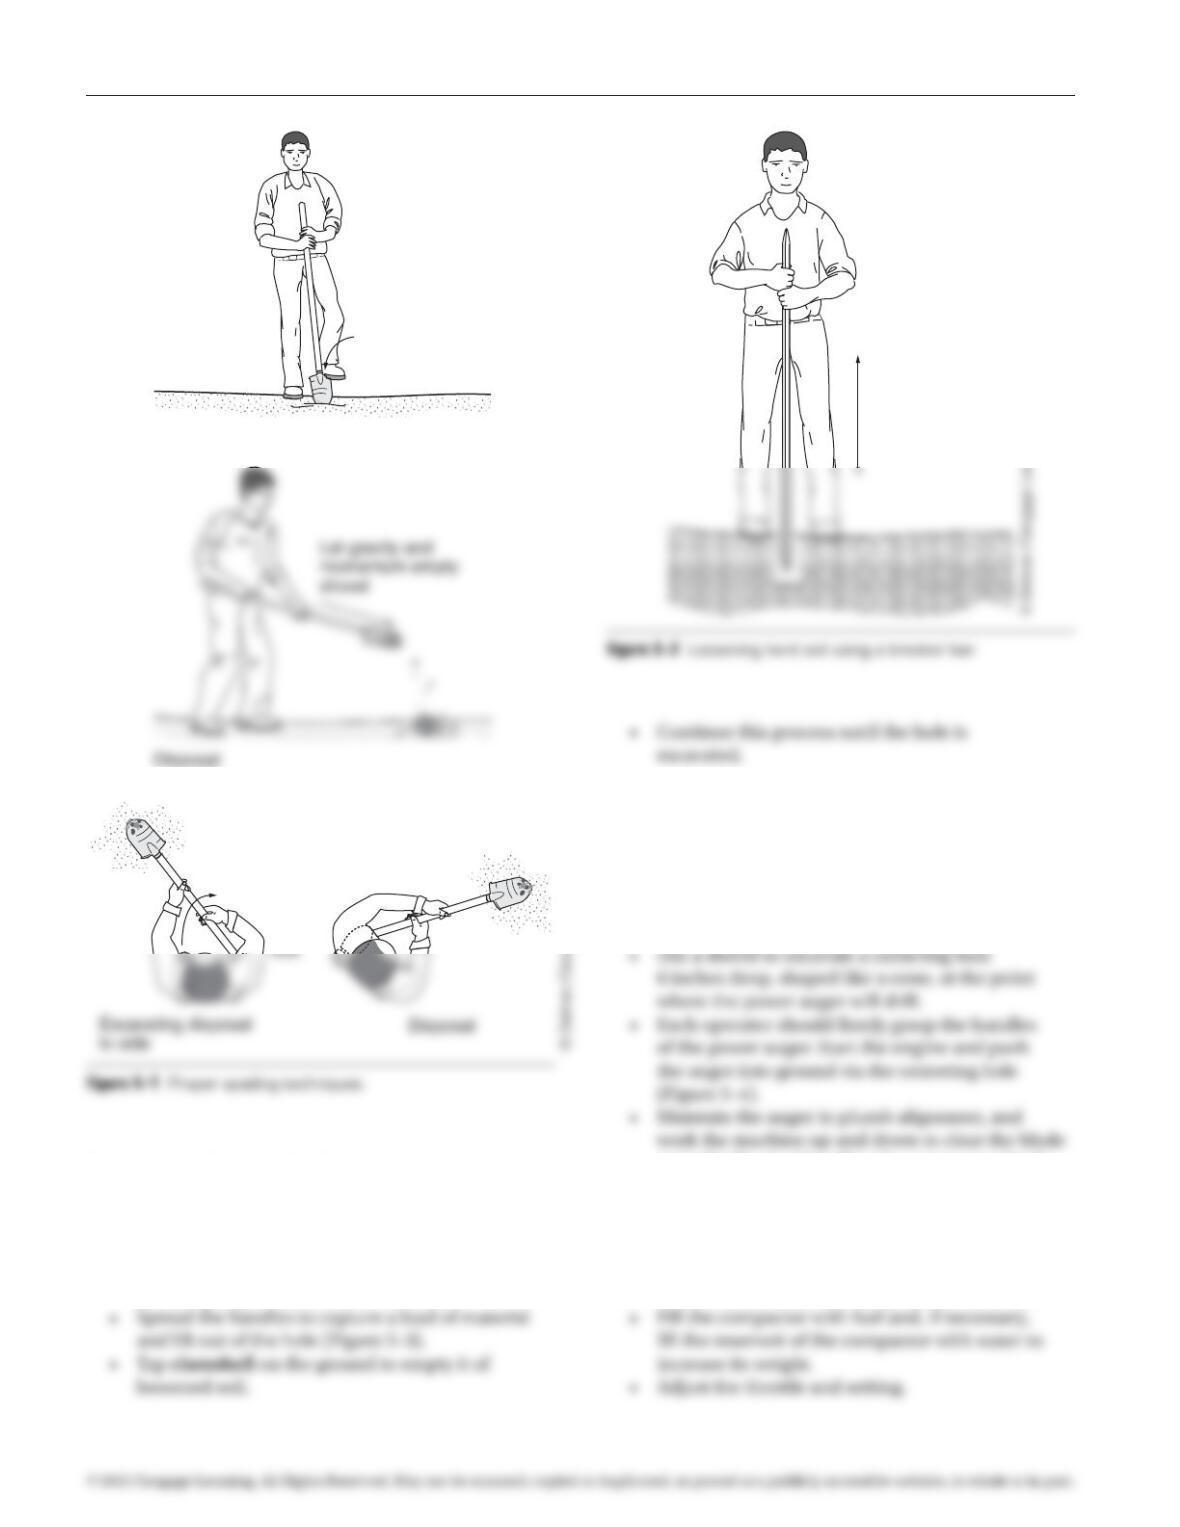
Steps for Excavating with a Shovel
• Select the proper shovel.
• Position the shovel with the blade perpendicular
to the ground. When trenching, turn the blade at a
45 degree angle to the side of the trench.
Steps for Excavating with a
Breaker Bar
• Lift and thrust breaker bar downward onto hard
soil (Figure 5–2).
• Break apart large sections of earth, then excavate
using a shovel or posthole excavator.
Steps for Posthole Excavation Using
an Auger
• Position the auger over the hole location and turn
it until the auger is full (Figure 5–3).
97171_05_ch05_p021-030.indd 21 14/06/10 8:41 PM
22 Exercise 5 Tool Operation and Construction Techniques
Steps for Posthole Excavation Using
a Clamshell
• Hold the handles together and drive the blades
into the ground at the hole location by dropping or
thrusting the tool downward with the arms. Avoid
pinching fingers between the handles.
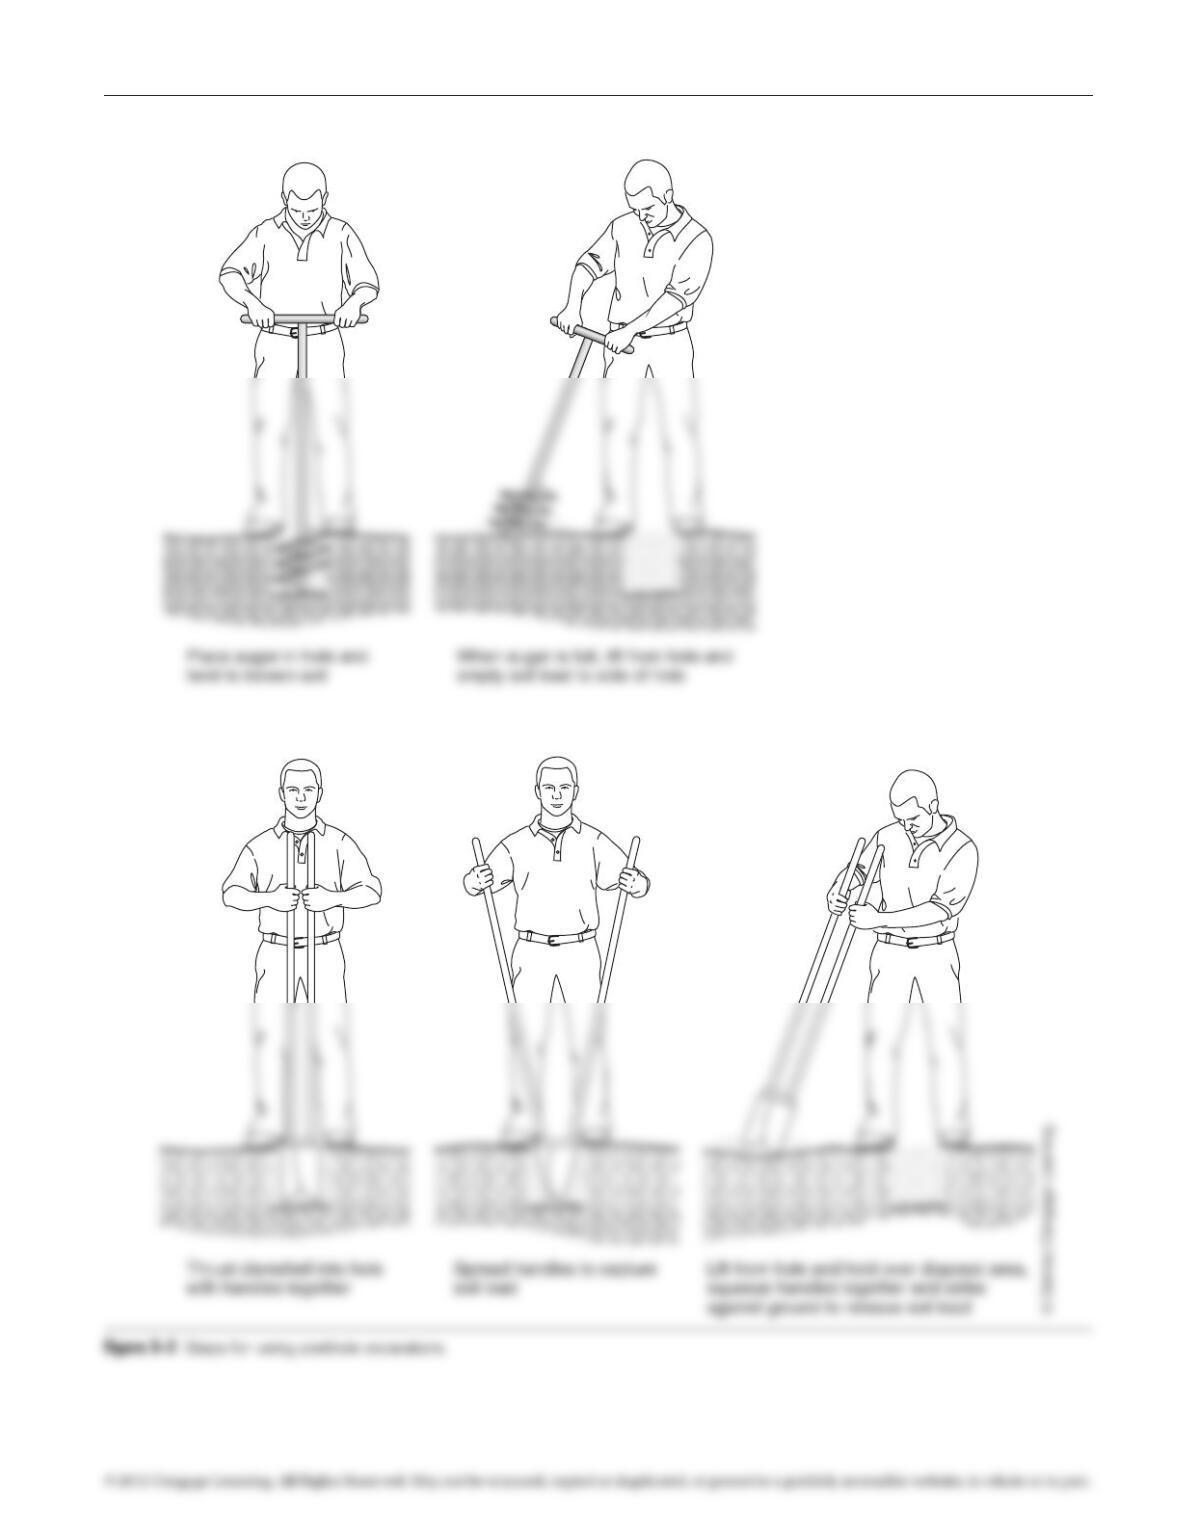
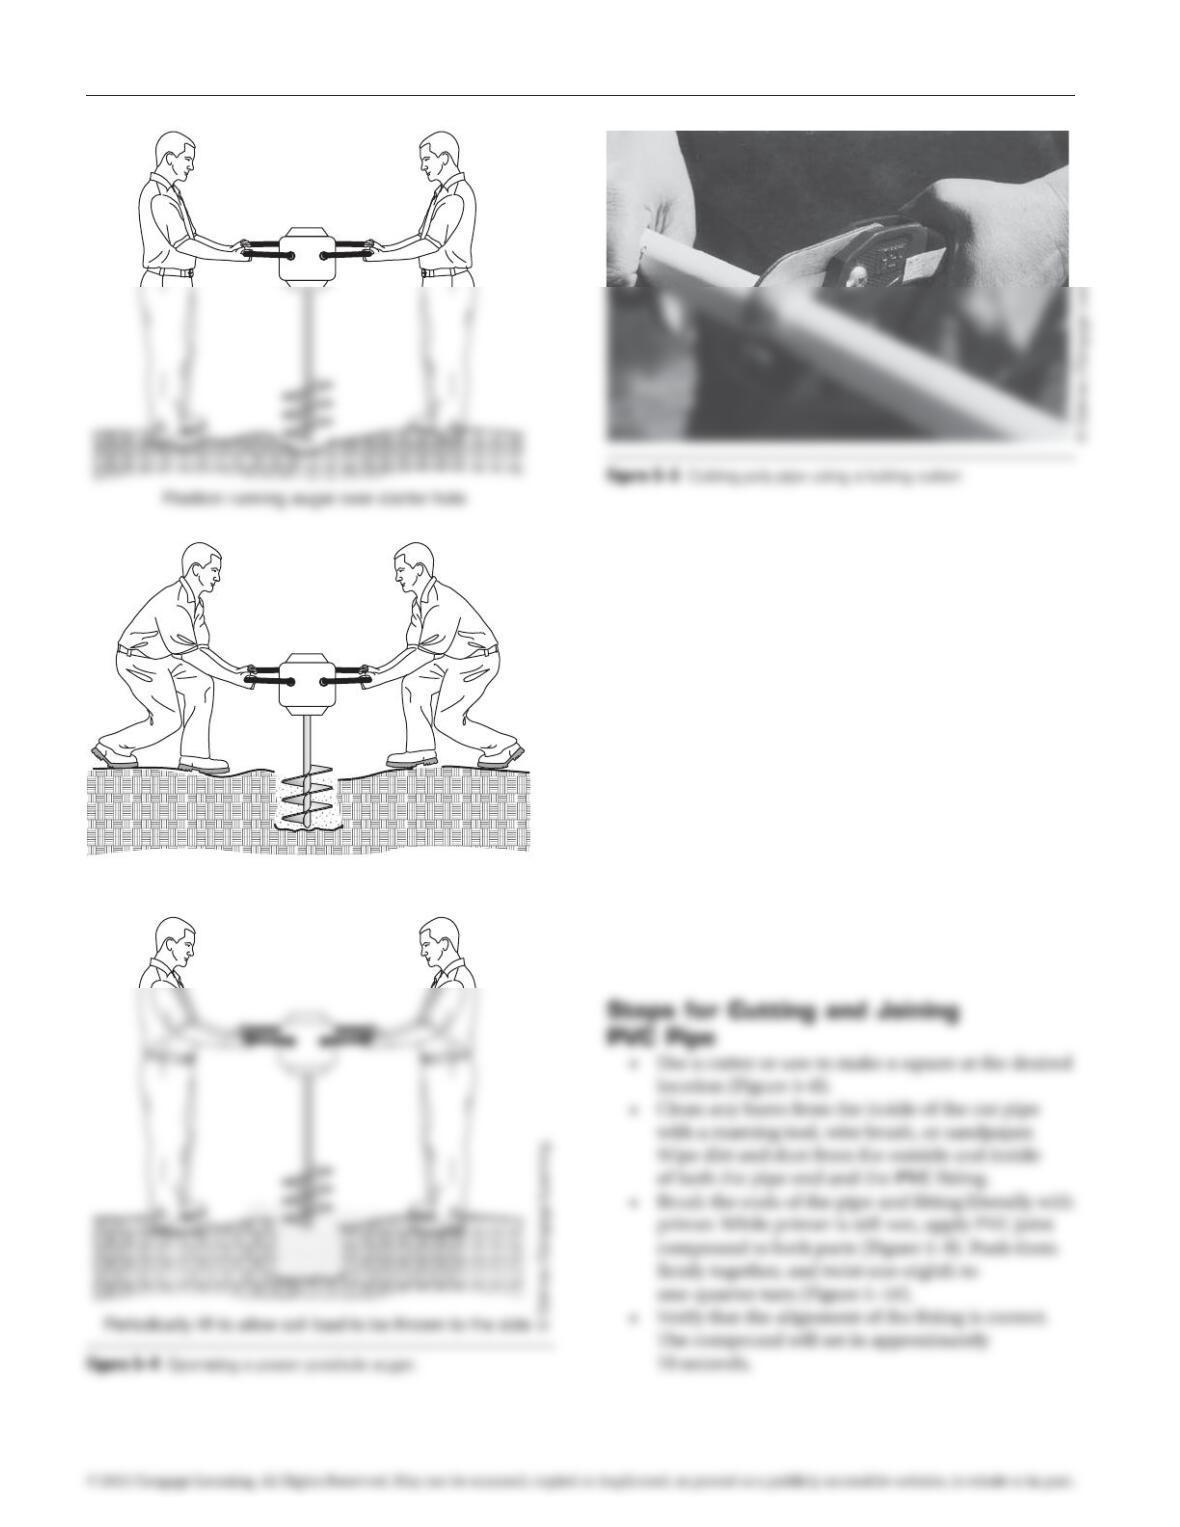
Steps for Excavating with a Power
Auger
• Ensure that two people are present to operate the
power auger.
• Clear the area around the hole of all unnecessary
objects.
periodically. Avoid pulling the auger completely
out of the hole.
Steps for Compacting Materials
with a Vibratory Plate Compactor
• With assistance, set the compactor on the site.
Pivot
Excavating
Instep
Pivot rather than twist to
empty a load to the side
Lift up and
thrust down
to loosen soil
97171_05_ch05_p021-030.indd 22 14/06/10 8:42 PM
Exercise 5 Tool Operation and Construction Techniques 23
Clamshell operation
Auger operation
97171_05_ch05_p021-030.indd 23 14/06/10 8:42 PM
• Start the compactor. It moves forward without
pushing.
• Steer using the handle. To turn sharp corners lift
the handle vertically and spin the compactor.
• When work is complete, shut off compactor and
lift off site.
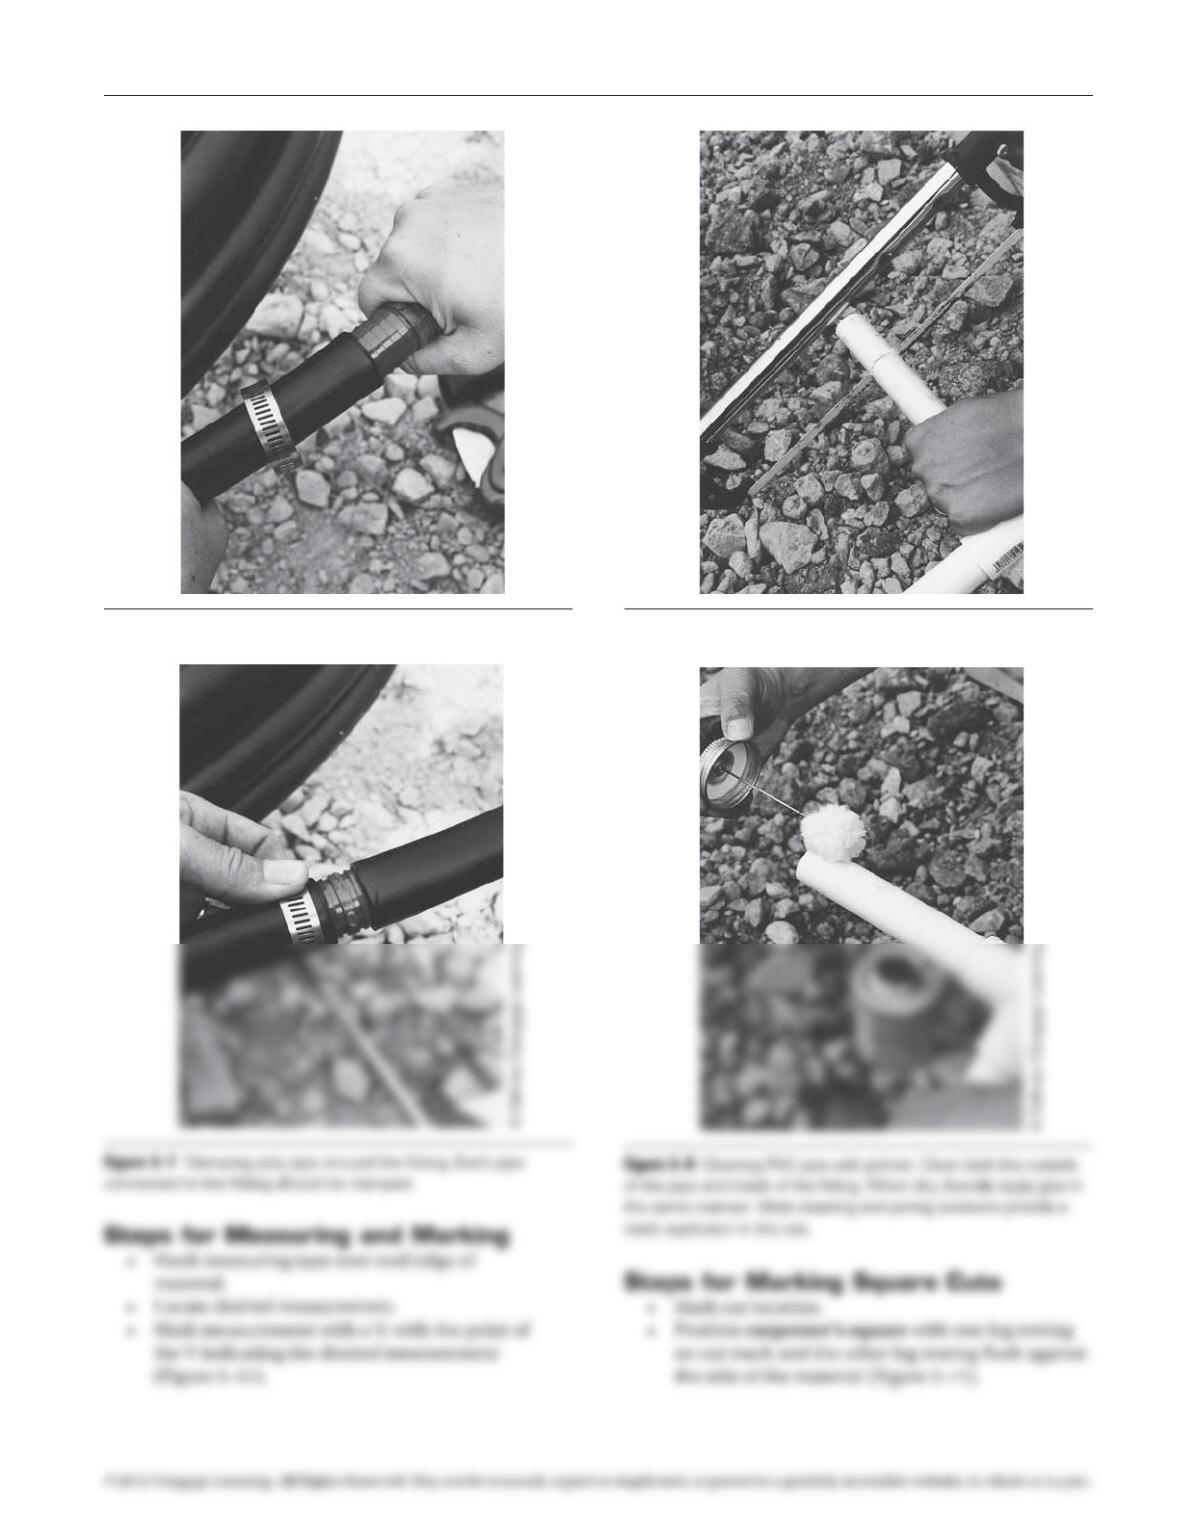
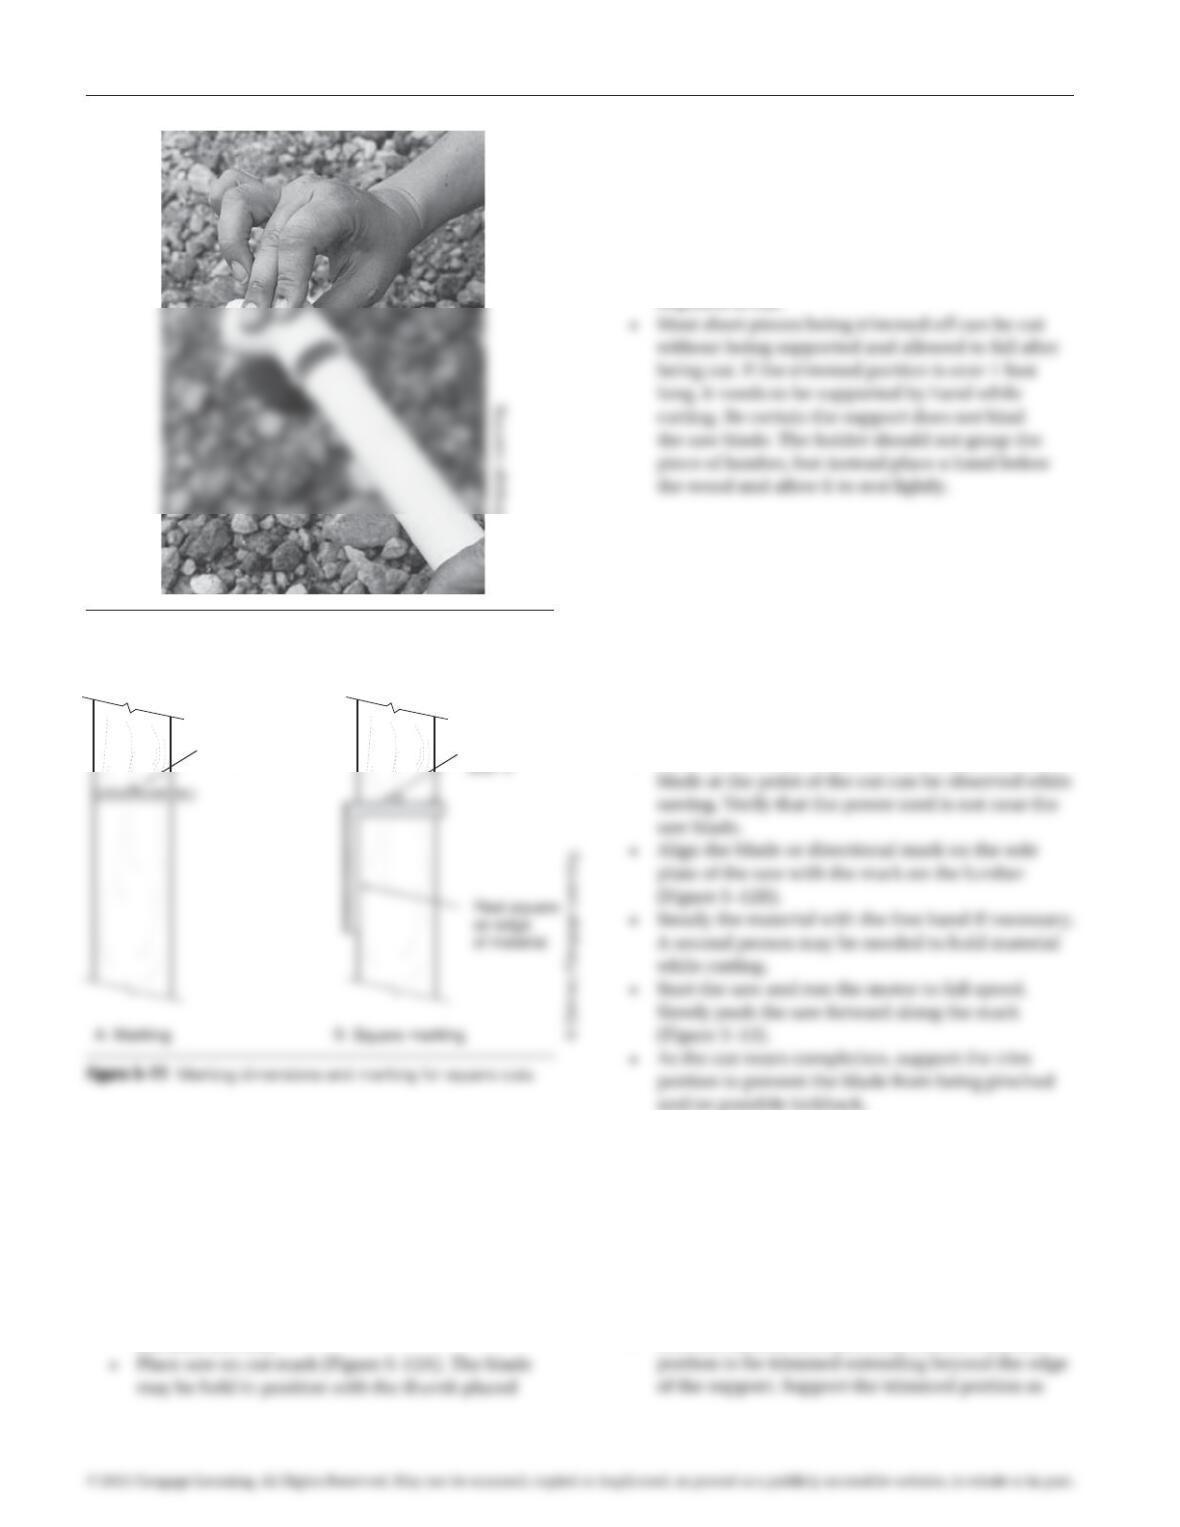
Steps for Cutting and Joining
Poly Pipe
• Use a cutter or saw to make a square cut at the
desired location (Figure 5–5).
• Slide a clamp over the end and down the
pipe a short distance. Fully insert a fitting
into the open pipe and slide the clamp back down
the pipe until it rests over the fitting (Figure 5–6).
• Tighten the clamp securely (Figure 5–7).
24 Exercise 5 Tool Operation and Construction Techniques
Accelerate and lower auger into hole
97171_05_ch05_p021-030.indd 24 14/06/10 8:42 PM
Exercise 5 Tool Operation and Construction Techniques 25
Figure 5–6 Joining poly pipe with a plastic fitting.
Figure 5–8 Cutting PVC pipe with a hacksaw.
© Delmar/Cengage Learning.
© Delmar/Cengage Learning.
97171_05_ch05_p021-030.indd 25 14/06/10 8:42 PM
• While holding square firmly against edge of
material, draw a line that passes through the cut
mark.
Steps for Cutting with a Hand Saw
• Rest the lumber on sawhorses or on a flat surface,
with the trim portion extending beyond the edge
of the support (the trim is the shortest dimension
left after the cut).
against the flat side surface of the saw. Begin with
a short stroke until a groove that will hold the saw
blade in position is cut along the mark.
• When cut is approximately 1 inch deep, withdraw
the thumb and position the hand to hold the
board. Extend the stroke to the full length of the
blade. Downward pressure on the saw is not
required to cut.
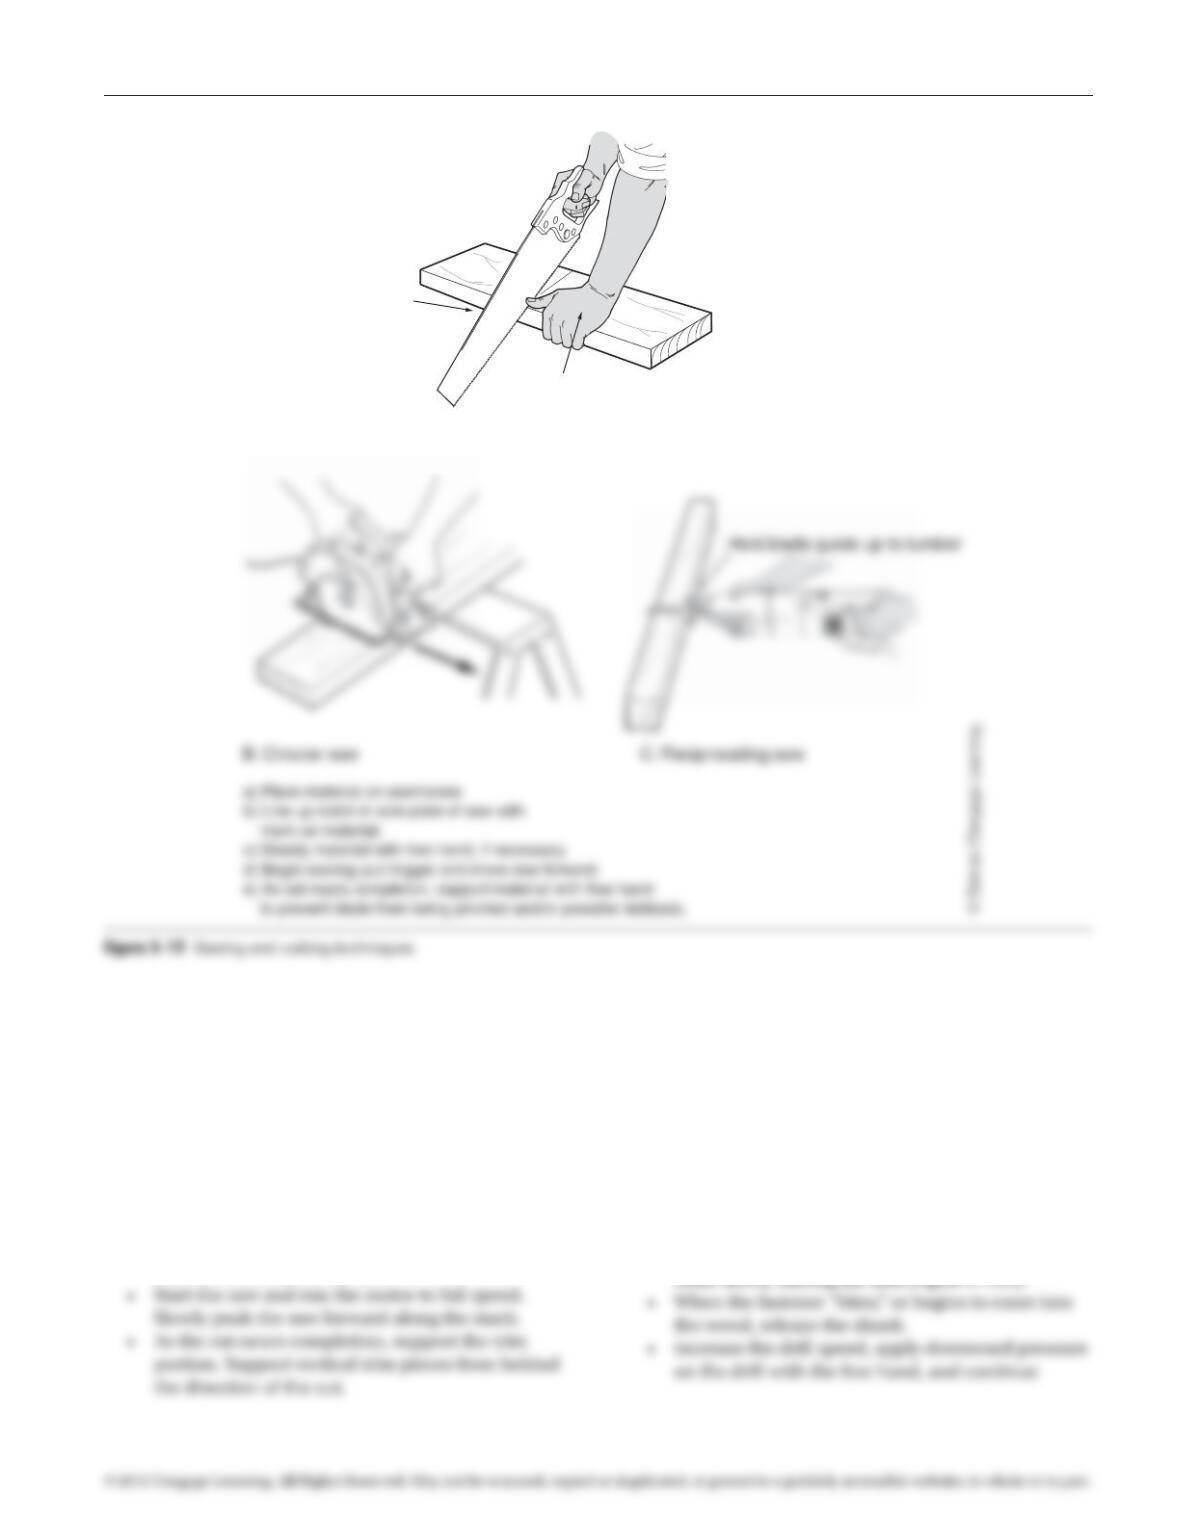
Steps for Cutting with a Circular Saw
• Rest the lumber on a sawhorse or a flat, solid
surface, with the portion to be trimmed extending
beyond the edge of the surface. Support the
trimmed portion as described in hand sawing. Set
the direction of the saw cut so the weight of the
circular saw motor rests on the supported portion
of the lumber. The sole plate of the saw should rest
flat on the lumber being cut.
• Position the body so that both the mark and the
and/or possible kickback.
• When cutting thick materials such as 4 × 4s, it
may be necessary to mark on both the top and
bottom of the lumber, cut the top, and turn the
lumber over to make a second cut aligned with
the first.
Steps for Cutting with a
Reciprocating Saw
• Rest the lumber on a flat, solid surface with the
26 Exercise 5 Tool Operation and Construction Techniques
Figure 5–10 Joining PVC pipe after applying glue. Use a twisting
motion to push pipe completely into fitting.
Mark desired
measurement
with a Mark line
© Delmar/Cengage Learning.
97171_05_ch05_p021-030.indd 26 14/06/10 8:42 PM
described in hand sawing. Posts or vertical pieces
may not require support.
• To reduce the heavy vibration caused with the
reciprocating saw, hold the blade guide firmly
against the piece being cut (Figure 5–12C).
• Position the body so that both the mark and the
blade at the point of the cut can be observed while
sawing. Verify that the power cord is not near the
saw blade.
• Align the blade or directional mark on the guide
with the mark on the lumber.
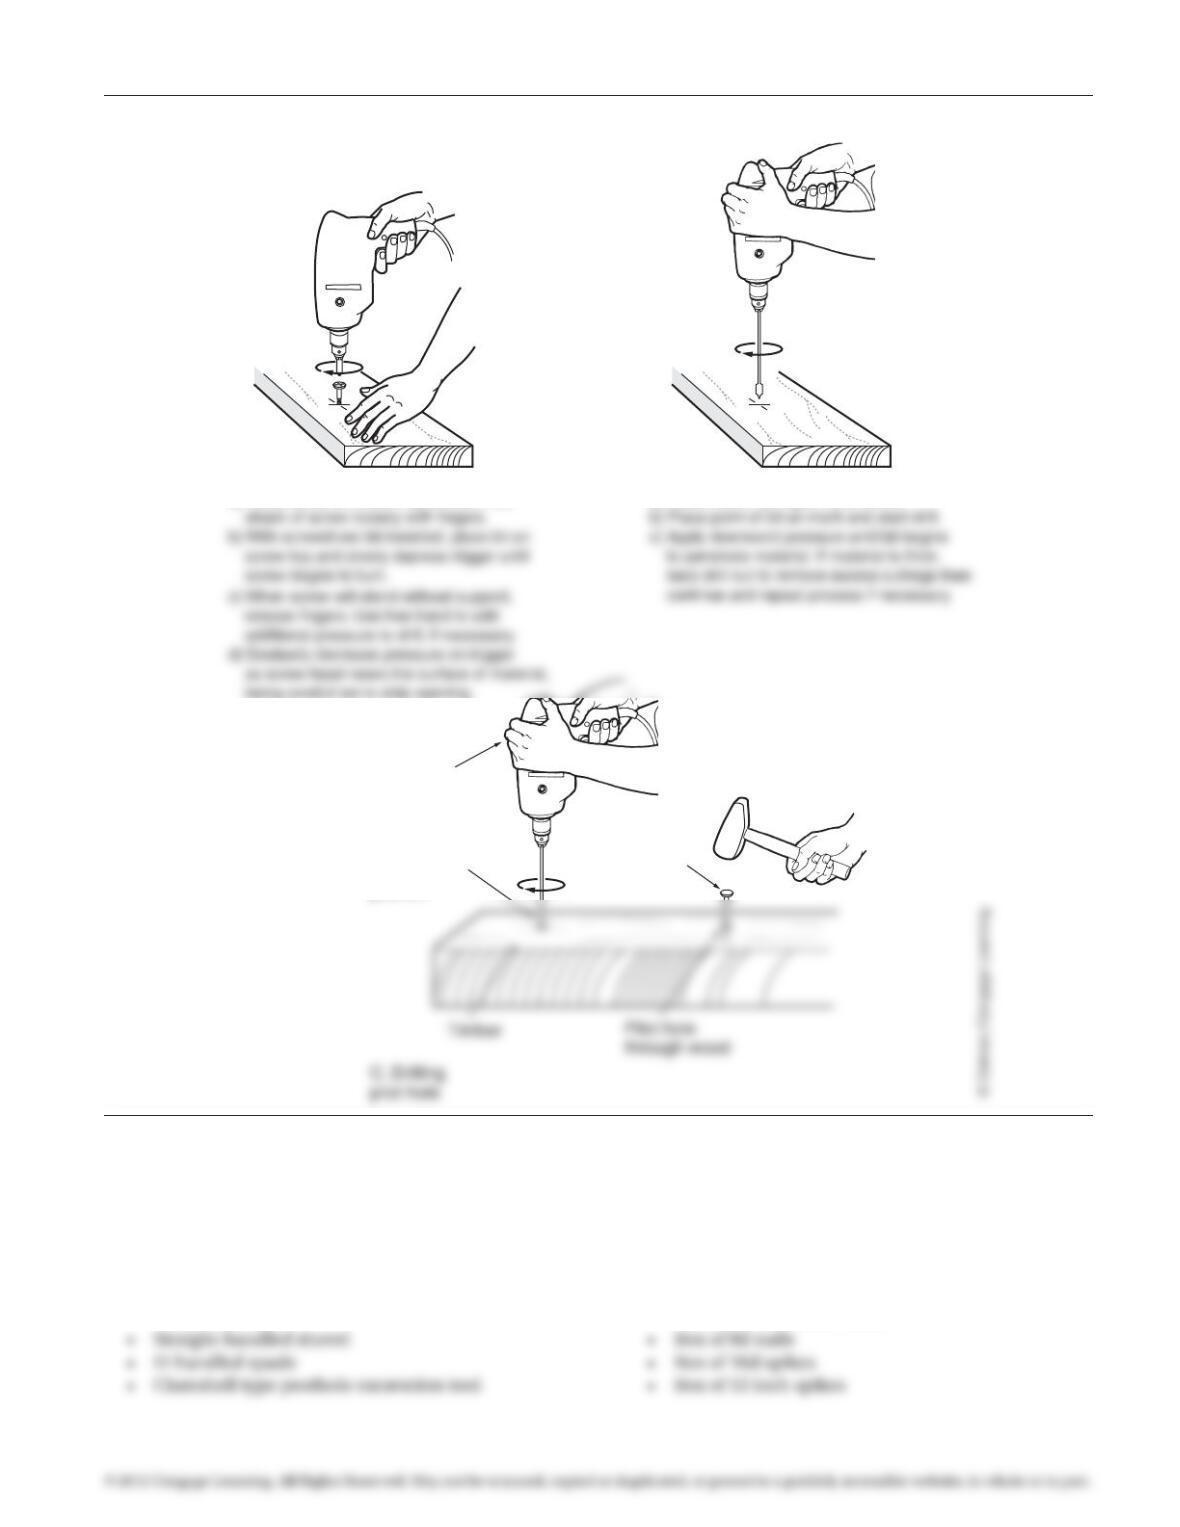
Steps for Installing Screws
with a Power Drill
• Install the appropriate bit for the drill. Tighten and
secure the bit using the chuck key.
• Place the fastener on the drill bit and, while
holding the fastener, position the tip at the
location where the fastener is to be installed.
• Hold the drill and fastener at the angle desired for
driving the fastener.
• Lightly hold the top portion of the fastener shank
Exercise 5 Tool Operation and Construction Techniques 27
Hold hand
Use short strokes
until cut is started
A. Hand saw
97171_05_ch05_p021-030.indd 27 14/06/10 8:42 PM

• Deep or wide holes may require that the bit be
pulled out of the hole every 2–3 seconds to clear
the wood shavings from the hole.
Steps for Drilling and Driving Spikes
for Wood Retaining Walls
• Drill a pilot hole at the location where the spike is
to be driven. Follow the steps for drilling holes as
outlined previously. Most timbers will require the
use of a long bit, which should be lifted from the
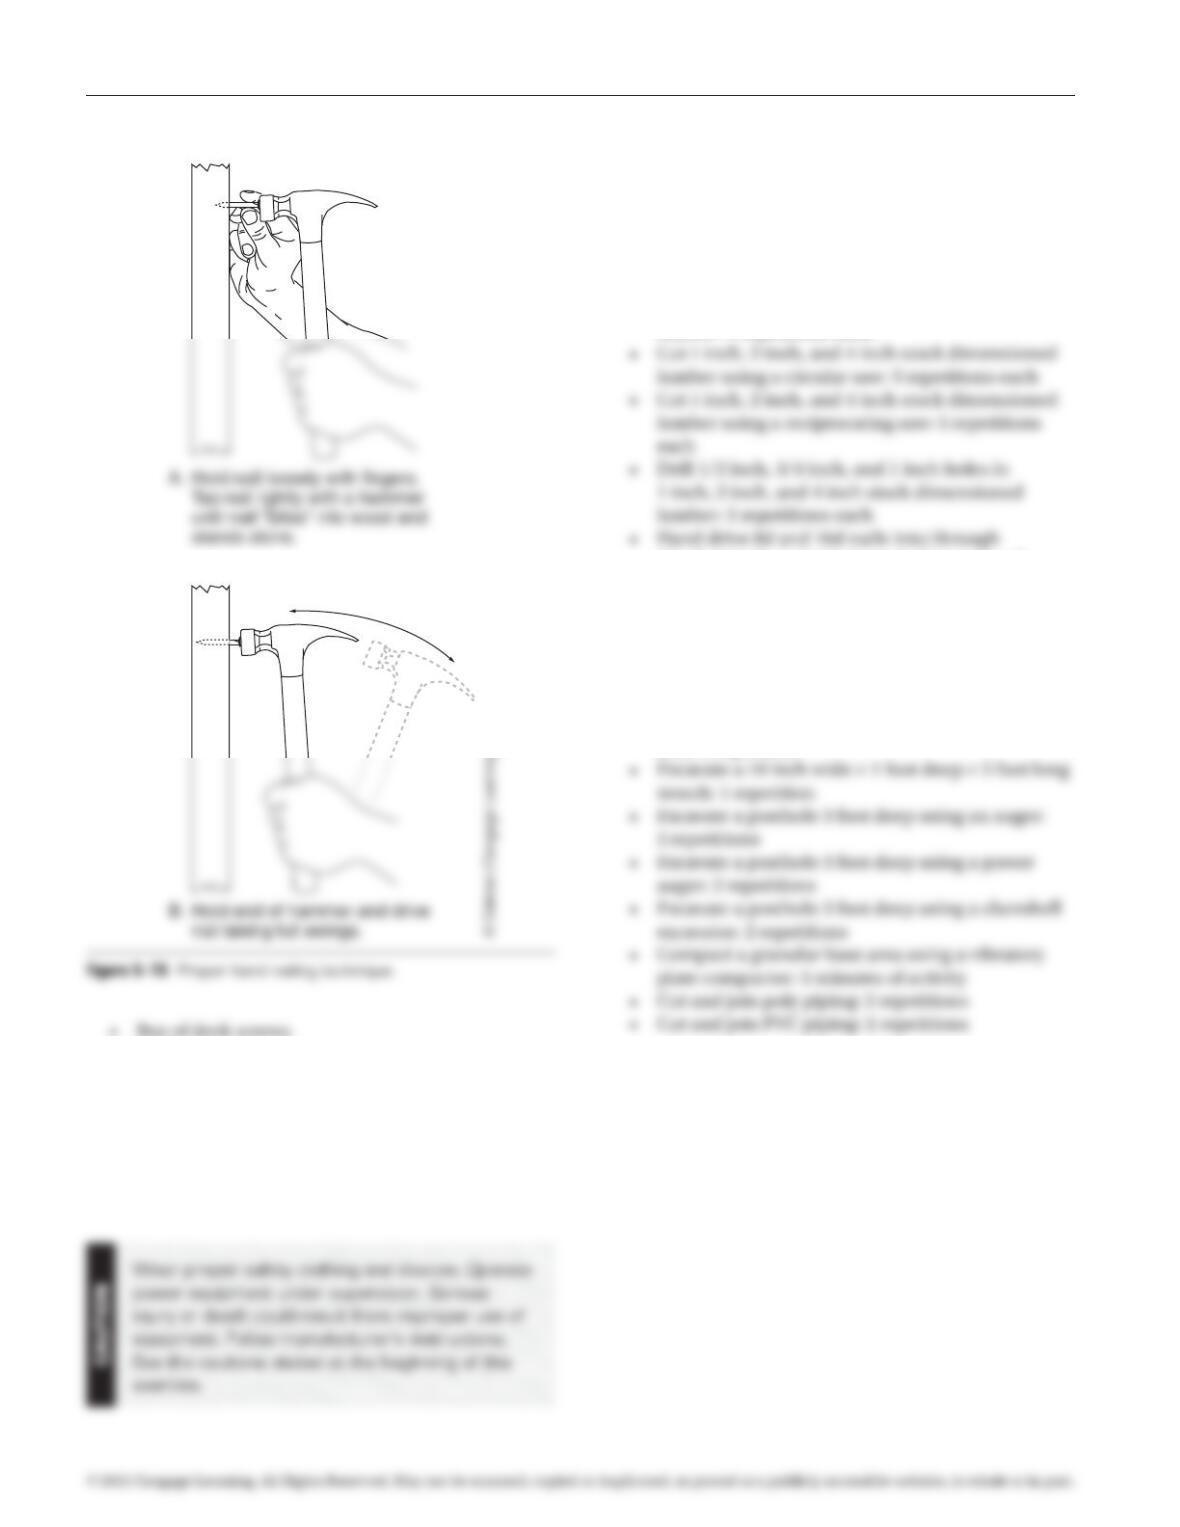
Steps for Hand Nailing
• Position the nail at the location where it is to be
installed, holding the nail lightly between the
thumb and index finger and at a right angle to the
face of the wood.
PREREQUISITE EXERCISES
None.
MATERIALS REQUIRED
• Proper clothing and safety equipment, including:
safety glasses, work gloves, hard hat, dust mask,
ear protection device, and work boots
• Carpenter’s square
28 Exercise 5 Tool Operation and Construction Techniques
Figure 5–13 Proper cutting technique for a circular saw.
fastener head.
• When removing fasteners, reverse the drill
direction and place the bit on the fastener
head. Maintain downward pressure on the drill
while removing the fastener. The friction of
removal may make fasteners hot for a few minutes.
Steps for Drilling with a Power Drill
• Place a block of wood under the piece being
drilled if the bit will penetrate through the
© Delmar/Cengage Learning.
97171_05_ch05_p021-030.indd 28 14/06/10 8:42 PM
• Power drill and 1/2 inch, 3/4 inch, and 1 inch
wood bits (regular and spade type), 3/8 inch bit
with long shank, and screwdriver bits
• Claw hammer
• 5 pound sledgehammer
• Two sawhorses
• Auger-type posthole excavation tool
• Vibratory plate compactor with fuel
• Power auger with fuel
• Base material for compaction
• Supply of 1/2 inch plywood—1 inch, 2 inch, and
4 inch dimensioned stock
Exercise 5 Tool Operation and Construction Techniques 29
B.
Drilling
hole
a) Locate and mark spot to be drilled.
A.
Inserting
screw
a) Place screw on mark or pilot hole. Hold
Light
downward
pressure
with hand
Position bit
over hole
position
Spike
Figure 5–14 Drilling and fastening with a power drill.
97171_05_ch05_p021-030.indd 29 14/06/10 8:42 PM
• Box of deck screws
• Pipe cutter or hacksaw
• Supply of poly pipe
• Supply of poly pipe barbed fittings
• Supply of poly pipe clamps
• Supply of 1/2 inch PVC piping
• Supply of 1/2 inch PVC fittings
• Supply of PVC primer and glue
EXERCISE DESCRIPTION
To complete this exercise perform the required number of
repetitions or length of operation for each of the activities
on the following list.
• Measure and mark dimensions: 10 repetitions
• Mark square cuts: 10 repetitions
• Hand saw 1 inch and 2 inch stock dimensioned
lumber: 5 repetitions each
1 inch, 2 inch, and 4 inch stock dimensioned
lumber: 10 repetitions each
• Drill 3/8 inch pilot hole and drive 12 inch spike
into landscape timber: 5 repetitions
• Drive and remove deck screws into/through
1 inch and 2 inch stock dimensioned lumber:
10 repetitions each
• Excavate a 2 foot wide × 2 foot deep × 2 foot long
hole: 1 repetition
30 Exercise 5 Tool Operation and Construction Techniques
End nailing
97171_05_ch05_p021-030.indd 30 14/06/10 8:42 PM