152
Exercise 37
Chain Link Fence
Construction
OBJECTIVE
The objective of this exercise is to properly install chain
link fencing.
Verify utility locations before beginning
TEXTBOOK REFERENCE
Information related to this activity can be found in the
Landscape Construction textbook in Chapter 32, Fencing.
INTRODUCTION
A common fencing material used in the landscape indus-
try today is chain link. This versatile material provides
for boundary definition and enclosure, and if desired,
can be modified for use as a screen. Chain link fencing
is installed in several steps, beginning with the installa-
tion of heavy gauge corner/gate posts and light gauge
approximately 100 feet. It is not uncommon for fabric
that is stretched tightly by hand to be stretched another 1
to 2 feet using jacks or mechanical stretchers. Fabric can
be stretched over straight runs and around the outside of
curved installations, but inside curves cannot be easily
stretched. If the fence runs up a slope, corner posts must
by using a single link of fabric to join two pieces. Overlap
the pieces and start weaving this link from top to bot-
tom by rotating the link. When joined, twist a bend in
the top and bottom of the link to prevent unraveling.
Fabric pieces can be shortened by reversing this process,
straightening the bends at the top and bottom of a link
then unweaving the link from the fabric.
Follow these steps to install a chain link fence.
Setting Corner, Gate, or End Posts
• Excavate an 8 inch diameter hole to frost depth
at each corner and gate post location. Using a
permanent marker, mark posts with a line at the
correct burial depth.
97171_37_ch37_p152-155.indd 152 14/06/10 9:11 PM
Exercise 37 Chain Link Fence Construction 153
Installing Line Posts
• Between the tops and bottoms of corner posts,
connect a stringline to guide the alignment of the
• An alternative to driving the line posts is to dig
or auger holes and place the posts in the holes.
Partially backfill the holes with gravel and adjust
the height to match the stringline. Check for level
in each direction and continue to backfill with soil.
Compact the soil after every 6 inches of fill.
Installing Framework
• Install top rail caps on each corner, gate, and
line caps slip on top of line posts and have an
opening through which the top railing runs
(Figure 37–1B).
• Place a second section of top railing through the
next line post caps and join with the first section
by sliding the nontapered end over the tapered
end of the previously installed section.
• Continue placing top rail until a section passes
over the corner post at the other end of the run.
• At the end of the run hold the top rail against the
corner post cap and mark where the end of the rail
will meet the back of the opening in the cap.
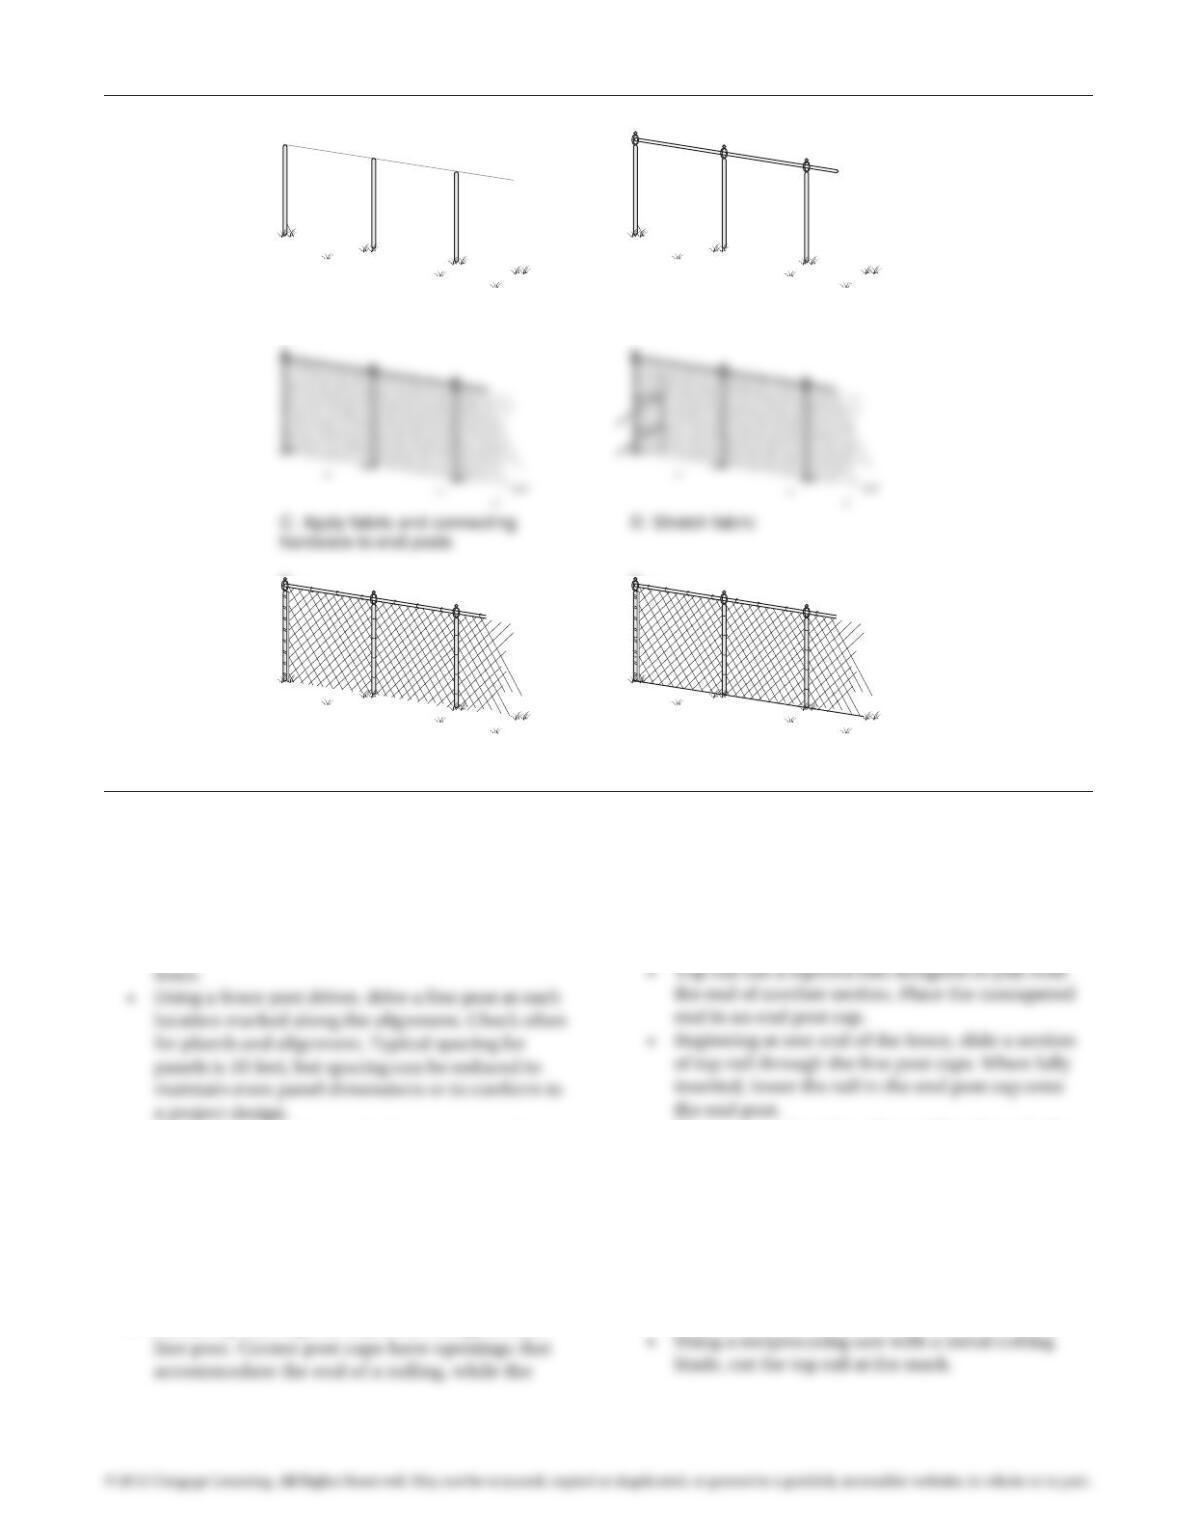
Figure 37–1 Chain link fence installation.
A. Install corner, gate, and line posts
along fence alignment
B. Install framework caps
and top rail
E. Secure fabric to posts and
to
p
rail with ties
F. Apply tension wire at bottom and
fasten to fabric with ties
© Delmar/Cengage Learning.
97171_37_ch37_p152-155.indd 153 14/06/10 9:11 PM
154 Exercise 37 Chain Link Fence Construction
Installing Mid Rail
A mid rail is installed on tall fences for stability, and at
each panel adjacent to corners and gates for any fence
over 4 feet tall.
• Loosely bolt the rail holder fitting around a corner
post at approximately mid level.
second fitting over the other end.
• Clamp this second fitting around the first line post.
Tighten the rail holder fitting at both posts.
• Repeat this process for every panel that requires a
mid rail.
Fabric Application and Stretching
• Roll the fabric out along the fencing run and
• Fasten clamps around this stretcher bar and the
corner post. Install one clamp for each foot of
fence height.
point to create the fabric end. For mechanically
stretched fabric, subtract an additional 2 inches
for every 10 feet of fence to locate the new end of
the fabric.
• Return the fabric to the ground and disconnect
(or add) sections of fencing to obtain the proper
length.
post, insert a single stretcher bar through the last
loop in the fabric and install clamps around the
corner post and stretcher bar. Install one clamp
for each foot of fence height.
• Loosen the jacks and remove the double stretcher
bar from the fabric.
• Attach the fabric to the top rails and posts using
aluminum fence ties. Work from the side of the
fence opposite the fabric. Place the hook end
every 4 feet along the top rail (Figure 37–1E).
Installing Tension Wire
• Attach clamps around the base of each corner post
(Figure 37–1F).
• Connect the tension wire to one clamp and
stretch tightly between the two corner posts.
• Attach the wire to the clamp at the base of the
PREREQUISITE EXERCISES
Students should have successfully completed Exer-
MATERIALS REQUIRED
• Proper clothing and safety gear
• Posthole auger
• Mason’s twine
• 25 foot and 100 foot tape measures
• Socket wrench and sockets
97171_37_ch37_p152-155.indd 154 14/06/10 9:11 PM
Exercise 37 Chain Link Fence Construction 155
EXERCISE DESCRIPTION
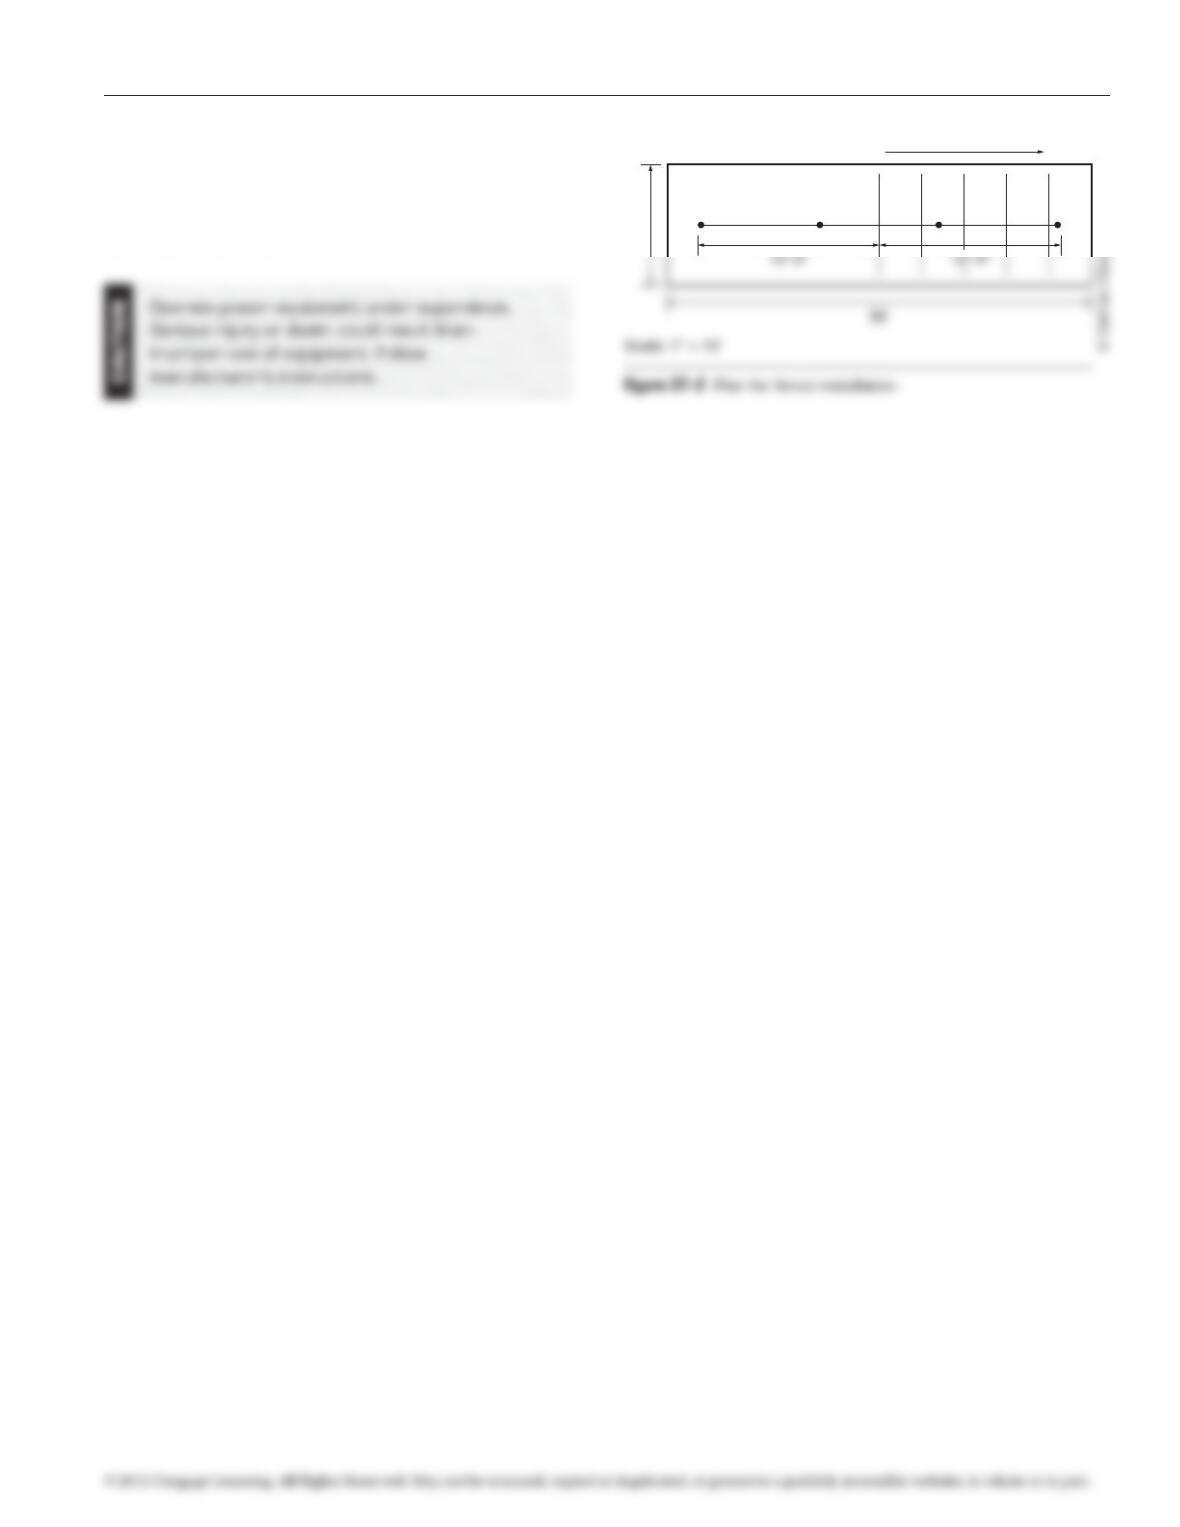
To complete this exercise construct a 15 foot long seg-
ment of 4 foot tall chain link fence on a level surface con-
nected to a 15 foot long segment of fence that is stepping
up a slight slope (Figure 37–2).
10′
Flat Slope
U
p
97171_37_ch37_p152-155.indd 155 14/06/10 9:11 PM