Unlock document.
This document is partially blurred.
Unlock all pages and 1 million more documents.
Get Access
130
Exercise 32
Paving Pattern Practice
OBJECTIVE
The objective of this exercise is to practice proper instal-
lation of common unit paving and stone paving patterns.
TEXTBOOK REFERENCE
Information related to this activity can be found in the
INTRODUCTION
The quality of a paving job is usually judged by the
complexity of the pattern installed and the craftsman-
ship of the work. To create complex patterns and ensure
Installation of Unit Pavers
Selection of a paving pattern for a site depends upon
the shape and dimension of the paving material cho-
patterns, such as stacked or running bond. Specialty
pavers often require installation in a pattern specifi-
cally designed for that unit.
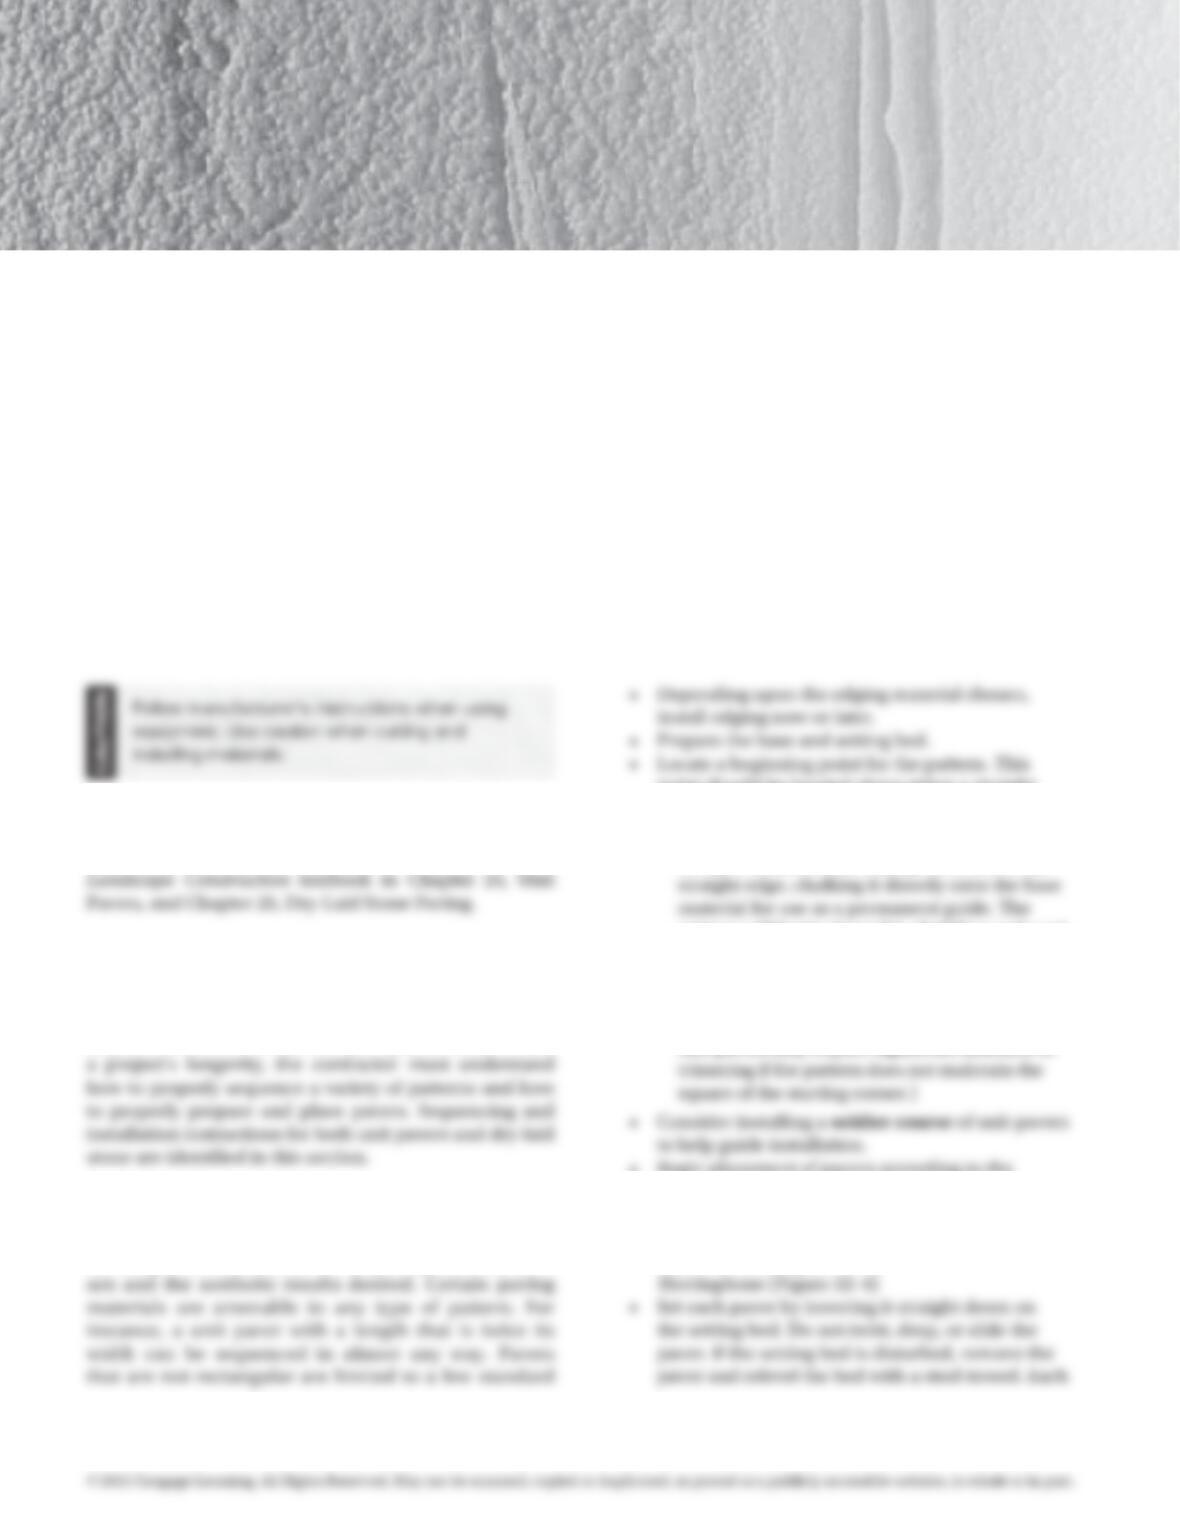
Use the following steps to install standard patterns:
point should be located along either a straight
edge or in a square corner.
If using a straight edge as the beginning point,
set up a chalkline that is perpendicular to the
pattern will begin along this chalkline and work
back to the straight edge.
If using a square corner as the beginning point, the
pattern will work diagonally outward from the
corner. (Note: using this starting pattern with
unit pavers may require significant amounts of
• Begin placement of pavers according to the
numbered sequence shown for each pattern:
Stacked bond (Figure 32–1)
Running bond (Figure 32–2)
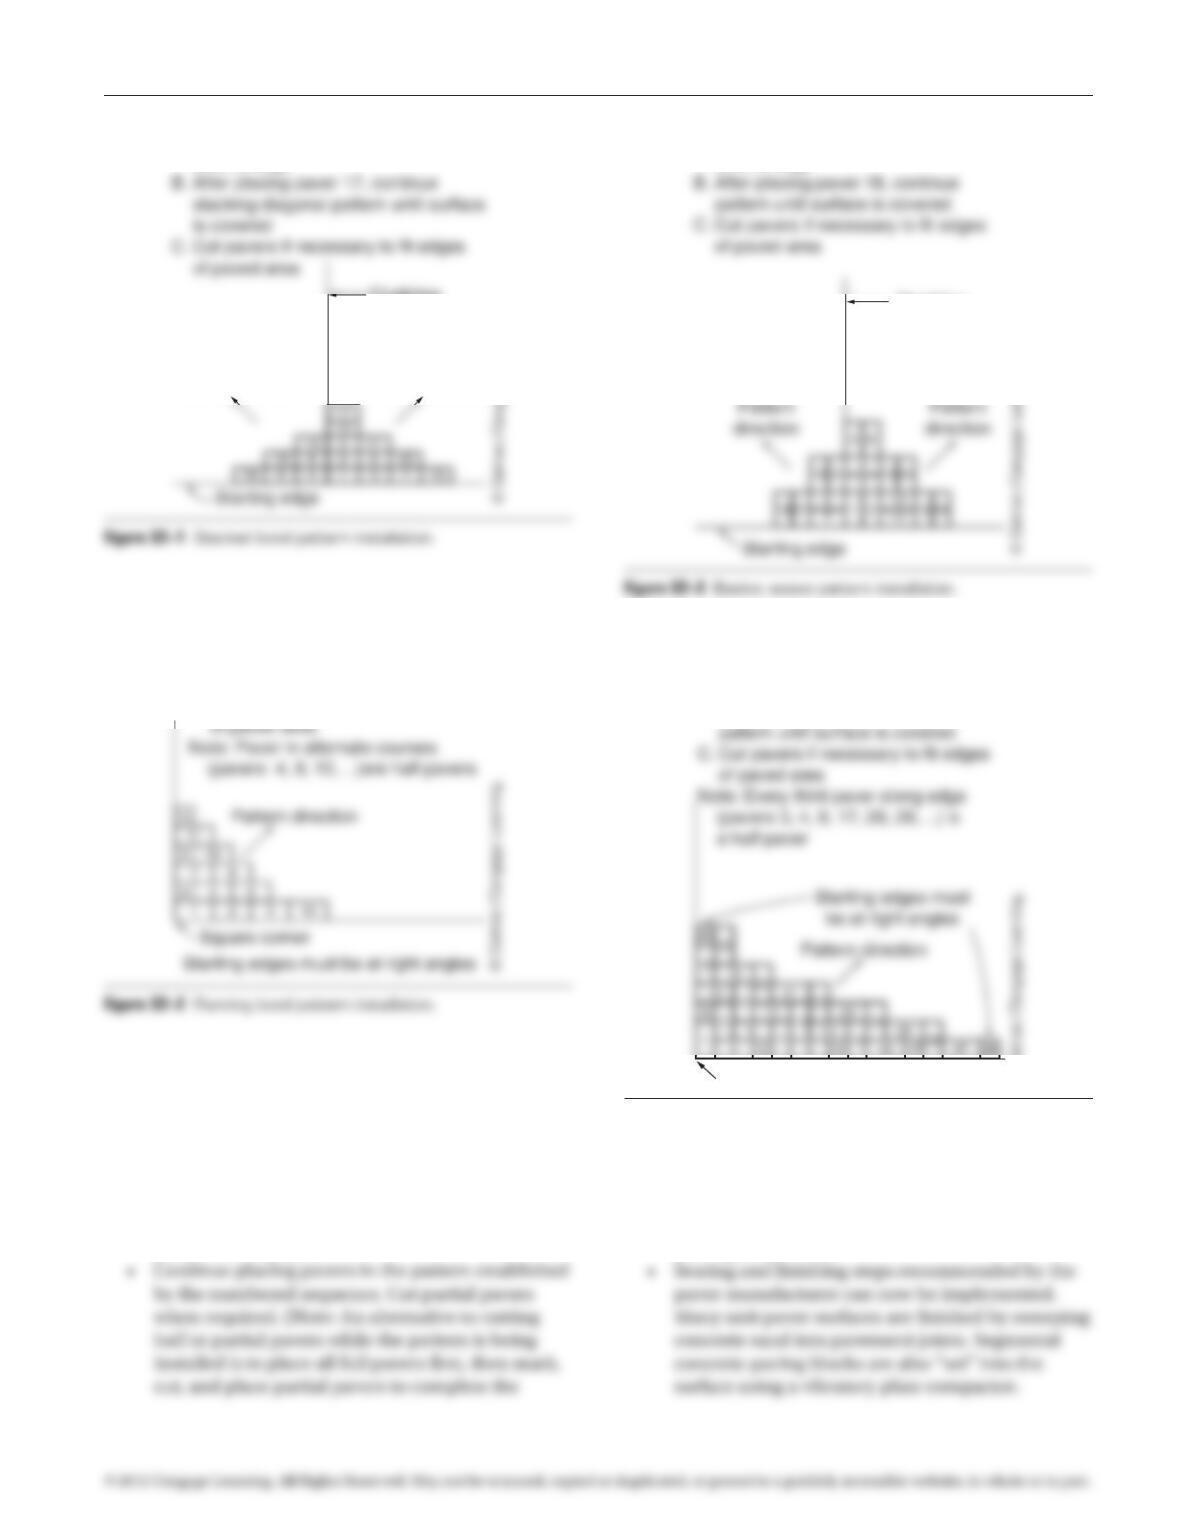
Basket weave (Figure 32–3)
97171_32_ch32_p130-133.indd 130 14/06/10 9:05 PM
Exercise 32 Paving Pattern Practice 131
paver should be set touching adjacent pavers with
spacing recommended by the manufacturer.
• Avoid stepping within 1 foot of an unrestrained
edge.
• Check alignment of pavers often, using a stringline
or straightedge. Do not go more than 10 courses
without checking for alignment. Adjust using a
putty knife or prybar.
surface. This will concentrate cutting into a single
activity. Use caution not to alter the pattern when
placing full pavers).
Pattern directionPattern direction
A. Consider installing soldier course
around edge
Chalkline
snapped on
setting bed for
alignment
A. Consider installing soldier course
around edge
Chalkline
snapped on
setting bed for
alignment
A. Consider installing soldier course
around edge
B. After placing paver 13, continue
pattern until surface is covered
C. Cut pavers if necessary to fit edges
Figure 32–4 Herringbone pattern installation.
Square corner
A. Consider installing soldier course
around edge
B. After placing paver 30, continue
© Delmar/Cengage Learning.
97171_32_ch32_p130-133.indd 131 14/06/10 9:05 PM
132 Exercise 32 Paving Pattern Practice
Installation of Stone Paving
The aforementioned paving patterns work well with unit
pavers, as they rely upon the pavers’ uniform size and
shape to create simple sequences that can be repeated
over large areas. Stone pavers, however, can be irregular
trim pieces to address the pattern’s structural needs.
Installation of four common stone patterns is executed
as follows:
• Depending on the edging material chosen, install
edging now or later.
• Prepare the base and setting bed.
• Locate a beginning point for the pattern. This
point should be located along a straight edge or in
a square corner.
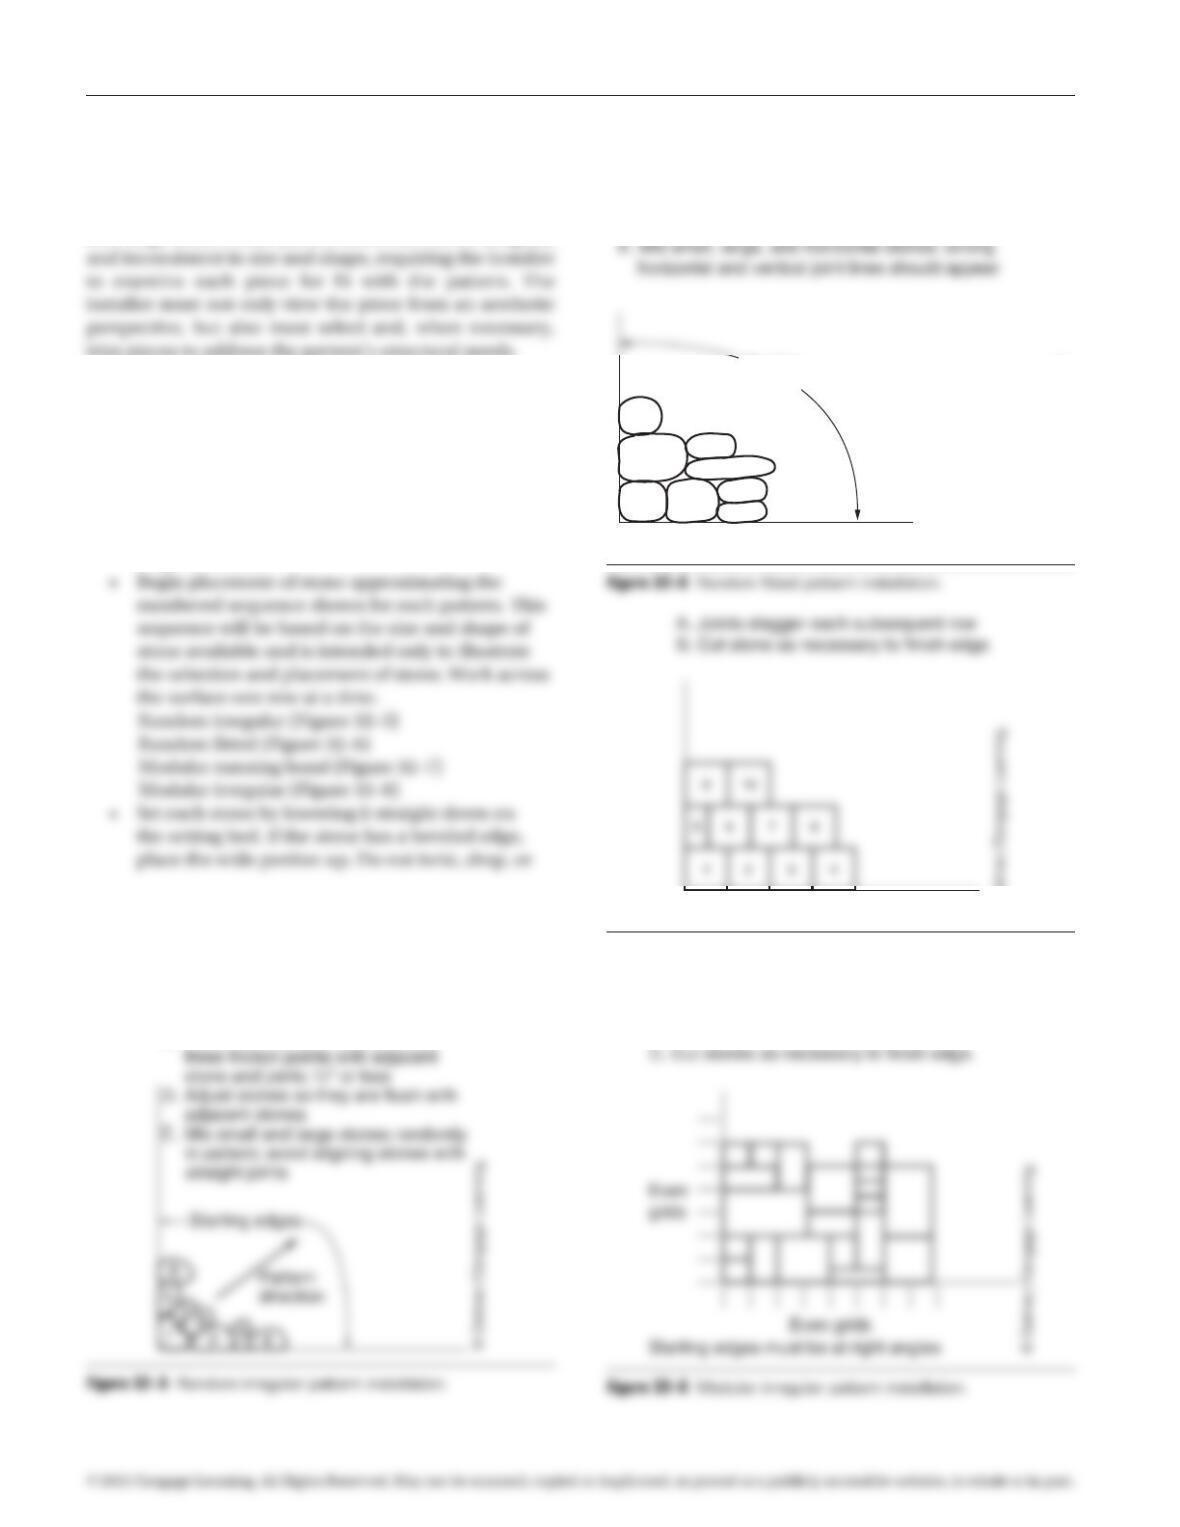
A. Begin with stone that matches
corner angle
B. Lay straight-edged stones along
sides
C. Fill center with stones that create
A. Begin with stone that matches corner angle
B. Lay straight-edged stones along side
C. Fill center with stones that create three friction points
and joints 1/2" or less
D. Adjust stones so they are flush with adjacent stones
Starting edges must be at right angles
12 6
7
8
4
5
3
Starting
edges
© Delmar/Cengage Learning.
Figure 32–7 Modular running bond pattern installation.
Startin
g
ed
g
es must be at ri
g
ht an
g
les
© Delmar/Cengage Learning.
A. Joints align along evenly spaced grids.
B. Mix large and small, long and square stones:
avoid aligning joints for long runs.
97171_32_ch32_p130-133.indd 132 14/06/10 9:05 PM
Exercise 32 Paving Pattern Practice 133
slide the stone. Stone should make contact with
adjacent stones in three places and should leave
joints between stones of 1/2 inch or less. Check
to see that each stone is flush with surrounding
stones when placed. If not flush, lift and add or
DISCUSSION
Which patterns will provide a look of craftsmanship? Are
there any patterns that would not work in a particular
situation?
PREREQUISITE EXERCISES
Students should have successfully completed Exercise 5,
MATERIALS REQUIRED
• Proper clothing and safety gear, including
knee pads
• Wet masonry saw or hydraulic splitter (prepared
EXERCISE DESCRIPTION
To complete this exercise fill an 8 foot × 8 foot practice
square with the designated pattern for each of the pave-
ment types indicated.
• Unit pavers with stacked bond
• Unit pavers with running bond
• Unit pavers with basket weave
• Unit pavers with herringbone
97171_32_ch32_p130-133.indd 133 14/06/10 9:05 PM


