Introduction to
Astronomical Imaging
Image Credit: ESO
https://www.universetoday.com/wp-content/uploads/2018/07/eso1613a.jpg
Student Name:
Student Number:
Date:
Lab Session (Day/Time):
Lab Demonstrator:
2018 version by Alex Cameron and Michele Trenti
Contents
1 Introduction 2
1.1 Telescopes……………………………….. 2
2 Imaging Astronomical Objects 2
2.1 CCDDetectors …………………………….. 3
2.2 Aperture and Exposure Time . . . . . . . . . . . . . . . . . . . . . . . . . . . 4
2.3 Saturation……………………………….. 4
3 Photography activity 4
3.1 Cameraapp………………………………. 4
3.2 Imagingthemoon …………………………… 5
4 Imaging Activity 6
5 Planning Astronomical Observations 6
5.1 Saturn…………………………………. 6
5.1.1 Coordinates and observing window . . . . . . . . . . . . . . . . . . . . 6
5.2 OmegaCentauri ……………………………. 8
5.2.1 Coordinates and observing window . . . . . . . . . . . . . . . . . . . . 8
5.2.2 Selecting a Telescope . . . . . . . . . . . . . . . . . . . . . . . . . . . . 8
5.3 Southern Pinwheel Galaxy (M83) . . . . . . . . . . . . . . . . . . . . . . . . . 9
5.4 ExposureTimes…………………………….. 9
6 Imaging with iTelescope 10
6.1 iTelescopeLaunchpad …………………………. 10
6.2 Creating an observation plan . . . . . . . . . . . . . . . . . . . . . . . . . . . 11
6.2.1 Saturn……………………………… 12
6.2.2 OmegaCentauri ………………………… 13
6.3 Astronomy in Colour – Photometric filters . . . . . . . . . . . . . . . . . . . . 13
6.4 Runninganobservation ………………………… 14
7 Post-processing 15
7.1 Creating a colour image with DS9 . . . . . . . . . . . . . . . . . . . . . . . . 15
1
1 Introduction
1.1 Telescopes
For thousands of years humans have been fascinated by the night sky, and our understanding
has improved vastly over this time. While there is much to see in the sky with the naked
eye (planets, comets, stars, and even a few galaxies), it was the invention of the telescope
around 400 years ago that has driven much of this advancement.
A telescope is a tool that allows us to gather light more effectively. They work by
focusing incoming light from a large area into an image that is brighter, clearer and more
magnified than what we could view with the naked eye.
When we view objects in the night sky, we’re collecting photons of light. When you look
at the sky at night, your eyes collect the light that falls onto your pupils and focus it onto
your retina, allowing you to see an image. The pupils in your eyes dilate to around 6-8
mm in diameter in the dark. Compare this to a typical backyard telescope which might be
around 15 cm in diameter. It’s this vast increase in light collecting area that underpins the
power of telescopes for astronomy.
The two most common telescope designs are refractor and reflector telescopes. Refractor
telescopes collect light through a large objective lens, while reflector telescopes use a large
mirror. The lower cost associated with producing large mirrors means that almost all
research grade astronomical telescopes are reflector telescopes.
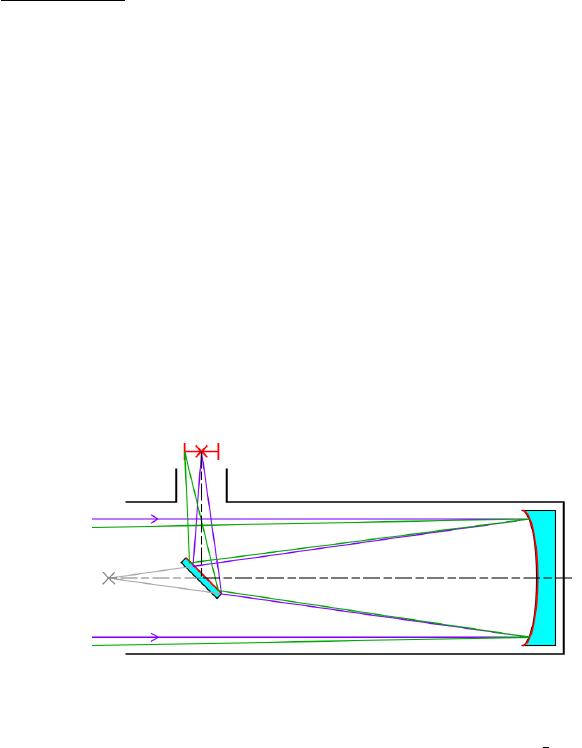
Figure 1.1: Diagram depicting a simple Newtonian reflector telescope. The light from the
target object enters from the left-hand side and is focused by a large curved mirror. Image
credit: Krishnavedala (https://en.wikipedia.org/wiki/File:Newtonian telescope2.svg)
2 Imaging Astronomical Objects
When we view an image, we’re capturing photons. Imagine it’s raining and you want to
catch water in a bucket. If you want to catch more water, you either get a bigger bucket or
leave your bucket in the rain for longer. By collecting light from a larger area, telescopes
enable us to use a “bigger bucket”.
When Galileo Galilei first pointed a telescope at the sky in 1609, he was viewing objects
with his eye through the telescope. The eye refreshes many times per second, meaning that
while the telescope was enabling him to catch more photons with its increased size, he was
not able to increase the length of time he was collecting light for.
2
In the early 1900s astronomers began collecting light onto photographic plates, enabling
light to be gathered over longer periods of time, improving the possible sensitivity of astro-
nomical images.
2.1 CCD Detectors
More recently astronomy has been revolutionised by the advent of so-called charge-couple
device detectors (CCD detectors). CCD detectors are devices that collect incoming light
and turn it into an electric charge that can be read as a digital signal. These detectors are
very similar to the one in your phone’s camera that allows it to record digital images. CCD
detectors are made up of an array of pixels. When the detector is exposed to light, each
photon of light that hits a particular pixel will create a charge in that pixel. After being
exposed for a certain period time, this pixel will have a certain charge that will reflect how
many photons have hit it, essentially enabling it to count how many photons have hit it.
This can be interpreted as the brightness of that location on the image.
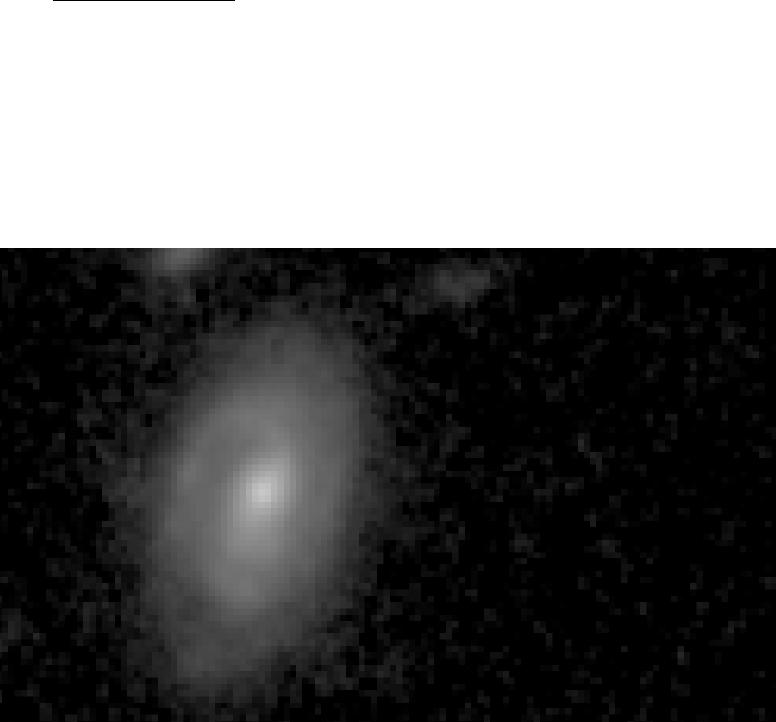
Figure 2.1: Zoom-in on an image of a distant galaxy taken with the Hubble Space Telescope.
If you look closely, you will notice that the image is comprised of a grid of pixels. The
brightness of each pixel is proportional to the number of photons that pixel received during
the exposure. A black pixel is one that received no photons, while a fully white pixel is one
that counted many photons. Most pixels are somewhere in between.
Like photographic plates, CCD detectors enable light to be collected over a long period
of time, enhancing the brightness of images. However, they have two additional advantages.
First, they are more sensitive to light (photographic plates do not register EVERY photon
that hits them; CCD detectors do a better job of capturing more photons). Second, the fact
that they record images in a digital format is crucial to modern astronomers as it enables
them to easily process their astronomical data with computers.
3

2.2 Aperture and Exposure Time
In the previous section, the analogy of collecting water by placing a bucket in the rain was
introduced in which the size of the bucket and the length of time we left it in the rain
were presented as the two most important factors in collecting water. When astronomers
talk about collecting light with telescopes, these properties are called aperture and exposure
time.
Aperture is the diameter of the telescope, which tells you how large your light-collecting
area is. The pupil of your eye dilates to an aperture of about 8 millimetres in the dark.
Compare this to the largest optical telescopes in the world which have apertures of around
10 metres!
Exposure time is the length of time that the telescope collects light for. The longer
the telescope is pointed at a target, the more photons can hit the detector, enabling us to
produce brighter images.
When you take a picture with your camera in broad day light, the light from the subject
of your picture is usually bright enough that the detector only collects light for a fraction
of a second. But when astronomers take images of distant galaxies, these galaxies are very
faint. Even with the largest telescopes available, a split-second exposure will not be enough
to produce a visible image of the faintest and most distant galaxies. To overcome this,
astronomers sometimes expose with their telescopes for many hours to produce a single
image!
2.3 Saturation
Let’s go back to our bucket in the rain scenario. If we leave the bucket out for too long it will
become full. Once it’s full, even if more raindrops hit the top, the bucket will not gain any
more water and the level of water in the bucket will not accurately reflect how much rain
has fallen into the bucket. The same thing occurs with CCD detectors capturing photons.
Each pixel has a maximum number of photons it can count, beyond which it will not count
any additional photons. A pixel that has reached this limit is referred to as saturated.
A saturated image is one where many of the pixels have reached this limit. This is a
problem because we can no longer identify changes in brightness between these pixels as
they will all just appear to have received the same maximum number of photons. This
not only causes a loss of valuable information about an image, but it can also corrupt the
measurement of the brightness in nearby pixels. In fact, the electric charges from a saturated
pixel might overflow to other pixels.
When imaging bright objects we need to ensure we do not expose our image for too long
so that we do not saturate our detector.
3 Photography activity
3.1 Camera app
Hopefully you’ve had a chance to download an app on your phone that allows you to
manually alter the exposure time. I you haven’t, your demonstrator will have a camera that
you can use.
For this activity, we’re going to leave the aperture fixed and experiment with varying the
exposure time. When an astronomer uses a particular telescope, that telescope will have a
4
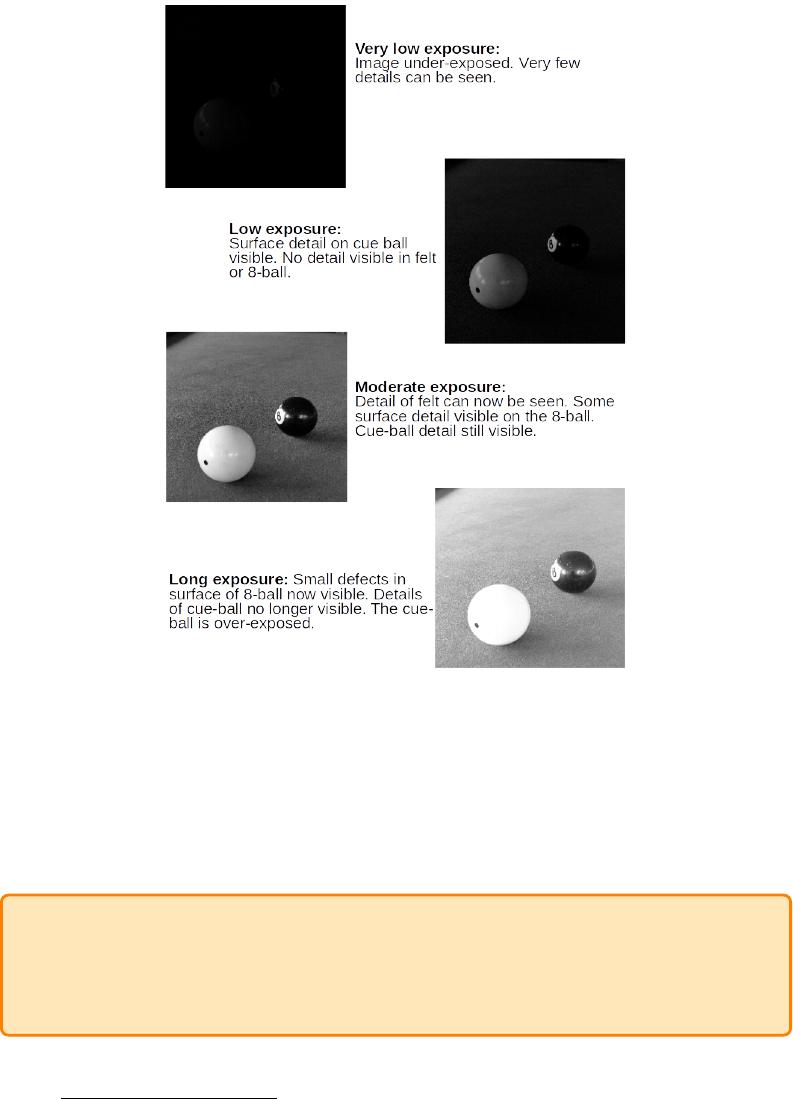
Figure 2.2: Images of billiard balls taken with different exposure times. Notice that as the
exposure time increases, more details can be seen. However, in the final image, the exposure
time is long enough that the cue-ball becomes saturated and its surface detail is no longer
visible.
fixed aperture and the astronomer will only be able to alter the exposure time. If they want
a larger aperture, they have to get access to a bigger telescope!
With your app or camera, identify the control that allows you to alter the exposure
time. Your demonstrator will help you with this. Once you’ve figured out how to set
the exposure time on your camera, take a series of 4-5 images of this page starting with
a very short exposure time, increasing it slightly with each subsequent image until the
page appears saturated in your image. Refer to questions 1 – 4.
3.2 Imaging the moon
The brightest and most recognisable object in the night sky is the Moon. If you look at
the full Moon with your eye, you may see some of its surface features (craters and “seas”).
5
Chances are though, if you take a picture of the full Moon with your camera on its standard
setting, the image you get will be saturated. However, now that you have mastered taking
images with different exposure times, you will be able to take an image in which you will
be able to see details of the Moon’s surface.
Your task is to take a quality image of the full (or close to full) Moon in which you can
see visible surface detail. The next full Moon is on the 26th of August. Thus, the best
time to complete this activity would be early in the evening between the 21st of August
and the 26th of August. A copy of this image will be due along with your iTelescope
images by the end of Week 8.
4 Imaging Activity
Your task is to obtain images of three objects: Saturn,Omega Centauri and the
Southern Pinwheel Galaxy (M83). You will work in groups of three. Each of you
should create an observing plan for all three objects. However, allocate one object to
each member of your group of three for execution of the actual telescope observations.
Thus, you will each use your observing plan to image the one object you have been
allocated. Once you have obtained your image, share it with the other members of your
group. You will submit these images as part of this assignment.