Illustrated Access 2016 | Module 7: SAM Project 1a
Dive Trips Database
ENHANCING FORMS
“Detailed Teaching Instructions” have been prepared for NGU students to enhance the
learning experience. Red, and italic text are additional details to the SAM instruction
documents designed to “teach” as you work. The italic and red words are the words your
instructor would likely speak while demonstrating the skill in a classroom setting.
There is usually more than one way to complete a task. Your instructions will indicate
one method; however, you should never be afraid to experience with other shortcuts to
accomplish the same task. When in doubt, just google for answers!
PC users will find many additional commands and options from the dialog box launchers
that appear in the lower right corner of many ribbon groups. Click the button for a dialog
box to reveal additional choices.
There is not an Access version for the MAC, therefore, MAC users will need to use a PC
for the Access unit of study. There are PC computers in the computer labs and library on
campus for your use.
FOLLOW THE GETTING STARTED INSTRUCTIONS AND SAVE THE FILE BEFORE MOVING
FORWARD!
GETTING STARTED
• Open the file IL_AC16_7a_FirstLastName_1.accdb, available for download
from the SAM website.
• Save the file as IL_AC16_7a_FirstLastName_2.accdb by changing the “1”
to a “2”.
o If you do not see the .accdb file extension in the Save As dialog box, do
not type it. The program will add the file extension for you automatically.
• Open the _GradingInfoTable table and ensure that your first and last name is
displayed as the first record in the table. If the table does not contain your
name, delete the file and download a new copy from the SAM website.
PROJECT STEPS
*If you did not save the project and change the 1 to a 2, do it now. In Access,
you will have trouble with saving and with the Compact and Repair tool at the
end of the project if you have not saved properly at the start of the project.
1. Open the blank form titled Countries in Design View and set the Record Source
property to the Countries table. Save and close the form.

Illustrated Access 2016 | Module 7: SAM Project 1a
Instructor Explanation: In Access you can start a blank form and then build the
contents from scratch instead of specifying the data source at the start of creating the
form. The Record Source property sets the source of the data for the form.
If you want to create a data entry form for the Countries table, you would
specify Products as the Record Source. This means that if you add a new record in the
form, it will insert a record into the Products table. If you modified a record within this
form, the data in the Products table would also be modified.
This activity has you open a blank form and make a connection to a table.
Here’s How:
In the Forms section of the Navigation Pane, right-click Countries and select
Design View
On the Design Ribbon, Tools Group, click the Property Sheet Button
On the “All” tab, click the drop-down arrow to the right of Record Source and
select Countries as the data source
Close the Property Sheet task pane
Click the X Close Button and answer Yes to saving
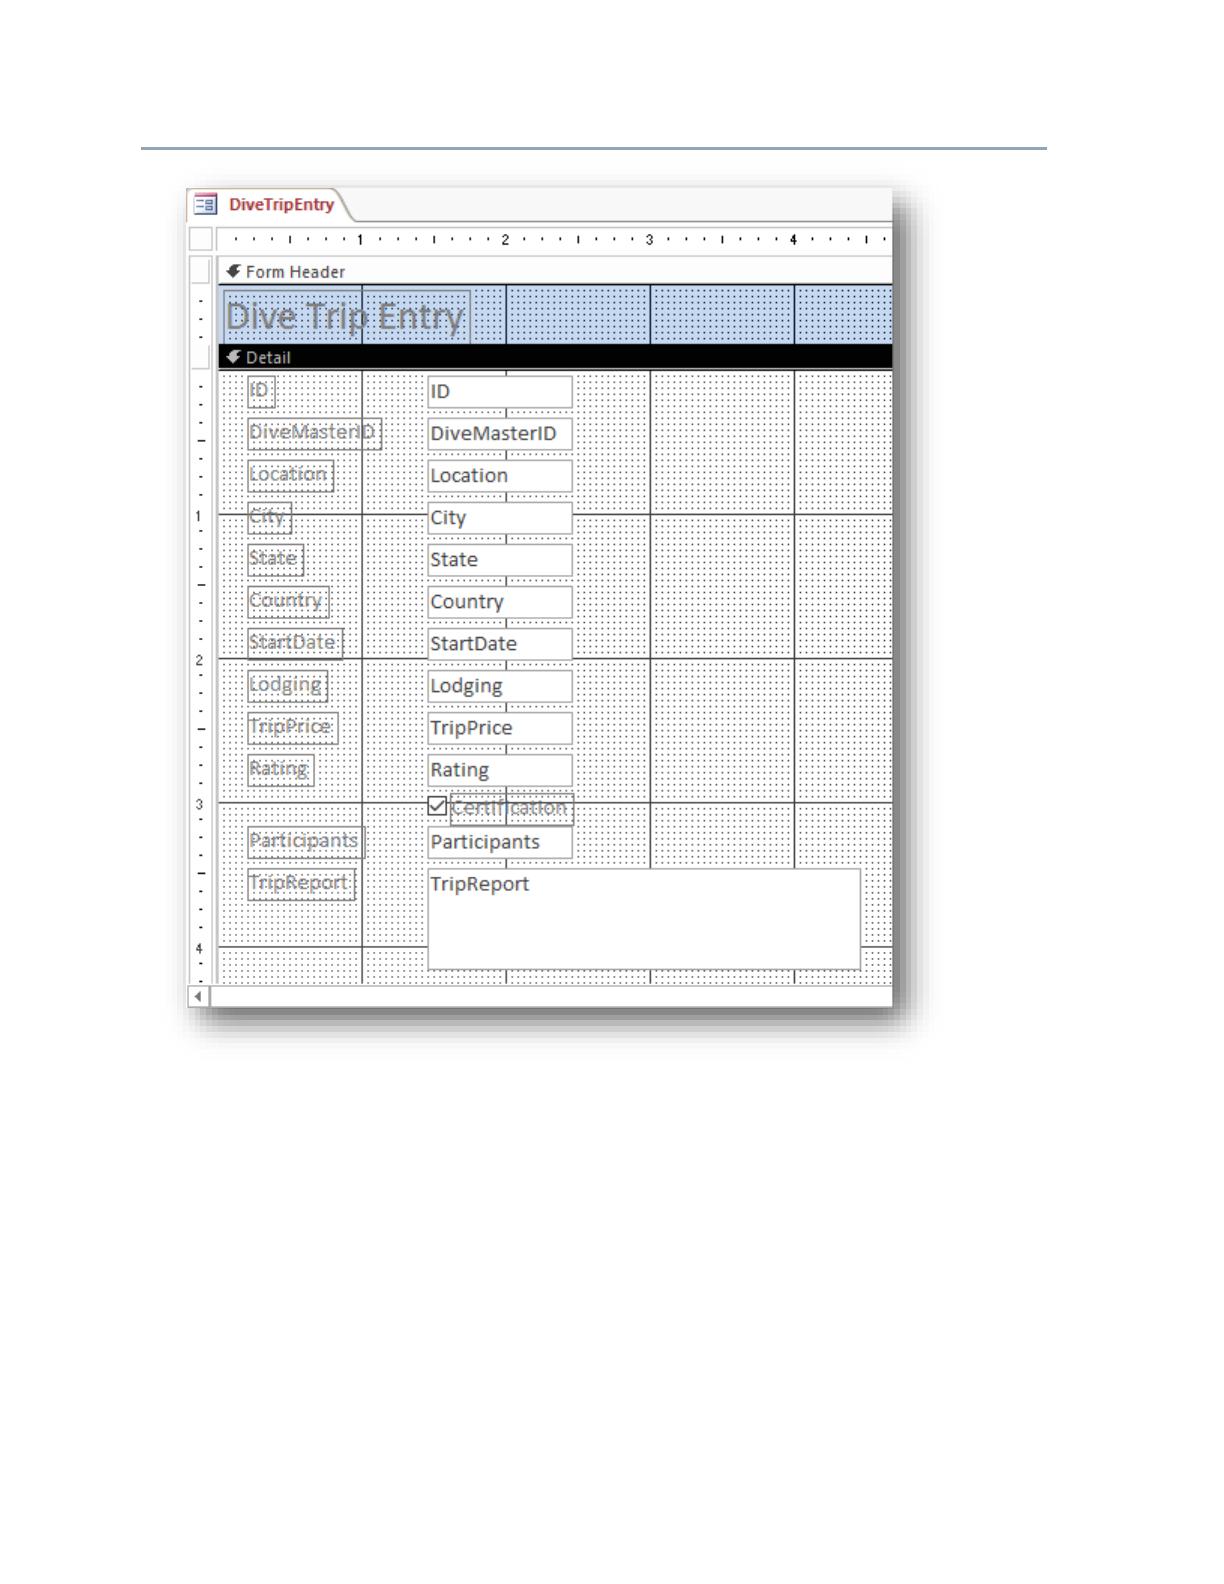
2. Open the DiveTripEntry form in Design View, then open the Field List. Add all
fields from the DiveTrips table to the form. Select all controls in the form and
move them to the approximate location shown in Figure 1 on the next page.
Save the form and close it.
Instructor Explanation: The form you will work with next already has a record source
defined, but no fields were added when the form was created. You will add fields to the
form.
Here’s How:
In the Forms section of the Navigation Pane, right-click DiveTripEntry and
select Design View
On the Design Ribbon, Tools Group, click the Add Existing Fields Button
In the Add Existing Fields task pane, click one time on the ID field to select
the field
Hold the Shift key and click one time on the Trip Report Button to select all
fields
Position the mouse pointer inside the selection and drag to position the tip of
the pointer just under the detail header bar at about the 1.5” mark in the grid
Compare to Figure 1
Close the Field List Task Pane
Click the X Close Button and answer Yes to saving
Illustrated Access 2016 | Module 7: SAM Project 1a
Figure 1: DiveTripEntry Form in Design View
3. Open the Members form in Design View. On the Ribbon, make sure the Use
Control Wizards button is selected so that controls that have associated wizards
are available.
Add a subform control to the form with the following options:
a. The subform should be added below the Phone Number label at about the
1″ mark on the horizontal and vertical rulers.
b. The subform should be based on the DiveTrips table (not the DiveTrips
form) and contain the following fields: DiveMasterID, City, State, Country,
and StartDate (in that order).
c. Connect the subform to the main form using the common DiveMasterID
field.
Illustrated Access 2016 | Module 7: SAM Project 1a
d. Name the subform DiveTripsSubform. (Hint: Do not type the period.)
Save the form without closing it.
Instructor Explanation: When you are working with relational data (related data that
is stored in separate tables), you often need to view data from multiple tables or queries
on the same form. For example, you might want to see a customer record from one
table and information about that customer’s orders from another table at the same time.
Subforms are a convenient tool for doing this, and Access provides several ways to help
you create them quickly.
Here’s How:
In the Forms section of the Navigation Pane, right-click Members form and
select Design View
On the Design Ribbon, Controls Group, click the drop-down arrow in the
Controls gallery
Verify that “Use Control Wizards” is selected (the icon to the left will appear
selected)
While the Controls Gallery is still open, click the Subform/Subreport Button
(third to last button)
Position the mouse pointer under the Phone Number area at the 1” verticle
gridline and click
Select Use existing Tables and Queries and click Next
Under Tables/Queries click the drop-down arrow and select the DiveTips Table